Arcanum World Editor Manual V 1.0


Table of Contents


World Ed Basics: * Starting WorldEd: *
Open Module: *
Allow Multiplayer: *
Creating a map: *
Base Terrain Types: *
Sectors (size of map): *
Starting location: *
Turning your maps into a Mod: *
The Interface: *
File *
New Map *
Open Map *
Save Map *
Save Map as *
Open Module *
Revert *
Exit (and save module) *
Edit *
View *
Zoom In *
Zoom Out *
Scrolling *
Objects *
Game Window *
Center Crosshair *
Ambient Lighting *
Ambient Colors *
Indoor *
Outdoor *
Scheme *
Tools *
Align Inventory *
Purge Destroyed Objects *
Relevel *
Generate Town Maps *
Remove Sector Light Schemes *
Find Next Useable Scenery Object *
Find Previous Useable Scenery Object *
Find Next Blocked Container Object *
Find Previous Blocked Container Object *
Adjust Critter Wanders *
Tab Panel: *
Prototype Pulldown: *
Thumbnail Window: *
Select/Edit Buttons: *
View Switches: *
Terrain Editor: *
Coordinates: *
Terrain View Window: *
Quicksave Button: *
Editor Window: *
Build Tab Panel: *
Arrow Cursor: *
Delete: *
Buildings: *
Doors: *
"P" pieces: *
Windows: *
Critters Tab Panel: *
Arrow Cursor: *
Delete: *
Critters: *
Kill Critter: *
Edit Tab Panel: *
Arrow Cursor: *
Delete: *
Tile Scripts: *
Jump Points: *
Tile Blocks: *
Environment Tab Panel: *
Arrow Cursor: *
Delete: *
Tiles: *
Scenery: *
Containers: *
Traps: *
Facades: *
Lights: *
Items Tab Panel: *
Arrow Cursor: *
Delete: *
Generic Items: *
Basic Items: *
Food: *
Scrolls: *
Written Objects: *
Quantity Objects: *
Ammunition: *
Coins: *
Keys: *
Weapons: *
Armor: *
Editing Window: *
Common Parameters: *
AC: *
Off: *
Flat: *
See Through: *
Shoot Through: *
No Block: *
Click Through: *
Don’t Light: *
Invulnerable: *
Illusion: *
Stoned: *
Hit Points: *
Internal: *
Known: *
Light Button: *
Dark Shadow: *
Don’t Animate: *
Don’t Cast Shadow: *
Indoor Ambient: *
Outdoor Ambient: *
Custom: *
Resistance: *
Scripts Button: *
Object Specific Parameters: *
AC Adj: *
Age: *
AI Data: *
Alignment: *
Ammo Type: *
Basic Stats: *
Blend: *
Blending: *
Bonus to Hit: *
Conceal: *
Crit Body Type: *
Crit Hit Chart: *
Crit Miss Chart: *
Damage: *
Derived Stats: *
Effects Dscr: *
End Line: *
Faction: *
Flags: *
Aloof: *
Always Locked: *
Animal: *
Boomerangs: *
Busted: *
Can Use Box: *
Fence: *
Hand Count Fixed: *
Hexed: *
Identified: *
Is Fire: *
Is Magical: *
Jammed: *
Kill on Sight: *
Locked: *
Locked Day: *
Locked Night: *
Loud: *
Magically Held: *
Marks Townmap: *
Mechanical: *
Mute: *
Needs Target: *
Never Locked: *
Nigh Invulnerable: *
No Auto Animate: *
No Blood Splotches: *
No Decay: *
No Disintegrate: *
No Display: *
No Drop: *
No Flee: *
No NPC Pickup: *
No Pickpocket: *
Nocturnal: *
Non-Lethal Combat: *
Only Cast Highest: *
Persistent: *
Positional Audio: *
Respawnable: *
Silent: *
Sticky: *
Stolen: *
Throwable: *
Torch/shield loc: *
Transfer Light: *
Two Handed: *
Uber: *
Undead: *
Unressurectable: *
Unrevivable: *
Wanders: *
Wanders in Dark: *
Waypoints Day: *
Waypoints Night: *
Won’t Sell: *
Gender: *
Generator: *
Is this a generator?: *
Generator ID: *
Inactive On-Screen: *
Spawn Beat Rate: *
Spawn Maximums: *
Concurrent: *
Ignore Total: *
Total: *
Spawn per Beat: *
Time Active: *
Hit Points: *
Inventory Source: *
Key ID: *
Level Scheme: *
Lock Difficulty: *
Magic AC Adj: *
Magic CH %: *
Magic CM %: *
Magic Hit Adj: *
Magic MS Adj: *
Magic Range Adj: *
Magic SM Adj: *
Magic Speed Adj: *
Magic Tech Complexity: *
Magic Wt Adj: *
Mana Store: *
Min Strength: *
Notify NPC: *
Origin: *
Poison Level: *
Portrait: *
Quantity: *
Race: *
Range: *
Reaction Base: *
Resistance Adj: *
Respawn Delay: *
Retail Price Mod: *
Scale: *
Silent Move Adj: *
Skills: *
Social Class: *
Sound Effect: *
Speed Factor: *
Spell 1: *
Spell 2: *
Spell 3: *
Spell 4: *
Spell 5: *
Spell Mana Store: *
Spells: *
Start Line: *
Trap Difficulty: *
Unknown: *
Wait Tolerance: *
Weight: *
Worth: *
Written Type: *
General Lighting: *
Ambient Lights: *
Dynamic Lights: *
The Edit Menu: *
Game: *
Start: *
Equipment (Autoequip.mes): *
Time (gameinit.mes): *
Story (StoryState.mes): *
Quests: *
Data (gamequest.mes): *
Log Entries (gamequestlog.mes): *
Log Entries for Dummies (gamequestlogdumb): *
Map: *
Areas (gamarea.mes): *
Lighting: *
Random Encounters (wmap_rnd): *
TownMaps (townmap.mes): *
Media: *
Movies (movies.mes): *
Portraits (userport.mes): *
Slides (slide.mes): *
Sounds: *
General (snd_user.mes): *
Scheme Data (schemelist): *
Scheme Index (schemeindex): *
Objects: *
Critters: *
AI (gameai.mes): *
Blessings (gamebless.mes): *
Curses (gamecurse.mes): *
Factions (gamefaction.mes): *
Generated Dialogs: *
Reputations (game_rp_npc*.mes): *
Rumors & Notes (game_rd_npc*.mes): *
Reputations: *
Data (gamerep.mes): *
Log Entries (gamereplog.mes): *
Descriptions (gamedesc.mes): *
Internal Names (gameoname.mes): *
Items: *
Effect Descriptions (gameitemeffect.mes): *
Keys (gamekey.mes): *
Written Items: *
Books (gamebook.mes): *
Newspapers (gamenewspaper.mes): *
Notes (gamenote.mes): *
Plaques (gameplaque.mes): *
Telegrams (gametelegram.mes): *
Scripts/Dialogs: Global Flags, Global Variables, Player Flags, Player Variables, Scriptmaker *
Global Flags (globalflags.mes): *
Global Variables (globalvars.mes): *
Player Flags (pcflags.mes): *
Player Variables (pcvars.mes): *
Scriptmaker: *
Event scripts: *
OBJ variables *
NUM variables *
Some general notes *
Counters *
Local flags *
Global variables *
Global flags *
PC variables *
PC flags *
Local variables *
Action statements *
(num) = (num) - (num) *
(num) = (num) *
(num) = (num) * (num) *
(num) = (num) / (num) *
(num) = (num) + (num) *
(obj) = (obj) *
add blessing (num) to (obj) *
add curse (num) to (obj) *
area of (obj): store in (num) *
armor coverage of item (obj): store in (num) *
armor of (obj): get in (num) *
autolevel scheme for (obj): change to (num) *
call script (num) at line (num) with triggerer (obj) and attachee (obj) *
call script (num) at line (num) with triggerer (obj) and attachee (obj) in (num) seconds *
call script (num) at line (num) with triggerer (obj) and attachee (obj) at seconds (num) *
call script attached to (obj) at point (num) at line (num) with triggerer (obj) *
change art num of (obj) to (num) *
change script attached to (obj) at point (num) to script (num) *
change this script to script (num) *
clear global flag (num) *
clear local flag (num) *
combat: (obj) attacks (obj) *
combat: force (obj) to stop attacking *
create item with basic prototype (num) inside (obj) *
create object with basic prototype (num) near (obj) *
damage (obj) for (num) points of type (num) damage *
damage (obj) unresistably for (num) points of type (num) damage *
day: store days since startup in (num) *
destroy (obj) *
destroy item named (num) in inventory of (obj) *
dialog (num) *
distance between (obj) and (obj): get in (num) *
do nothing *
drain (num) charges from (obj) *
end game and play slides *
faction of npc (obj): set to (num) *
faction of npc (obj): store in (num) *
fade and teleport: pass (num) seconds, play (num) sound, play (num) movie, and teleport (obj) to map (num) at X:(num) Y:(num) *
fade: pass (num) seconds, play (num) sound, and play (num) movie, with (num) seconds during fade *
fatigue of critter (obj): store current in (num) and maximum in (num) ) *
float line (num) above (obj) *
get location of (obj) and store X in (num) and Y in (num) *
give (obj) spell mastery in college (num) *
give (obj) the effect (num) with cause (num) *
give (obj) xps for a quest level (num) *
gold of (obj): adjust by (num) *
goto line (num) *
grant one fate point to (obj) *
have (obj) instantly become prone *
have (obj) perform animation (num) *
have (obj) try to steal 100 coins from (obj) *
have (obj) use (obj) on (obj) using skill (num) with modifier (num) *
have critter (obj) become a follower of (obj) *
have critter (obj) run to X:(num) Y:(num) *
have critter (obj) stop following his leader *
have critter (obj) wait for his leader *
have critter (obj) walk to X:(num) Y:(num) *
heal (obj) for (num) fatigue points *
heal (obj) for (num) points *
heal (obj) for (num) poison points *
hit points of (obj): store current in (num) and maximum in (num) *
hour: store current game hour in (num) *
hour: store hours since startup in (num) *
kill (obj) *
lock state of (obj): set to (num) *
loop break *
loop end *
loop for (obj) *
magic/tech: adjust (num) by item (obj) used by (obj) on (obj): store in (num) *
magic/tech: adjust (num) by item (obj) used by (obj): store in (num) *
mark map location (num) of pc (obj) as known *
minute: store current game minute in (num) *
newspaper: float current headline over (obj) *
newspaper: queue (num) with priority (num) *
object type of (obj): store in (num) *
origin of npc (obj): store in (num) *
play sound (num) *
play sound (num) at (obj) *
play sound scheme (num) and (num) *
print line (num) with a message class of (num) *
random number (num) to (num): store in (num) *
reaction of npc (obj) to pc (obj): adjust by (num) *
reaction of npc (obj) to pc (obj): set to (num) *
reaction of npc (obj) to pc (obj): store in (num) *
remove blessing (num) from (obj) *
remove curse (num) from (obj) *
remove from (obj) the effect (num) *
remove from time queue the call to script (num) with attachee (obj) *
remove this script *
rename (obj) as (num) *
reputation: give (obj) the reputation (num) *
reputation: remove from (obj) the reputation (num) *
return and RUN default *
return and SKIP default *
rotation of (obj): set to (num) *
rumor: quell rumor (num) for pc (obj) *
rumor: set rumor (num) for pc (obj) *
schematic UI start: display for (obj) *
script eye candy: play (num) on (obj) *
script eye candy: stop (num) on (obj) *
scroll distance: store in (num) *
set day standpoint of critter (obj) to X:(num) Y:(num) *
set day standpoint of critter (obj) to X:(num) Y:(num) on map (num) *
set global flag (num) to true *
set local flag (num) to true *
set night standpoint of critter (obj) to X:(num) Y:(num) *
set night standpoint of critter (obj) to X:(num) Y:(num) on map (num) *
set PC (obj) quest (num) to state (num) *
set PC (obj) quest (num) to state unbotched *
set quest (num) to global state (num) *
skill (num) of (obj): store in (num) *
slideshow: queue slide (num) *
social class of npc (obj): store in (num) *
spell eye candy: play (num) on (obj) *
spell eye candy: stop (num) on (obj) *
spells: cast spell (num) on (obj) *
spells: cast unresistable spell (num) on (obj) *
spells: have (obj) cast free and unresistable spell (num) on (obj) *
spells: have (obj) cast free spell (num) on (obj) *
spells: have (obj) cast spell (num) on (obj) *
spells: have (obj) cast unresistable spell (num) on (obj) *
spells: stop spell (num) on (obj) *
stat (num) of (obj): adjust by (num) *
stat (num) of (obj): store in (num) *
story state: set to (num) *
story state: store in (num) *
teleport (obj) to map (num) at X:(num) Y:(num) *
toggle (obj) invulnerability *
toggle (obj) open/closed *
toggle (obj) state on/off *
toggle item (obj) inventory display on/off *
toggle monster generator (num) on/off *
toggle the blocked state of sector at location X:(num) and Y:(num) *
touch art (num) *
transfer item named (num) from (obj) to (obj) *
transform Attachee into basic prototype (num) *
unfog townmap (num) *
weapon of (obj): get in (num) *
written start in (obj) set to (num) *
written UI start: book (num) for reader (obj) *
written UI start: image (num) for reader (obj) *
written UI start: plaque (num) for reader (obj) *
Conditional statements *
(num) <= (num) *
(num) == (num) *
(obj) can hear (obj) *
(obj) can open the container (obj) *
(obj) can open the portal (obj) in direction (num) *
(obj) can see (obj) *
(obj) has a body spell *
(obj) has at least (num) gold *
(obj) has bad associates *
(obj) has bless (num) *
(obj) has curse (num) *
(obj) has item named (num) *
(obj) has mastered spell college (num) *
(obj) has maximum followers *
(obj) has mirror image *
(obj) has reputation (num) *
(obj) has surrendered *
(obj) is an animal *
(obj) is at location X:(num) Y:(num) *
(obj) is busted *
(obj) is dead *
(obj) is identified *
(obj) is in combat *
(obj) is in dialog *
(obj) is invisible *
(obj) is invulnerable *
(obj) is named (num) *
(obj) is open *
(obj) is polymorphed *
(obj) is prowling *
(obj) is shrunk *
(obj) is switched off *
(obj) is undead *
(obj) is under the influence of spell (num) *
(obj) is waiting for leader's return *
(obj) is wielding item named (num) *
(obj) is within (num) tiles of location X:(num) Y:(num) *
(obj) knows spell (num) *
(obj) was jilted by a PC *
global flag (num) is set *
it is daytime *
items are being rewielded *
local flag (num) is set *
monster generator (num) is disabled *
npc (obj) has met pc (obj) before *
npc (obj) is a follower of pc (obj) *
npc (obj) is a monster of specie (num) *
PC (obj) has quest (num) in state (num) *
pc (obj) knows rumor (num) *
quest (num) in global state (num) *
rumor (num) has been quelled *
sector at location X:(num) and Y:(num) is blocked *
Dialogue *
Dialogue Test Field *
Dialogue Result Field *
Quests *
Script Attachment Points *
EXAMINE *
USE *
DESTROY *
UNLOCK *
GET *
DROP *
THROW *
HIT *
MISS *
DIALOG *
FIRST HEARTBEAT *
CATCHING THIEF PC *
DYING *
ENTER COMBAT *
EXIT COMBAT *
START COMBAT *
END COMBAT *
BUY OBJECT *
RESURRECT *
HEARTBEAT *
LEADER KILLING *
INSERT ITEM *
WILL KOS *
TAKING DAMAGE *
WIELD ON *
WIELD OFF *
CRITTER HIT *
NEW SECTOR *
REMOVE ITEM *
LEADER SLEEPING *
BUST *
TRANSFER *
CAUGHT THIEF *
CRITICAL HIT *
CRITICAL MISS *
Useful Lists: *
Spell List: *
Eye Candy List: *
Script Eye Candy List: *
Scenery List: *
Item List: *
Unique NPC: *


World Ed Basics:
WorldEd is a tool that allows you to create your own game based on existing art used in Arcanum. When using WorldEd, you are creating and editing the contents of a module. This module is stored in a *.dat file. The dat file acts like a zip file that the Arcanum executable can read. When a module is opened, the dat file is uncompressed to a series of temporary folders. When a module is closed, it recompresses the dat file and deletes all temporary folders. If somehow WorldEd is terminated without the module being saved (such as WorldEd crashing or being ended by the Task Manager), these temporary files will remain and WorldEd can attempt to recover any lost data when it is run next.
The dat file created during this process is what will be sent out or downloaded in order to play a custom game. Any dat files found in the modules directory can be selected for play in the options menu of Arcanum.
Important Note: You should NEVER play Arcanum or any custom modules while WorldEd is open. WorldEd attempts to modify dat files which may be in use by the game.
 
Starting WorldEd:
To begin WorldEd, click "Start—Programs—Sierra—Arcanum—Editor--World Editor".
Open Module:
When WorldEd loads, a screen will pop-up asking you to select a module. A module is a group of files and directories that form a game. In the window you will see any modules that you have available to edit. You may click on one of these names, or in the box beneath the text "Enter Module Name", type in the name of the module you wish to create. Entering the name of a non-existent module automatically creates a new one.
Allow Multiplayer:
After you have entered in the name of the module you wish to create, you will need to decide whether or not the game you are making will be a multi-player or single player adventure. If the module you are making will be a multi-player game, you will need to indicate it by checking the box marked "Allow Multiplayer". If this is not checked and you hit the ok button, the engine will assume this game is supposed to be played by one player at a time. You will not be able to change this setting at a later date, so it is important to decide now.
When making your decision about creating a multi vs. single player module, there is something important to keep in mind, which is map size. In a single player adventure, you can teleport from one map you have made to a completely different one. So you can make a small map for your town, and then the dungeon beneath can be an entirely different map. Teleporting to different maps cannot be done in a multi-player game. In a multi-player module, every area MUST be on one map. You can make your multi-player map large, thus you can teleport to different looking/feeling areas and trick the player into thinking they are traversing several different maps. In the example of the town and dungeon, the town would be created and far to the right (out of the scrolling view of the player) you would make your dungeon.
A good start-up size for a multiplayer map is 100x100. You may not need all that space, but it’s there if you do.

Creating a map:
When you have created or selected a module, the first thing you will see in your view screen is an expansive terrain of green grasslands. This is just the way WorldEd loads by default. You will want to make your own map from scratch and adjust a few parameters.
To create your own map, go to the top options bar and select "File-New Map". A warning will pop up after you clicked new, it will ask "do you want to save changes to untitled". You don’t care about the default map that WorldEd created, so select "NO".
Base Terrain Types:
The next thing you will have to choose when creating your own map is your base Terrain Type. A base terrain type is what your maps terrain will be to begin with. For instance, if you started with "snowy plains" selected, your map would be snow filled terrain as far the eye can see. Keep in mind that you will be able to edit these base terrain types at any time during the creation of your map. Even though you may select snowy plains to start, you can throw a patch of jungle or mountains in at any time using our Terrain-Editor. So select the terrain type that most of your map will be filled with.
Sectors (size of map):
The sector size (x and y) will determine how large your map is. A sector is roughly a ¼ mile square. As a reference, the continent of Arcanum was created with a default start size of 2000x2000 sectors. It took us more that 2 years to fill it up decently, so you may want to start with something smaller J . 64 x 64 is the default size. I would recommend 100 x 100 for a multiplayer map.
Starting location:
The starting location is where the player will begin his adventure when your module loads. In Arcanum, we set the starting location to be the crash site. In your game, just choose wherever makes the most sense.
To set the starting location of your player, load whichever map you wish to be the starting area. Once the map is loaded, right-click on the spot on the ground where you wish your player to appear. In the dialogue box that pops up, select "Set as Start Location". When you run your module now, you will begin in the spot you selected!
Keep in mind that having a start location is required. If you try to close a module you are working on and have not designated a start location, you will receive an error message.
Turning your maps into a Mod:
To turn your maps into a module that you can load and play, simply go and select "file" and then "compress module". If you have not saved the map you are working on, it will prompt you before it begins the process. You must also have selected a starting location and closed all windows opened under the Edit menu, or you will be prompted to do so. Once the compression is complete, it will display a "finished" window. Now if you load Arcanum, you will find the module you just created inside the "Options" menu. There you can scroll through all the different modules you have in your modules directory.
Compressing the module creates the *.dat file that contains all of your game data. This *.dat file is what you would send to a friend so that they could play your game. When you receive a *.dat file and wish to play it, make sure it is in the root of your modules directory.
 
The Interface:
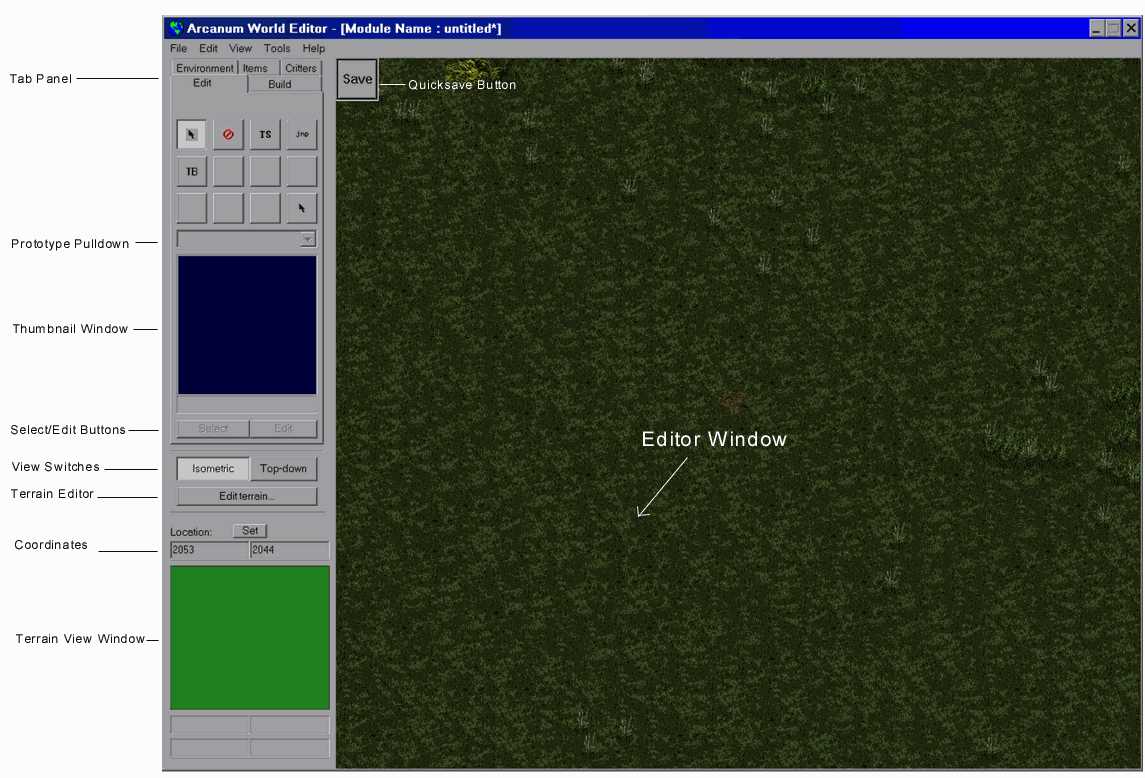
The interface of WorldEd has been created to make most functions of module generation as easy as possible. There is a lot you can do with this tool, after all… we made Arcanum with it! Here is a diagram and a basic explanation of the different screen areas of WorldEd.

File
New Map
Create new map within the current module.
Open Map
Open existing map within the current module.
Save Map
Save changes made to your map.
Save Map as
Save your map with a new name. Both this new map and the old map will appear in your module.
Open Module
Open existing module or, by entering a new module name, create a new one. Opening a module while one is already active will automatically compress the active module.
Revert
This will undo any changes you have made since last time you saved your map.
Exit (and save module)
This will exit WorldEd and automatically save and compress the current module.
Edit
This menu gives you access to all of the text files that control your module. If you select any of the mes files from this menu, they will be opened using whatever program you have associated with the *.mes extension. If you haven’t associated a program with the MES extension, I recommend you choose notepad. A detailed explanation of each of these files is located in the MES file section.
You will also have the ability to run ScriptMaker from this menu. ScriptMaker should be run to edit any scripts OR dialogues. You can read more about this utility in the ScriptMaker section of this manual.
View
Zoom In
Zooms in while in top-down view. (keyboard shortcut "-")
Zoom Out
Zooms out while in top-down view. (keyboard shortcut "+")
Scrolling
Here you will be able to adjust the speed at which the screen scrolls. The default setting is the fastest and will probably be the only setting you will ever need. (keyboard shortcut: The numeric keypad scrolls the editing window screen.)
Objects
Here you can hide or unhide most objects that appear in the editing window.
Game Window
Toggling this activates a red box outline which indicates what the player will see when he plays the game. This box is 800x400.
Center Crosshair
Toggles a crosshair to indicate the center of the screen.
Ambient Lighting
Unchecking this will deactivate the default lighting scheme for this map. It will all the lights up to full brightness. Keep in mind this has no bearing on the actual game. This is only for viewing purposes in WorldEd.
Ambient Colors
All of these options adjust the lighting view. These options are for viewing purposes only. None of the parameters set here adjust how the map will look when played.
Indoor
Controls the ambient light level for interior areas.
Outdoor
Controls the ambient light level for exterior areas.
Scheme
This will let you choose between different lighting schemes available in your module. By default you have two you can choose from, but you can create your own. When they are created properly, they will appear automatically in this dialogue. See "General Lighting" for more info.
Tools
Align Inventory
You will probably never use this tool. It looks for items that have bad data associated with them. If you run this tool, nothing will should ever happen. If by some chance you have items that are in a bad state, this will correct them.
Purge Destroyed Objects
You will probably never use this tool. It looks for objects that have been destroyed, but not deleted. If you run this tool, nothing will should ever happen. If by some chance you have objects that are in a bad state, this will correct them.
Relevel
This tool goes through all creatures on the map and reinitiates their level schemes, if they have one attached.
Generate Town Maps
See TownMaps section.

Remove Sector Light Schemes
You will probably never need to do this, but if you do…. This tool removes any hand defined sector light schemes for every map in the module.
Find Next Useable Scenery Object
This will cycle through all scenery objects in the game that have a script attached to the "use" attachment point. This is very useful on larger maps. Example: Let’s say you have a garden and, if you pull on a rose, a fairy appears. If there is an entire garden it can be hard remembering which one you set. This will center the editor window the rose in the garden.
Find Previous Useable Scenery Object
This is the same as the "find next useable scenery object" tool, except that this one cycles through the objects in the opposite direction.
Find Next Blocked Container Object
Containers can not be opened or used if they are in a tile that is blocked. Tiles can be blocked either by hand using the Tile Blocking tool, or if an object is present in that tile.
Find Previous Blocked Container Object
This is the same as the "find next blocked container object" tool, except that this one cycles through the containers in the opposite direction.
Adjust Critter Wanders
This tool operates on all NPC’s on the currently edited map. This will adjust the wander states of the NPCs. The wander states of individual NPCs can be edited by right-clicking on them, and looking at their "flags" section.
Tab Panel:
Here is where you will access all the tools to place or alter anything placed in your world. Available tools are grouped appropriately in each of the tabs.
Prototype Pulldown:
When placing an object into the editor window, you will frequently notice that a name appears in the prototype pulldown. This usually means you can click within this field and scroll through different groups of prototypes.
Thumbnail Window:
Here you will see a reference image of what you are about to place in the world.
Select/Edit Buttons:
The select button will allow you to browse different prototypes within the current selected prototype group. The edit button will allow you to change the art of the current selected prototype.
View Switches:
These two buttons toggle between isometric and top-down view. Every object in the items, critters and environment menus can only be placed in the isometric view. Buildings can only be created when in the top down view. Everything else can placed in either one.
Terrain Editor:
This button activates the terrain editor. The terrain editor will allow you to edit large portions of terrain.
Coordinates:
When you hover over any tile in the editor window, you will see the x,y location in the coordinate window. You can also enter x,y coordinates into this window and hit "set" or press enter to reset the view to that location on your map.
Terrain View Window:
This area will represent a rough view of what the base terrain type of your map look like. By default it is all green because the initial map load defaults to green grasslands.
Quicksave Button:
This button provides a quick way to save the map you currently working on. If the map save is current, you will notice this button turn grey.
Editor Window:
This is the viewport in which all editing of the map will take place.
Build Tab Panel:
Arrow Cursor:
The arrow cursor is found in all the tabs and simply returns you to selection mode. Just click on the arrow button to activate.
Delete:
The delete button is found in all of the tabs. It can delete anything on the screen except for walls and tiles. Just select the delete button click on any object in the editor window to remove it.
Buildings:
  Buildings are placed in the world much the same way that tiles and other scenery objects are, just point and click. When laying down buildings though, you MUST be in the top view mode. To enter the top-view mode of WorldEd just click on the "top-down" button on the left hand panel.
To begin laying down buildings in WorldEd, we must first make sure the building icon is active in the "build" command tab. Once this button is depressed, you will see a building image appear in the window beneath. You can use the "previous/next" keys to cycle through the different building types.
To construct a building, initiate the top-down view and left click on one of pink dots. The first dot that you click will represent the first "post" of your building. With a dot left-clicked and held, drag out a rectangular shape until it is the size and shape you desire. Once you have a shape you like, just release the left-click and your building will be created! Now go back to the ¾ view and check out your new structure.
If you want to add to the building, simply go back to top-down view and begin clicking inside the structure and drag out a new piece. If you want to create interior walls, click and hold and drag out a shape that is only one of those pink dots wide. This is the way indoor and outdoor walls are made.
If you wish to delete any building you have created, select the delete icon in the "build" tab and ctrl-click on the structure. This will delete pieces of the building. Just keep clicking until it’s all gone.
Doors:
Doors can be placed anywhere there is room on an existing wall. Doors can be placed on exterior as well as interior walls. Every wall set has a different selection of doors.
To place a door, select the door icon in the "build" tab panel. With this button select, simply left click on a wall to place a door. To cycle through variations, left click on the door again. If you want to expand the entry to double doors, click on either the left or the right side. Keep in mind that not all wall sets have multiple door variations and you MUST have room on the wall to place your door. Doors will not appear when too close to windows or edges of walls.
By default, all doors begin with the same behavior. Doors, by default, are unlocked and can be destroyed if dealt more than 70 hit-points. This works a lot of the time, but sometimes you want to set specific behavior for the door. To do this, right click on the door and select edit. This brings up all of the options available. A detailed description of the options you have is below….
"P" pieces:
P-pieces are pieces of art that adorn walls to add difference and flavor. The first piece of art completed for this function was an image of pots and pans. That’s where the "p" came from. P-pieces come in many shapes and sizes and are different depending on which wall set you are using. Some wall sets have many p-pieces available and some have none.
To adorn your walls with p-pieces, you must be an isometric view and have some walls to place these on. Select the p-pieces icon in the "build" tab panel. To administer a p-piece, just left-click on any wall and, if there are p-pieces for the wall set, you will see it appear. To change an existing p-piece you can click on the p-piece to cycle through ones that size, or you can click just to the left and right of it to see larger variations.
Windows:
Windows can be placed on most all of the wall-sets in WorldEd. Windows, unlike doors, have different default properties depending which type you lay down. Some windows, by default, cannot be opened (large plate glass windows) and some cannot be seen through (boarded up or stained glass windows).
To place a window in WorldEd, select the window icon in the "build" tab panel. With this button selected, simply click on any part of an existing wall. This will place a window. To cycle through window variations, click on the window again. To change the size, click to either the left or the right of the window. Keep in mind that doors and windows all need appropriate space from wall edges and each other.
When a window is first placed it will assume its default behavior, but you have the ability to change all of its properties. To edit window properties, hover the window and right click and select edit. This will bring up a screen full of options for you to adjust. A detailed description of the options you have can be found the "Editing Window" section.
Critters Tab Panel:
Arrow Cursor:
The arrow cursor is found in all the tabs and simply returns you to selection mode. Just click on the arrow button to activate.
Delete:
The delete button is found in all of the tabs. It can delete anything on the screen except for walls and tiles. Just select the delete button click on any object in the editor window to remove it.
Critters:
  The critter button is used to place all people, monsters, and animals in the game. With this button selected you can cycle through all the different creatures available in WorldEd.
Kill Critter:
Kill critter is used when you want to keep an NPC, you just want him dead. The way it works is by dealing out 32000 points of damage. This ensures a timely death. J Just click on the kill critter button and then click in the editor window on the creature you wish to kill.
Note: If you kill someone and they are not facing the direction you think is appropriate, you can right-click on the body and hit rotate until it is right.
Edit Tab Panel:
Arrow Cursor:
The arrow cursor is found in all the tabs and simply returns you to selection mode. Just click on the arrow button to activate.
Delete:
The delete button is found in all of the tabs. It can delete anything on the screen except for walls and tiles. Just select the delete button click on any object in the editor window to remove it.
Tile Scripts:
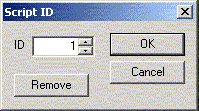
Tile Scripts are very easy to understand. A tile script fires every time a PC or an NPC walks over it. A tile script is laid down on the terrain using the button. This button can be found under the Edit tab. Right-clicking on the tile script brings up this window:

 
You will enter the script number in the ID field.
A few helpful hints:
The "Triggerer" for tile scripts is the PC or NPC that walks over it.
There is no "Attachee" for tile scripts (tile scripts are not objects in the way that critters or items are). Therefore, if you wish to do something that requires an Attachee, such as looping for someone or something when the tile script is triggered, then you will have to use the "(obj) = (obj)" script command, entering "Attachee = Triggerer". In essence, this makes the triggerer of the tile script the attachee as well.
 
Jump Points:
Jump Points are used for teleporting the PC from one location to another. Jump points can teleport you around the same map or can transport you between different maps in your module.
To create a jump point, click on the jump point button and left click in the editor window for placement. When you click a blue-hatched box will appear on the ground followed by the jump point editing window. Within that window, select the map you wish to teleport to from the pull down menu. Then enter the x and y coordinates of the tile you want the player to land on. Now when you play the game, if someone steps on this tile he will be teleported.
Keep in mind, the blue-hatched jump point representation you see in WorldEd will not appear in the game. If you wish the player to clearly know there is a teleport point there, I suggest adorning that location with some obvious scenery.
Tile Blocks:
Blocking tiles prevent the player from moving to that specific location. You will see two types of blocking tiles, generated and placed.
Generated blocking tiles are ones that are built into certain facades and tilesets. Generated blocking tiles cannot be edited. They will always be blocked. An example of a generated blocking tile is the deep water tileset. If you select deep water and spray it down in the editor window, you will notice a dark red-hatched tilesize piece of art appear on top of the water. This is indicating that the player will not be able to walk on these tiles. Generated blocked tiles are also very common on facades and scenery.
The next type of blocking tiles are placed. Placed blocking tiles are ones that you can lay down or remove at any time. To place a blocking tile of your own, select the "edit" tab and click the tile-block button. With the TB button active, you can click in the editor window to mark tiles as non-walkable. When you block a tile you will notice the red-hatch indicator is bright red. This is how you can identify the difference between generated and placed tile blocks. If you wish to remove a tile block, just click on the tile again with the tool still active, this will remove the block.
A quick word about scenery and blocking tiles: If you place any of the larger scenery objects on the ground, you will see a blocked tile appear beneath it. Certain groups of scenery prototypes will always block the tile they are placed in. You can read more about scenery objects in the scenery section.
Environment Tab Panel:
Arrow Cursor:
The arrow cursor is found in all the tabs and simply returns you to selection mode. Just click on the arrow button to activate.
Delete:
The delete button is found in all of the tabs. It can delete anything on the screen except for walls and tiles. Just select the delete button click on any object in the editor window to remove it.
Tiles:
Tiles are what the world of Arcanum is built on. They are the foundation found everywhere you play. A tile is an area of space that is 80 pixels wide by 40 pixels high. Characters always stand in the center of a tile unless walking/running/sneaking. Although npc’s snap to a tiles center, scenery and items of all kinds can be positioned anywhere within a tile.
In WorldEd, changing the art of the tiles is extremely simple. With WorldEd loaded and a map ready to edit, select the environment tab on the left-hand panel. If you select the tile button, you will be in tile-editing mode. This will allow you to lay down water, marsh, dirt, rock, and many more within the editing window of WorldEd. When you select the tile button you will see a picture of a brown dirt swatch appear beneath it. If you press the "select" button beneath dirt image it will bring up a list of all available tiles to lay down. Just double-click on the one you want and left click to spray in the edit window. You may spray these down in both top and ¾ views of the editor.
There is one thing that you need to keep in mind when it comes to choosing tile types, indoor vs. outdoor. Some tiles are linked automatically to the outdoor light setting and some are linked to the indoor light setting. This accommodates the difference between interior and exterior locations. If you were to spray down grass, it would reflect the outdoor lighting so as day turns to night, the colors of the ground will change. You wouldn’t want that effect on a wood floor of a house. Interiors colors you would want to remain static as the light changes outside. So if you were to lay down an interior tile outside, you might notice it is much darker than the other tiles because it is getting its lighting from the interior setting. Additionally, interior tile sets do not transition between each other. An outdoor tile of grass place on a pool of water will create all the necessary ground transitions between the two. An indoor tile placed anywhere will simply be that indoor tile.
Scenery:
Scenery objects are what you place in WorldEd to decorate your scene. Scenery objects have different defaults depending on which prototype you use. Most of the settings have to deal with the player being able to walk through, shoot through, or see through them. You will find that they are almost always appropriately set, but you can adjust them at any time if you wish.
To place a scenery object, select the environment tab panel and click on the scenery icon. By default, the bed will appear as the first piece of scenery you can lay down, but you can browse all the default prototypes by clicking on the pulldown menu above the thumbnail. Here you can see a list of all prototype scenery in the game. They are organized this way to help when choosing which scenery you wish to use.
After you have selected a prototype, you may want to change its look. Click on the edit button beneath the thumbnail to bring up all of the available options. Here you can cycle through different pieces of art to represent your scenery object. Select one that you like and hit OK. Now you can place that object in your scene by left clicking in the editor window.
Something you may need to adjust frequently is beds. Beds can only be used if the module you are creating is a single-player adventure. In multiplayer there is no way to advance time while someone sleeps. If you want to place a bed that can be slept upon in your single player game, you will need to do the following:
Place a bed in your scene and right-click on it. Select "edit".
Click on the scripts button.
Now click on the circle to the left of the "use" field. This will make the script number we are about to type in tie into the "use" of the bed.
Below in the "script" entry box, type in number 1893 then hit ok. This script is something we have pregenerated for use in this instance.
Now your bed can be slept in. It will function the same way as beds in Arcanum when you purchase a room at the Inn.
If you want to place a bed as scenery and forego the ability to sleep in it, just place one. The beds default behavior is to act only as dressing in your scene.
Containers:
Containers are objects that can hold multiple items. Containers can be empty, can have hand placed contents, or can use "substitute inventories".
To place a container, select the Environment Tab and click on the container icon. By default you will see a thumbnail of the "arcane chest". If you select the pull-down menu above the thumbnail you can see many different container defaults. If you wish to edit the look of your container before placing it in your scene, select the "edit" button beneath the thumbnail. This will bring up all the art available for chests in our game.
The default containers have all have "inventory sources" attached to them. An inventory source is list of objects that can appear in a container when attached to it. When the game loads, containers with inventory sources will randomly pull from their list and fill the chest full of goodies. This is great for shopkeepers and for your basic dungeon chests.
To create a custom chest stocked with items you specify, select "empty chest" from the prototype pulldown. This prototype does not have any default inventory. With this container placed in your scene, you can put any object into it by dragging the item on top of the chest and dropping.
If you wish to remove all the items in a container, you can right-click on it and select "poop". This will dump all the contents of a container on the ground. You may have to move the container to see the objects beneath it.
Note: To make a chest available to an NPC for bartering, you need to make sure the NPC has an internal name (see editing). Right-click on the container and select "Remember for Substitute", then right click on the NPC and select "Set Substitute Inventory". This will attach the chest to the NPC. Keep in mind that chest needs to be fairly close to the NPC, or the NPC will not recognize its existence. As a rule of thumb, if while playing Arcanum, the chest is centered on the screen and you can still see the NPC somewhere in the game window, the chest is close enough.
 
Traps:
Traps are placed on the ground and affect anyone who enters into the tile they are place in. To place a trap, open the environment tab and select the traps button. By default, you will see a magickal trap. If you hit the select button beneath the thumbnail you can choose between the seven trap types available in our game. To place the selected trap, just left-click in the editor window to place it.
Arrow traps require an additional trap object to be set. This object is called a trap-source. The trap-source defines where the arrow will come from when the trap is stepped on. To place the trap-source, just click the pulldown menu above the thumbnail and select "TrapSource". You can place these any where in your scene and they will only show up in the WorldEd editor window. You will not be able to see these in the game, the player will only see an arrow fly from this location.
Note: Arrow traps will use whichever trap source is closest to fire from. Make sure you place your trap source no more than 6 tiles away from the trap or it may not fire. If you want the arrow to come from a particular trap source, see Counter 2 below.
All traps can be adjusted after being placed. If you right-click on a trap and select "edit", then click on the "scripts" button, you will see 4 counters below in the script window. Here is how each of the counter functions.
Counter 0: Adjusting the number in counter 0 will adjust the minimum damage dealt out by the trap.
Counter 1: Adjusting the number in counter 0 will adjust the maximum damage dealt out by the trap.
Counter 2: Counter two can get a little tricky. Counter two is only used for arrow traps because arrow traps are the only ones that require a trap source. If you have multiple trap sources in an area, you can define a number for them in their counter 2 area. If you copy that number into your traps counter two, the arrows will fire from the trap source with the same number.
Counter 3: Counter 3 defaults to zero, which will probably work for people most of the time. By giving counter 3 a new number, you are saying "in addition to firing the trap like normal, play a spell on whoever steps on me". The appropriate spell numbers can be found in the spell list towards the bottom of this document.
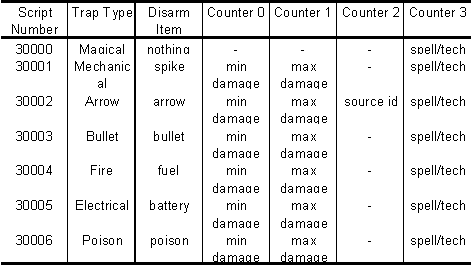
Another function of traps is the object you receive when disarming it with Expert training. Every trap, except for magickal, when disarmed by an Expert will insert an object into the player’s inventory. The object you receive given the type of trap is in the chart below.
Here is a chart breaking down what each trap-script does.

 
Facades:
Facades are groups of ground tiles that form a picture. This image, although a flat 2d picture, can trick the player into thinking they are before a grand castle or bottomless chasm.
To place a facade, click on the façade button in the "environment" tab panel. You will see a thumbnail appear in the window beneath accompanied by a number and the facades name. There are 372 facades in the game. To page through them use the previous/next button. Once you have selected one, simply click in the editing window and you will see your façade appear.
To delete a façade, select the delete button in the "environment" tab panel. Left click on the façade in the editor window and the façade will be erased. When the façade is erased, it will leave behind a patch of tiles that represent whatever the façade’s base was when we created it. We defined the base in order to determine what sounds would play when a character walked over it. So if you delete the boat façade, you will see a patch of wood where the boat once was. Just draw over this area with whatever tile is appropriate to your scene.
Remember, facades are simply tiles in a group. Some facades are outdoor tiles and some are indoor, so lighting will affect facades differently. Also, since facades are tiles, everything will be drawn on top of the façade.
Lights:
The lights that this button lay down are referred to as dynamic lights. I highly recommend you read the "General Lighting" section for more info on lighting your maps.
To place a dynamic light, select the environment tab and click on the light icon. If you click on the "select" button you will get different variations of lights you can place. By clicking on the edit button, you will be able to define the color of the light you are about to lay down.
Now, if you try to place a light into your scene now you might not be able to see it. The reason for this is that the outside ambient light is so bright you cannot see the dynamic light that has been placed. I usually start by selecting "view—ambient colors—scheme" and changing the time value to 20. This makes worlded display eight o’clock time of day colors (the time value is military time, 0 for midnight and 23 for 11pm). Now that the light is less bright outside, you can see the lights you place into your outdoor scene. Indoors, by default, begins darker so lights can be placed and seen immediately on interiors.
To set a light to be a shadow, choose a light, place it, and right click on it and select "edit". Select the check box "dark (shadow)". Now anything that makes it into this light will be darkened instead of lit.
 
Items Tab Panel:
There are several different types of items in Arcanum. There are generic items, weapons, armors, food, written objects, scrolls, ammo, money, and keys. All have different properties and all can be edited.
On thing to keep in mind before I describe Items any further. There are two basic types of items. One type of item is a prototype. Prototype items are ones that we have generated in house. These items usually have specific properties that are important to the game. In all of our menus when you are scrolling through different types, you are scrolling through prototypes. The other type of item is what we call a "custom" item. This is any item you edit by hand. If you right click on anything and change its properties, you are no longer dealing with a prototype, you are dealing with a "custom item". This does not affect the original prototype, this only changes the object you are editing.
There are six different categories of item editing screens you will come across: Generic Items, written objects, quantity objects, keys, weapons, and armor.
Arrow Cursor:
The arrow cursor is found in all the tabs and simply returns you to selection mode. Just click on the arrow button to activate.
Delete:
The delete button is found in all of the tabs. It can delete anything on the screen except for walls and tiles. Just select the delete button click on any object in the editor window to remove it.
Generic Items:
Generic items are basic items, food, and scrolls. Most objects in the game are generic items with different art and effects. For example, scrolls have a script attached to them. When the scroll is used it will heal a target by 40 points lets say. If you attached the same script to a piece of bread, it would do the exact same thing. The real difference between bread and scrolls is the art (which you can change to anything you want) and the script number typed into its "use" slot.

Basic Items:
  To select a basic item click on the button and hit the select button beneath the thumbnail. Here you will see a list items we used in the game. Basic items can rarely be equipped and mostly are used as schematic pieces, quest items, and non-returnable thrown objects (like grenades).
Food:
  In the food category you will find everything to make organic/chemical based schematics and bread and other basic foodstuffs. If you click in the pulldown beneath the tabs, you will see general, herbal, potions, and therapeutic. Currently, only general and potions contain prototypes. Select general or potions in the pulldown menu and hit the select button to browse the different types.
Scrolls:
  Scrolls are objects in the game that have specific scripted behaviors attached to them. If you hit the select button you can browse the scroll prototypes we have generated for the game. An example of a scroll would be the "scroll of disarm". This script disarms traps. In WorldEd, you have the ability to create your own scripts thereby creating your own custom scroll behaviors. To access the different types of scrolls hit the select button.
Written Objects:
  There are five different types of written objects you can access from the pulldown menu, books, newspapers, notes, schematics, and telegraphs.
Written objects are very simple to use and to understand. Written objects are similar to other items in the game, except for a few options at the bottom of their Edit Window:

The "Written Type" pull-down menu allows you to change the designation of a written object when you lay it down. Therefore, you could change a note into a telegram, if you so desired.
"Start Line" refers to the message file line that the written object will draw its content from. Here is a list of the written objects, and the message files associated with them:
Book: gamebook.mes
Newspaper: gamenewspaper.mes
Note: gamenote.mes
Schematics: (you cannot access this file)
Telegrams: gametelegram.mes
All of these message files can be accessed in World-Ed using the Edit Menu. There are detailed descriptions of those message files and how they work in the section describing the Edit Menu.
For example, if you laid down a book, and you entered 1020 in the start line for that book, then that book, when used in the game, would display the contents of the book entry on line 1020 in gamebook.mes.
"End Line" is no longer used and should be ignored.
Quantity Objects:
Ammunition:
  Ammunition has four different categories in the pulldown menu; arrows, bullets, charges, and fuel. Different weapons in the game require different types of ammunition. To place ammunition, select one of the four types from the pull down menu, then click in the editor window to place it. To edit the amount of ammunition, right click on the newly placed object and hit edit. In the edit screen you will see a field that says "quantity", this is how many units of ammo this object contains. Change the number in the field to change the amount of ammo.
Coins:
 Coins are money in the game. This is the only type of currency available. To place coins just left-click in the editor window to place the object. Once the coins item is place you can right-click on the object and select edit to adjust the amount. In the edit screen you will see a field that says "quantity", this is how many units of coin this object is worth. Change the number in the field to change the amount of coin.
Keys:
 Keys are objects in the game can unlock locked objects. Keys are like most other objects except that when you right-click on a placed key and select edit, you will notice a different field. Within the edit window, there is a field called "Key ID". This is how the locked object knows to become unlocked when this key enters it. If you place a door, lock it, and edit it and give it a key id of 8, then give a key the same number 8, the key will be able to unlock the door. This works the same for chests and windows. Note that two Key ID’s are reserved:
0 - no key will open this lock or this key opens nothing
1 - any key will open this lock or this key opens any lock
Weapons:
  Weapons are wielded objects that are used to inflict damage! Some weapons have spells that can be cast while wielding them, such as the staff of healing. Some weapons require ammo to use. Weapons are broken into eleven categories. To see all the different categories click on the pulldown menu above the thumbnail. Once you have selected a category, click the "select" button to browse the different variations.
There are many different weapon prototypes we offer, but all of these can be edited. To create your own custom weapon, just place a similar weapon in the editor window and right-click and select edit.
Armor:
  Armor is considered anything that you wear. Armor includes many different categories that you can see by clicking on the pulldown menu above the thumbnail. Many armor objects have effects and scripts built into them. You have the option of editing any of the existing properties to create your own custom armor. The first and easiest step to changing armor is the edit button.
When you select a prototype of any piece of armor, before you lay it down, you can click on the "edit" button next to "select". This will bring up every different variation of this type of weapon. Just select the one that you think is best and place it in the editing window. Now it will have the same stats of the prototype you chose, but it will look like whatever you changed its art to.
 
Editing Window:
You can right-click on almost any object in WorldEd and select the "edit" option. This brings up the "edit window". The edit window may be arranged slightly different from one object to the next, but many of the parameters you can edit are the same.
This section is broken down into two different parts. The first part is common editing parameters and the second part is object specific parameters. Common editing parameters are ones that ALL objects in the game have, like "internal name" and "hit-points". Object specific parameters can be found in only one or a few of the objects in worlded, like "fire damage" and "magic-tech complexity".
This section will list all editable parameters. Next to each parameter you will see a list of which objects have the parameter to edit.
Common Parameters:
Here is a list of common parameters to all objects.
AC:
This sets the Armor Class of the object.
Off:
This will switch the object to the "off" state. With this selected, you will not be able to see it in the game. In the editor, however, it will be appear green and translucent.
Flat:
This flag forces the object to be drawn flat. It will appear like a rug or carpet, everything else in the game will be drawn on top.
See Through:
If checked, the object will not be taken into consideration when determining if the player or npc can see through it.
Shoot Through:
If checked, the engine will assume this object will not block a ranged attack.
No Block:
The "No Block" checkbox toggles whether or not an object creates a blocking tile where it is placed.
Click Through:
The mouse cursor will target any object or the tile under this object, i.e. it cannot be targeted with the mouse.
Don’t Light:
Removes all lighting applied and displays the object at full brightness.
Invulnerable:
The object will be impervious to damage.
Illusion:
The object is illusionary (no longer supported)
Stoned:
The object is treated as stone by the render (i.e. drawn in gray scale)
Hit Points:
This field defines how much damage an object can take before being destroyed or busted.

Internal:
This is an internal name for the object, used to uniquely identify the object to scripts.

Known:
This field controls the description of the object. For critters and magical items, this is the name of the object after you have met/identified the object.
Light Button:
The light button gives the player the option of attaching a light to any object in the game. When selected, this button will bring up a window with a few options. Most options will be unavailable for selection until a light has been selected. Click on "select" to see a list of light options. Once a light is chosen, other options will be available.
Dark Shadow:
This will invert the light and create a dark shadow.
Don’t Animate:
If this light has animation, this will disable it from playing.
Don’t Cast Shadow:
This will prevent a shadow from being drawn on this object (since they are only drawn on critters, this is a pretty specific flag)
Indoor Ambient:
This will force the color of the light to be the same as the indoor ambient light setting.
Outdoor Ambient:
This will force the color of the light to be the same as the outdoor ambient light setting.
Custom:
Here is where you can bring up the color picker and determine what color you wish your light to be.
Resistance:
These resistances can range from 0 to 95:
Damage: resistance to regular damage, such as being struck by a sword, arrow or bullet
Electrical: resistance to electrical damage
Fire: resistance to fire damage
Magic: resistance to magical spells and item effects
Poison: resistance to poison (this reduces the incoming poison level by the specified percent)
Scripts Button:
The script button will give you access to the script entry window. This window will show every script attachment point available for this object. For more information of editing and applying scripts, see the "Scripts" section.
 
Object Specific Parameters:
AC Adj:
Armor.
This number is how much to add to the wearer’s AC.
Age:
Critters.
This is the creature’s age. It doesn’t have much affect in the game, but it can be tested for in scripts.
AI Data:
Critters.
This is the number of the AI packet for this creature. You can set valid values using Edit->Objects->Critter->AI.
Alignment:
Critters.
This the creature’s alignment, which ranges from –1000 (pure evil) to 1000 (pure good), with 0 being neutral.
Ammo Type:
Weapons.
This selects which type of ammo the weapon will consume when fired.
Basic Stats:
Critters.
These are the 8 basic stats in the game (for more info, see the game manual):
Beauty
Charisma
Constitution
Dexterity
Intelligence
Perception
Strength
Willpower
Blend:
Critters.
Use Constant Alpha Blending?: Selecting "yes" enables the blend and will allow you to change the blend level.
Level: The blend level determines how transparent the critter will be. 255 is totally opaque, and 0 is totally transparent.
Blending:
Scenery.
Add: Additive blends will make "add" the pixel value of the scenery to whatever is behind it. The brighter the object was to begin with, the brighter it will be against the background. "Add" blending is a visual must for any scenery you’ll find in the "light" prototype pull-down.
Mul: Mul is short for "multiplicative". Mul’ blends take the brightest parts of the art and make them darker against the background. The brighter the pixels were to begin with, the dark they will now become.
None: None is the default setting for scenery. This setting draws scenery exactly how it appears.
Bonus to Hit:
Weapons.
This is the bonus (or minus, if negative) to the wielder’s skill with this weapon.
Conceal:
Critters.
This will force the critter into its concealed art (if available). It will automatically unconceal itself in the game when attacking or moving.
Crit Body Type:
Critters.
The body type helps determine possible critical hits and misses.
Crit Hit Chart:
Weapons.
Used to determine what types of criticals are possible.
Crit Miss Chart:
Weapons.
Used to determine what type of criticals are possible.
Damage:
Weapons, Armor.
Weapons (accessed via clicking the box):
For each damage type, you can set:
Low: lowest damage possible (without modifiers)
High: highest damage possible (without modifiers)
Magic: magic adjustment to damage (can be positive or negative, and is affected by wielder’s magick-tech level)

Armor (these are resistances added to the wearer):
Damage: resistance to regular damage, such as being struck by a sword, arrow or bullet
Electrical: resistance to electrical damage
Fire: resistance to fire damage
Magic: resistance to magical spells and item effects
Poison: resistance to poison (this reduces the incoming poison level by the specified percent)

Derived Stats:
Critters.
These are the derived stats (as described in the manual), They cannot be set, but they changes as the Basic Stats change.
AC Adjustment:
Carry Weight:
Damage Bonus:
Heal Rate:
Magic Tech Aptitude:
Max Followers:
Poison Recovery Rate:
Reaction Modifier:
Speed:
Effects Dscr:
Generic Items, Weapons, Armor, Written, Quantity Objects, Keys.
These are descriptions of the item’s effect that you see when you examine the item (it must be identified if magickal). You add can more using Edit->Objects->Items->Effect Descriptions.
End Line:
Written.
This value is no longer used.
Faction:
Critters.
This is the faction the creature is in. In general, creatures do not attack other creatures on their same faction. You can add mode using Edit->Objects->Critters->Factions.
Flags:
Aloof:
Critters.
Aloof critters ignore race and Beauty modifiers.
Always Locked:
Containers, Doors and Windows.
If the "Locked" flag is set, then the door is locked even to NPC’s.
Animal:
Critters.
This creature is considered an animal. This is important to the spell system, and animals cannot open doors either. All animals act aloof and cannot be traded with.
Boomerangs:
Weapons.
This weapon will return to the wielder when thrown.
Busted:
Containers, Doors and Windows.
The object has been broken open, and the lock is destroyed as well.
Can Use Box:
Generic Items, Weapons, Armor, Written, Quantity Objects, Keys.
This item can be dropped in the Use Box in inventory to activate its use.
Fence:
Critters.
The critter will buy items marked as "Stolen".
Hand Count Fixed:
Weapons.
If this weapon is marked as "Two Handed", it must be used two-handed. Otherwise it must be used one handed.
Hexed:
Generic Items, Weapons, Armor, Written, Quantity Objects, Keys.
This item is considered a cursed item by the system. Its name is drawn in orange when examined, and in general these items are given bad effects.
Identified:
Generic Items, Weapons, Armor, Written, Quantity Objects, Keys.
If attached to a magickal item, then the item is considered identified. Its known name is printed, and its active magickal effects are useable.
Is Fire:
Scenery.
This object is fire and will cause damage if stood upon.
Is Magical:
Generic Items, Weapons, Armor, Written, Quantity Objects, Keys.
Used internally to keep track of items that have charges. To make an item that is considered magickal by the game, give it a positive magick-tech complexity.
Jammed:
Containers, Doors and Windows.
The lock has been jammed and cannot be picked. The door will unjam automatically in 24 hours.
Kill on Sight:
Critters.
This creature will attack any other critter it sees that is not on its faction.
Locked:
Containers, Doors and Windows.
This object is locked.
Locked Day:
Containers, Doors and Windows.
This object will automatically relock the next day.
Locked Night:
Containers, Doors and Windows.
This object will automatically relock the next night.
Loud:
Weapons.
This weapon is loud and can be heard from up to 15 tiles away.
Magically Held:
Containers, Doors and Windows.
This door is being kept locked via magick.
Marks Townmap:
Scenery.
Examining this scenery will add its description to the townmap.
Mechanical:
Critters.
This critter is a mechanical creature. It is immune to poison, aloof, and will not trade with his leader.
Mute:
Critters.
This creature cannot engage in dialog.
Needs Target:
Generic Items, Weapons, Armor, Written, Quantity Objects, Keys.
This item needs a target when you use it.
Never Locked:
Containers, Doors and Windows.
This item ignored its "Locked" flag and always reports itself as unlocked.
Nigh Invulnerable:
Critters,
This creature can only be be damaged by items marked as Uber.
No Auto Animate:
Scenery.
All scenery with more than one frame of animation will automatically animate itself unless this flag is applied.
No Blood Splotches:
Critters.
These creatures do make blood splotches when struck.
No Decay:
Critters, Generic Items, Weapons, Armor, Written, Quantity Objects, Keys.
This item will not disappear if left lying on the ground for too long. Otherwise, such items disappear after 2 days.
No Disintegrate:
Critters.
This creature is immune to being disintegrated.
No Display:
Generic Items, Weapons, Armor, Written, Quantity Objects, Keys.
This item does not appear in inventory when carried.
No Drop:
Generic Items, Weapons, Armor, Written, Quantity Objects, Keys.
This item cannot be dropped once picked up.
No Flee:
Critters.
This creature will never run away in combat no matter how badly hurt.
No NPC Pickup:
Generic Items, Weapons, Armor, Written, Quantity Objects.
NPC’s will not pick this item up if it is placed on the ground.
No Pickpocket:
Critters.
This creature cannot be pick-pocketed.
Nocturnal:
Scenery.
The object and its attached light are only visible at night.
Non-Lethal Combat:
Critters.
This critter will stop fighting a critter when it goes unconscious.
Only Cast Highest:
Critters.
This critter will only cast the highest spell it knows in each college.
Persistent:
Generic Items, Weapons, Armor, Written, Quantity Objects, Keys.
This item is not destroyed during inventory respawning.
Positional Audio:
Scenery.
These flags control how far away the sound effect on the scenery can be heard. Small is 2 tiles, Medium is 5 tiles, Large is 10 tiles, and Extra Large is 20 tiles.
Respawnable:
Scenery.
If destroyed, the object will respawn after a delay of indicated by "Respawn Delay".
Silent:
Weapons.
This weapon is quiet and can only be heard within 2 tiles.
Sticky:
Containers, Doors and Windows.
This object will not close after being opened.
Stolen:
Generic Items, Weapons, Armor, Written, Quantity Objects, Keys.
This item has been been tagged as stolen and can only be sold to a creature marked as a "Fence".
Throwable:
Weapons.
This weapon can be thrown and retain its damage values. Otherwise, thrown items do damage based on their weight.
Torch/shield loc:
Generic Items.
This item can be wielded in the torch-shield location.
Transfer Light:
Generic Items, Weapons, Armor, Written, Quantity Objects, Keys.
NO LONGER USED
Two Handed:
Weapons.
This weapon should be wielded with two hands. If wielded one-handed (ie, the wielder’s torch-shield location is filled), then its MSR is 4 higher.
Uber:
Generic Items, Weapons, Armor, Written, Quantity Objects, Keys.
This item can harm creatures marked as "Nigh Invulnerable".
Undead:
Critters.
This creature is an undead. They are immune to poison, stunning and unconsciousness. They are always aloof and cannot be blinded or scarred.
Unressurectable:
Critters.
If this creature dies, it cannot be resurrected, but it can be re-animated as a zombie.
Unrevivable:
Critters.
This creature cannot be resurrected or reanimated.
Wanders:
Critters.
This creature will wander around its standpoint, within 4 tiles.
Wanders in Dark:
Critters.
This creature prefers to stay in dark areas as it moves.
Waypoints Day:
Critters.
This creature’s waypoints are only used during the day. It will go to its night standpoint at night.
Waypoints Night:
Critters.
This creature’s waypoints are only used at night. It will go to its day standpoint during the day.
Won’t Sell:
Generic Items, Weapons, Armor, Written, Quantity Objects, Keys.
The owning NPC wont sell this item (except to a haggle master).
Gender:
Critters
You can set this to male or female. It affects stat adjustments and dialog options.
Generator:
Critters
Is this a generator?:
Checking this will make the monster into an invisible monster generator.
Generator ID:
Each generator must have a unique id, so that it can track its spawn counts.
Inactive On-Screen:
If checked, this generator will NOT spawn critters if it appears on screen.
Spawn Beat Rate:
This is how quickly it can make a set of spawned critters.
Spawn Maximums:
Concurrent:
How many spawned critters can be alive at the same time.
Ignore Total:
If checked, the generator will ignore its total and make as many spawn as allowed by Concurrent.
Total:
How many spawned critters can EVER be made.
Spawn per Beat:
This is the maximum number of critters created on each spawn beat.
Time Active:
This is whether the generator works during the day or night.
Hit Points:
Critters.
You can set the hit points of your critter here. You can set how many points to spend (yielding 4 hit points per point), and adjustment to simply add in, and damage to subtract out (in case you want a creature to start injured).
Inventory Source:
Critters, Containers.
You can pick a substitute inventory for the critter, which will be created on it when he begins the game.
Key ID:
Containers, Keys, Doors and Windows.
This is the ID which determines what key opens what lock. See the section on Keys above for more details.
Level Scheme:
Critters.
These are the auto level schemes which creature use as they level up.
Lock Difficulty:
Containers, Doors and Windows.
This is a skill modifier when someone attempts to pick this lock. Positive numbers are bad, but negative numbers can HELP the picker.
Magic AC Adj:
Armor.
This number is added to the AC of the wearer after being adjusted by his magick-tech aptitude.
Magic CH %:
Weapons.
This number is added to the chance for critical hits after being adjusted by the wielder’s magick-tech aptitude.
Magic CM %:
Weapons.
This number is added to the chance for critical misses after being adjusted by the wielder’s magick-tech aptitude.
Magic Hit Adj:
Weapons.
This number is added to the chance for hits after being adjusted by the wielder’s magick-tech aptitude.
Magic MS Adj:
Weapons.
This number is added to the chance for misses after being adjusted by the wielder’s magick-tech aptitude.
Magic Range Adj:
Weapons.
This number is added to the weapon’s range after being adjusted by the wielder’s magick-tech aptitude.
Magic SM Adj:
Armor.
This number is added to the armor’s Silent Move modifier after being adjusted by the wearer’s magick-tech aptitude.
Magic Speed Adj:
Weapons.
This number is added to the weapon’s speed after being adjusted by the wielder’s magick-tech aptitude.
Magic Tech Complexity:
Generic Items, Weapons, Armor, Written, Quantity Objects, Keys.
This number ranges from –100 (fully tech) to 100 (fully magickal).
Magic Wt Adj:
Generic Items, Weapons, Armor, Written, Quantity Objects, Keys.
This number is added to the weapon’s weight after being adjusted by the wielder’s magick-tech aptitude. It can be negative, to allow weight-reducing items.
Mana Store:
Generic Items, Weapons, Armor, Written, Quantity Objects, Keys.
This number is how much mana is bestowed to the item wielder.
Min Strength:
Weapons.
This is the minimum strength required to wield the weapon without penalty (the MSR).
Notify NPC:
Containers, Doors and Windows.
This is the internal name of the critter being notified if the container or portal is tampered with. You cannot set it here (it is for informational purposes only). To make an object notify an NPC of tampering, you need to make sure the NPC has an internal name (see editing). Right-click on the NPC and select "Remember for Notify", then right click on the object and select "Set Notify NPC". Keep in mind that object needs to be fairly close to the NPC, or the NPC will not recognize its existence. As a rule of thumb, if while playing Arcanum, the object is centered on the screen and you can still see the NPC somewhere in the game window, the object is close enough.
Origin:
Critters.
You can set where the NPC thinks it is from. Guards will help any NPC who share their origin, regardless of faction differences. You can add more origins in Edit->Map->Areas
Poison Level:
Critters.
You can make a critter start poisoned by making this number positive. In general, a poison level of 550 or higher is really badly poisoned, and anything over 200 is seriously poisoned.
Portrait:
Critters.
You can set portrait numbers here. You can add more with Edit->Media->Portraits.
Quantity:
Quantity Objects.
How many units of this item is in this object (ie. set to 300 on gold, it means the gold pile has 300 coins in it).
Race:
Critters.
You can change the race of any critter, but it only matters for non-monster types (ie. not animals, monster, undead, etc).
Range:
Weapons.
This is the range of the weapon in tiles.
Reaction Base:
Critters.
This is the critter’s reaction in the absence of any modifier, where 50 is neutral, 0 is hatred and 100 is love.
Resistance Adj:
Armor.
This is how much the armor will adjust the resistance of the wearer in each category, subject to adjustment by the wearer’s magick-tech aptitude.
Damage:
Electrical:
Fire:
Magic:
Poison:
Respawn Delay:
Scenery.
This is the amount of time before a scenery object will respawn after being destroyed (if marked as "Respawnable"). If 0, this means 1 game day. If positive, it means that many real seconds like scripts use (but since pausing the game will stop them, it really means game seconds times 8). If negative, then it means that many GAME minutes (remember 1 real minute equals 8 game minutes).
 
Retail Price Mod:
Critters.
This is the percentage markup on all goods sold by this creature.
Scale:
Critters.
This is percentage size of the creature, based on 100% is normal sized. You can make smaller or larger creatures with this number.
Silent Move Adj:
Armor.
This is how much the armor helps the wearer move silently (the component of Prowling which checks to see if opponents hear you).
Skills:
Critters.
You can set all of the skills and their training levels. See the game manual for more info on skills.
Social Class:
Critters.
You can set the social class of the critter. Mostly this just affects generated dialog responses, but guards have different AI. They will help other critters that share their Origin but are not necessarily their Faction.
Sound Effect:
Scenery.
You can pick a sound effect number for the scenery to play when the player is near it (how near? See the positional audio flags above). You set sound in Edit->Media->Sounds->General.
Speed Factor:
Weapons.
This sets how fast the weapon is. This number adds to the wielder’s Speed.
Spell 1:
Generic Items, Weapons, Armor, Written, Quantity Objects, Keys.
This is a spell that the wielder of the item can cast if the item has been identified. It uses the Spell Mana Store to power itself.
Spell 2:
Generic Items, Weapons, Armor, Written, Quantity Objects, Keys.
This is a spell that the wielder of the item can cast if the item has been identified. It uses the Spell Mana Store to power itself.
Spell 3:
Generic Items, Weapons, Armor, Written, Quantity Objects, Keys.
This is a spell that the wielder of the item can cast if the item has been identified. It uses the Spell Mana Store to power itself.
Spell 4:
Generic Items, Weapons, Armor, Written, Quantity Objects, Keys.
This is a spell that the wielder of the item can cast if the item has been identified. It uses the Spell Mana Store to power itself.
Spell 5:
Generic Items, Weapons, Armor, Written, Quantity Objects, Keys.
This is a spell that the wielder of the item can cast if the item has been identified. It uses the Spell Mana Store to power itself.
Spell Mana Store:
Generic Items, Weapons, Armor, Written, Quantity Objects, Keys.
This is the mana that powers the spells in the item slots 1 thru 5 above.
Spells:
Critters.
You can check every spell that the critter is capable of casting. Make sure they have enough Fatigue to cast it! Fatigue is a derived stat from Constitution.
Start Line:
Written.
This is the line number to use for various written objects in the game. You can check and add more of these numbers with Edit->Objects->Items->Written Items.
Trap Difficulty:
Traps.
This is a skill modifier when someone attempts to disarm a trap. Positive numbers are bad, but negative numbers can HELP the disarmer.
Unknown:
Critters, Generic Items, Weapons, Armor, Written, Quantity Objects, Keys.
The unknown descriptions are used in the game in two instances. For critters, they are used when the player has not met the creature yet (so a shopkeeper may appear as "Human Shopkeeper", an unknown description, until the PC talks to him, and from then on his description will be "Bob"). For items, the unknown description is used for magick items until they are identified.
Wait Tolerance:
Critters.
This field specifies how long a PC’s follower will stay put (when told to wait by the PC) before heading back to his origin.
Weight:
Generic Items, Weapons, Armor, Written, Quantity Objects, Keys.
This is how much the item weighs, in stone. 10 stone = 1 pound.
Worth:
Generic Items, Weapons, Armor, Written, Quantity Objects, Keys.
This is the base worth of the item. Of course, shopkeepers will sell it for more, depending on their "Retail Price Mod", their reaction to the PC (itself based on race, Beauty, reputations, and other factors), and the PC’s Haggle skill.
Written Type:
Written.
You can set what type of written material this item is, which affects how it displays and which MES file it pulls its text from.
 
General Lighting:
There are three different types of lights in the game; Indoor Ambient, Outdoor Ambient, and dynamic. You will need to understand all three in order to successfully create your module.
Ambient Lights:
Ambient lights are the most important lights in your scenes. Ambient lights are on all the time and both indoor and outdoor constantly cycle through a 24 hour day. In Arcanum you will notice the color change from day to night. That is done through ambient lights. Outdoor ambient light affects anything thing that is on an outdoor tile and indoor ambient light affects anything on an indoor tile. To understand the difference between indoor and outdoor tiles, read the "tiles" section.
There are two ways to change ambient lighting values in worlded.
One way is for viewing purposes only. This is accessed through clicking "view—ambient colors". This menu has three options in it: Indoor ambient, Outdoor ambient, and Scheme. By clicking on indoor or outdoor ambient, you can bring up a color window. Here you can adjust the look of the lighting in worlded. You can also click on scheme. Clicking on scheme will bring up a dialogue that lets you change the time of day and change the lighting scheme that the time of day window is referencing. Changing the colors in these three areas will affect the look of lighting immediately in worlded. The important thing to remember is THESE CHANGES ONLY AFFECT WORLDED. You will not see any of these changes in the game when you play, they are strictly for testing purposes.
The second way to change the ambient lighting WILL show up when the game is played. Lighting values in your game are set up by editing or creating lighting schemes. Lighting schemes are MES files (text files that control the game). These files control the values of ambient light everywhere you play. By default the entire map uses "Lighting Default.mes". To view or edit this file, select "edit—map—lighting—default". It should look like this:
---------------------------------------------------------------------------------------------------------------------------------
//
// Default ambient lighting scheme
//
//
// 24 messages. Each message number is an hour of the day (0-23),
// where 0 is 12 AM and 23 is 11 PM.
//
// Each message contains RGB values in the form: ro, go, bo, ri, gi, bi
// where ro is red outdoor, ri is red indoor, etc. Valid values are
// in the range 0 - 255.
//
// All 24 messages _must_ exist. However, an empty message (just braces)
// will be automatically filled in with values interpolated from the
// closest non-empty messages surrounding it. Neither the first nor last
// message can be empty.
//
{0}{74, 80, 98, 74, 80, 98} 12AM
{1}{} 1AM
{2}{} 2AM
{3}{} 3AM
{4}{74, 80, 98, 74, 80, 98} 4AM
{5}{} 5AM
{6}{213, 182, 222, 74, 80, 98} 6AM
{7}{} 7AM
{8}{} 8AM
{9}{255, 255, 246, 74, 80, 98} 9AM
{10}{} 10AM
{11}{} 11AM
{12}{255, 255, 255, 74, 80, 98} 12PM
{13}{} 1PM
{14}{} 2PM
{15}{255, 255, 246, 74, 80, 98} 3PM
{16}{} 4PM
{17}{} 5PM
{18}{246, 186, 148, 74, 80, 98} 6PM
{19}{} 7PM
{20}{74, 80, 98, 74, 80, 98} 8PM
{21}{} 9PM
{22}{} 10PM
{23}{74, 80, 98, 74, 80, 98} 11PM
---------------------------------------------------------------------------------------------------------------------------------
The numbers 0-23 on the left are the hours of the day. The first three numbers in the brackets are the red blue and green (RGB) numbers that represent the outdoor lighting color. The second three numbers are the RGB value for indoor ambient light. The engine will automatically shift the colors of light between the entries in this file as the hours pass. If you enter the same colors for two entries in a row, the lighting will not change during that period.
If you wish to create your own custom lighting scheme, here is how you do it…..
After you have created your own lighting scheme, you will need to edit the schemes document and include the new file. You do this by selecting "edit—map—lighting—schemes". The file should look like this:
//
// Available ambient lighting schemes
//
//
// Each message specifies a new ambient lighting scheme. The text of
// the message is the base file name of the scheme message file contained
// in the Rules folder. Message 0 must remain unchanged, and message 1
// must exist and is the default lighting used if no other lighting scheme
// is specified.
//
{0}{<map default>}
{1}{Lighting Default}
{2}{Lighting Dungeon}
To add your new lighting scheme in, just add new entry. If your lighting scheme is named "green crystal caverns.mes", then your new file would look like this:
--------------------------------------------------------------------------------------------------------------------------------
//
// Available ambient lighting schemes
//
//
// Each message specifies a new ambient lighting scheme. The text of
// the message is the base file name of the scheme message file contained
// in the Rules folder. Message 0 must remain unchanged, and message 1
// must exist and is the default lighting used if no other lighting scheme
// is specified.
//
{0}{<map default>}
{1}{Lighting Default}
{2}{Lighting Dungeon}
{3}{Green Crystal Caverns}
Save this file and your new lighting scheme can be viewed in worlded from the "view—ambient colors—scheme" pulldown.
Keep in mind something. Some files are read in by worlded at the time of module loading. In order for new files to appear, such as lighting schemes, you must exit and reload your module.
Dynamic Lights:
  Dynamic lights are ones that you place into a scene. These lights only affect objects within their radius.
To place a dynamic light, select the environment tab and click on the light icon. If you click on the "select" button you will get different variations of lights you can place. By clicking on the edit button, you will be able to define the color of the light you are about to lay down.
Now, if you try to place a light into your scene now you might not be able to see it. The reason for this is that the outside ambient light is so bright you cannot see the dynamic light that has been placed. I usually start by selecting "view—ambient colors—scheme" and changing the time value to 20. This makes worlded display eight o’clock time of day colors (the time value is military time). Now that the light is less bright outside, you can see the lights you place into your outdoor scene. Indoors, by default, begins darker so lights can be placed and seen immediately on interiors.
To set a light to be a shadow, choose a light, place it, and right click on it and select "edit". Select the check box "dark (shadow)". Now anything that makes it into this light will be darkened instead of lit.
The Edit Menu:
When you pull down the Edit Menu in World-Ed, you will be given a number of options. This menu allows you to edit the various message files that determine the way that your module is played. These will be categorized and explained in the same order as they appear in the menu.
When you first pull down the menu, these are the options you will see:
Game
Map
Media
Objects
Scripts/Dialogs
Each of these menu options has sub-categories. All of the options and their sub-categories are listed below, in order of appearance.
Game:
Start:
Equipment (Autoequip.mes):
Here's an explanation of the various lines in Rules\AutoEquip.mes:
Money
------
Lines 1-5: Starting wealth for a character (backgrounds modify this amount
by a %).
Line 1: levels 1 - 10
Line 2: levels 11 - 20
Line 3: levels 21 - 30
Line 4: levels 31 - 40
Line 5: levels 41 - 50
Note if somehow you cheat and your level is beyond 50 this can cause the
game to crash.
Item lines
-----------
Item lines give the player an instance of the prototypes specified in the
braces for the given line. Depending on your character's attributes
different lines are processed. Additional lines are provided to prevent a
character from getting items if they already have a similar item.
Lines 100 - 515: Armor for a character
Lines 101 - 105: medium sized (magically biased >50)
Lines 201 - 205: small sized (magically biased >50)
Lines 301 - 305: medium sized
Lines 401 - 405: small sized
Lines 501 - 505: large sized
The number in the ones place (between x00 and x05) is determined from a
formula that factors your strength and level to decide what kind of armor
you have. The higher your strength and the higher your level the closer to 5
you'll actually get. This helps insure that a level 50 character (with a low
strength) doesn't end up getting plate mail armor (which he or she could not
carry).
The actual formula is:
n = ( ( level - ( 21 - strength ) ) + 9 ) / 10
The lines located 10 lines ahead of the calculated number are conditional
lines. If your player already has any of these items they will not get the
specified items.
Thus line 211 has the list of prototypes the character must not have in
order to get the items located on line 201. Which they would only get if
they were a small sized magically biased character.
Lines 600 - 609: Melee Weapons
Lines 700 - 709: Bow Weapons
Lines 800 - 809: Throwing Weapons
Lines 900 - 909: Firearms
The same rules apply as for armor only you must have rank in the respective
skills to gain these items. Then the formula used is as follows:
n = ( level + rank + 9 ) / 10
If no items were given via lines 600-909 then if your level is 20 or less
you get the items on line 1001. Otherwise if your magic aptitude is greater
than 75 then you get the items on line 1002, otherwise if its greater than
20 you get 1003, otherwise if your tech aptitude is greater than 75 you get
1004, and lastly if none of those happened you get line 1005.
Of course all of these have the +10 conditional lines applied to them as
well.
Lines 1100 - 1103: Lockpicks
Lines 1201 - 1203: Healing
Lines 1301 - 1303: Backstabbing
Same rules apply for weapons as for these utility items however the formula
is now:
n = ( level + rank + 29 ) / 30
Time (gameinit.mes):
Gameinit.mes allows the user set the game start year and starting hour. The year is input on line 4, while the starting hour is input on line 5. Time is written out using military time therefore 15 would be 3pm.
Story (StoryState.mes):
Allows the player to define what is displayed in the Save Game screen when a game is accessed through the load/save interface.
This is what you will see when you open the file:
// Story-State Information -- Currently used by the MainMenu for Load/Save
//
// These are general descriptions of what the player is doing at a given story-state
{0}{}
[NOTE: A quick description of Story State. In Arcanum, we defined certain states during the main story arc. We used these "Story States" as milestones in particular interactions so we could determine where the player was at any given moment during the game. We took these Story States, and generated StoryState.mes so that we could display for the player what he was supposed to be doing for completion of the main story arc for specific saved games.]
The mod builder can define his own story states by using scripts or dialogue, and then check against those states in his game. And by using StoryState.mes, he can display what the player is supposed to be doing at any point during his game.
An example:
{0}{Having landed on Death Island, it seems you must find a way to the Bald Mountain.}
{1}{Having disturbed the ancient lair of Cmoorogoth, you must now either find a suitable sacrifice, or face him in combat.}

If a player were to start the game and save immediately, he would see the description in line 0 appear in the Main Menu for Load/Save. After speaking with the Cmoorogoth in his lair, the story state would be set to "1" (probably in the dialogue with the dreaded beast), and then a save game would display the description in line 1.
Quests:
Data (gamequest.mes):
The main purpose of Gamequest.mes is to set the experience level and alignment adjustment the PC will receive for completing a specific quest. The secondary purpose is to store data for use by the generated dialog system.
For example, here are two quests as you would see them in Gamequest.mes:
{0001}{1 0 -1 -1 -1 -1 -1 -1 -1 -1 -1 -1 -1 -1 -1 -1 -1 -1 -1 -1 -1 -1 -1}
{0002}{25 -200 -1 -1 -1 -1 -1 -1 -1 -1 -1 -1 -1 -1 -1 -1 -1 -1 -1 -1 -1 -1 -1}
 
The only numbers you will probably care about are the first three. The first bracketed number is the quest number. The first two numbers in the second set of brackets are the experience level for the quest and how much it will affect the PC’s alignment when completed.
The next 21 numbers are used by the Q: generated dialog operator. These numbers are arranged in three banks of seven numbers each. The banks, in order, are normal dialog, bad reaction dialog (used if the PC has a reaction of 20 or lower), and stupid PC dialog (used if the PC has an intelligence of 4 or lower). Each of the seven numbers in each bank is the dialog entry point for the quest in each of its seven states. The number refers to a PC dialog line which will be used in place of the Q: line based on the associated quest state. You can use a –1 to indicate no dialog line, meaning no message will be printed.
For more information on the seven states of quests, see EventScripts.doc.
So therefore, the first quest is 0001. It will give the PC the experience points for a level one quest, and will change his alignment by 0. The second quest listed is 0002, which is a level 25 quest and will reduce the PC’s alignment by 200.
Log Entries (gamequestlog.mes):
Gamequestlog is used to display the descriptions for quests in the logbook of players with an intelligence of 5 and above.
You will see this when the file is opened:
{1000}{This is what appears in the log for quest 1000.}
This is a very straightforward file. The number in the first set of brackets corresponds to the number of the quest. So if you were to set a quest state in scripts or in dialogue, this is the quest number that you will use.
For example, the script command to set a quest state is:
Set PC (obj) quest (num) to state num
The "quest (num)" here would be 1000.
IMPORTANT: If you want the logbook to display "stupid" descriptions for players with an intelligence of 4 and below, then you must update gamequestlogdumb.mes (see below) in tandem with this message file.
 
Log Entries for Dummies (gamequestlogdumb):
Gamequestlogdumb.mes is used to display the descriptions for quests in the logbook of players with an intelligence of 4 and below.

This file works exactly the same way as gamequestlog.mes, and must be kept in tandem with that file.
Map:
Areas (gamarea.mes):

Gamearea.mes is used for various features concerned with the World Map. Unfortunately, you cannot currently create your own World Maps, but there are a few things that gamearea.mes will be useful for in your mods.
When you open the file, you will see this:
// Area -- List of areas
// X-Coord, Y-Coord /Name /Description./Radius:<#>
//
// Coords are on the main world-map. Radius is detection radius (in sectors),
// in other words, the # of sectors that the player must pass near it on the
// WorldMap to make it visible if it isn't already known; default value is 5.
//
{0}{0, 0, 0, 0 /A Place Unimportant/This is the unknown area.}
Area (0) is used for the "unknown area" and should not be changed (this will be explained in a moment). The first set of coordinates is the placement of the area on your primary map (for example, Tarant was 62243, 65664 in Arcanum.) The next set of numbers is not important now, but must be there in order for the game to run. For now, keep them at 0,0.
The next two text fields are the name of the area, and a short description of the area. So, the following entry was made for Tarant in Arcanum’s gamearea.mes:
{21}{62243,65664, 0, 0 /Tarant/The biggest, most industrial city in Arcanum.}
Radius values are unimportant for now. You need not enter anything.
The reason you might want to enter values into your gamearea.mes is because there are mechanics, both in dialogues and scripts, to check against the area that the player is in. If you wanted certain dialogue options to only appear when the player is in a certain area, then you could check against that area in the test field of your dialogue. In order to be able to check against an area, that area must be entered in gamearea.mes, and also must have a Townmap associated with it.
Lighting:
For information on lighting, see General Lighting.

Random Encounters (wmap_rnd):
 
The random encounter tables allow the user to specify the creatures or beings the player will come across as they travel the world via the world map.
When the game checks for a random encounter, it checks for a number of things. First, it checks for Frequency, which determines how often to check for random encounters. If a random encounter triggers, the game then checks to see if the area is using a user-defined Encounter Index table. If one is being used, then the game will default to that table. If it is not, then it determines what terrain type the PC is on. Next it checks the Power Level of the area. Once all of these checks have been made, the game goes to the appropriate table based on the information it gathered from the checks.
There are 3 types of charts that are used in Arcanum, Frequency charts, Power charts and Encounter Index charts. Frequency charts determine the chance that an encounter will happen within the specified area. Power charts determine the severity of the encounter. Lastly Encounter Index charts enable the user to place encounters independent of the terrain type.
Each chart contains four fields. The first three fields in each of the chart types are universal. The first two entries being the x-y coordinates from the world, and the third being the radius, in sectors. The fourth entry is unique to each of the charts. The fourth entry for the Frequency chart indicates the percent chance per day that an encounter will occur. The fourth entry for the Power chart indicates the power of the encounter and can be set to either easy, average or powerful. The fourth entry in the Encounter Index chart refers to a user-defined table that will be called on in that area.
There are 47 random encounter tables. Each table covers a specific terrain type, power level and day or night cycle. There are 16 terrain types, each terrain type uses 6 different tables that cover the three power levels of easy, average, and powerful for both day and nighttime encounters. Any of these tables can have up to 100 different entries, each representing a possible encounter.
Beyond the 47 terrain-based tables are the unique encounters starting at table 54 or line 55400. Each additional table is numbered consecutively in increments of 100. So if you were to add new tables to this section, the next table (55) would start at line 55500. (NOTE: For each "user defined" table that gets created, you must increment line 49999 of the message file needs so that it reflects the total number of "user defined" tables that exists.)
Each entry in a table (line 50000 and above) has a number of parameters that can be used to create an encounter. For any entry to be valid it will need at least 3 parameters set; Frequency, Creature Proto Number and Critter Count. The following is an explanation of each of the parameters that may set on any given line of a table.
<value>% (Frequency) - this entry indicates the percent chance that the given encounter will trigger. Note that the all the frequencies do not have to add up to 100%, the chance will be base on the total number of entries. This parameter is required on each line.
First: <protonumber>, <number appearing> - this parameter represents the first creature or creatures that will appear in the encounter. The creature is specified by inputting it’s proto number, which can be found in description.mes. After the proto number, separated by a comma, is the number appearing. This entry accepts single digits as well as ranges. For example, "2" would create 2 creatures of the proceeding prototype, while "1-4" would create anywhere from 1 to 4. This parameter is required on each line.
Second: <protonumber>, <number appearing> - Same as First, but not a required field.
Third: <protonumber>, <number appearing> - Same as First, but not a required field.
Fourth: <protonumber>, <number appearing> - Same as First, but not a required field.
MinLevel: <value> - this parameter allows the user to set the minimum level that the PC needs to be in order to get the encounter.
MaxLevel: <value> - this line allows the user to set the maximum level the PC can be to get the encounter. Once the PC’s level exceeds this value he will no longer get the encounter.
GlobalFlag: <global flag> - this entry allows the user to specify a global flag which controls whether the given encounter is given or not. If the specified global flag is 0, the encounter will not trigger, if the flag is 1 it will. The user can turn on and off global flags via scripts and dialogs. For instance you could put a script on the "insert" of an inventory object of a statue that sets global flag 0002 to 1 turning on hoards of monsters all across the world. The "remove" script of the item could set it back to 0.
TriggerCount: <value> - this parameter sets the number of times an encounter will trigger. For example if the TriggerCount was set to 2, the encounter would only come up twice then never again.
Note that each entry in a line must be separated by a [comma] [space].
 
 
TownMaps (townmap.mes):
Town maps allow the player to see where he is and where he as been more easily. They provide an isometric view similar to the one you see while playing, but zoomed very far away. If define areas of your map as townmap locations the editor can generate the maps automatically. The process for accomplishing this is below.
Open "edit—maps—townmaps". This will open the townmap.mes file. An example of what you will see is below.
 
//
// TownMap Info
//
// The first entry must be left as (0)(<none>)
//
{0}{<none>}
{1}{my town}
 
Just replace "my town" with the name of whatever you want town-mapped. If you have multiple areas you want town-mapped, just add more entries.
Example:

{0}{<none>}
{1}{Redstone Lake}
{2}{Mantaville City}
{3}{Dragons Canyon}
YOU MUST NOT REPLACE THE "0" LINE. The engine expects this line to be the way it is.
If you want the player to be able to "wait" while on your map, you must set a flag within the townmap.mes file. Setting this flag will automatically unfog your map and allow the player to have access to the wait menu within the game. The flag is "[w:1]". Here is an example using the previous entries:
{0}{<none>}
{1}{Redstone Lake [w:1]}
{2}{Mantaville City [w:1]}
{3}{Dragons Canyon}
Now that I have set these entries, Redstone Lake and Mantaville City will be unfogged and waitable when the townmaps are processed. Dragons Canyon will be fogged and there will be no waiting while in this area.
After you have edit the townmaps file, you must save and close your module. Now re-open your module and go to whatever area you want town-mapped. Select the top down view and zoom out using the "-" key on the numeric keypad. You will see some yellow lines in this view. These yellow lines are defining areas of space called "sectors". Right click on one of these sectors and select "townmap". This will bring up a pulldown menu. Select whatever name is appropriate to your area and hit "ok". You will notice the sector lines for that area have changed colors to indicate a townmap has been defined. If your town/dungeon is large, just repeat the above process for the other surrounding sectors.
Now.... go back to your isometric view. WorldEd will generate the townmap based on which view you are in, so make sure you are in the isometric view. Go to "tools" and hit "generate town maps". It will ask you some questions that I will explain.
If you have not saved your map since you last made changes, it will ask you, "do you want to save your map?"
It is important that you save your map because the changes you have made will probably be reflected in the townmap. For example, if you have created a park, process your townmap, then don’t save your map you will see the park on the townmap and not while you are playing the game.
It will ask you if, "This will generate all townmaps for all maps in the current module. This could take awhile, are you sure you want to continue?"
Sometimes I can take some time to generate townmaps depending on how many townmap areas you have defined. All functions of WorldEd are frozen while townmaps are being generated, so WorldEd is just making sure you can commit the time to let it process.
Then it will ask if you,"Do you wish to overwrite all existing townmaps?"
WorldEd has the ability to let you process only the townmaps that haven’t been processed yet. So if you want it to recreate the existing ones (in case you have made some changes) then click yes. If you have 3 complete villages and you just added a fourth, you can click "no" and it will only process the fourth village.
The next question is,"You are about to delete all files from the townmap folder in the current module. Are you sure you want to do this?"
It will only ask this if you answered yes to question 3. It’s just double checking to see if it’s ok to flush the existing townmaps and replace them with new ones.
It will begin processing as soon as the last question is answered. You might notice that when it is done, you will be on a different map than the one you started on. That's ok. In order for WorldEd to calculate the townmaps it has to load everymap and check to see if there are townmap locations it needs to process. Sometimes it finishes on an odd map.
Now if you load your mod and go to that area, you will be able to see your townmap by clicking on the townmap icon!
Media:
Movies (movies.mes):
Movies.mes is used to define a value for in-game cinematics. This number is accessed through scripts when the mod builder wants to play a movie.
This is what you will see when you open the file:
// movies.mes
//
// NOTE: movie 0 is reserved (it means the empty non-movie to scripts)
{0}{reserved - do not use}
{1}{} // Opening Movie
{2}{}
{3}{}
{4}{}
{5}{}
{6}{}
{7}{} // Opening Movie 2
Line 0 is reserved, but the following lines can be defined by entering the number and the exact name of the file.
IMPORTANT! This file is a little convoluted. First, the easy part. When a single-player mod loads, it will look to see what file is in position 1, and play the file as the opening movie. BUT!!! As soon as that movie is over it will look to see if there is a file in position 7 and play that as well. So, if you don’t want to have two movies play consecutively at the outset of your game, then don’t define a movie for position 7 (or for position 1, if you don’t want any movie to play.)
All other movies can be called with the following script command:
fade: pass (num) seconds, play (num) sound, and play (num) movie with (num) seconds during fade
The line number in this message file would be entered into the "movie (num)" field.
The engine only recognizes and displays Bink movie files.
Portraits (userport.mes):
Userport.mes allows the mod builder to make custom portraits available to the player.
Each portrait is a 256 color BMP file that is 64 x 64 pixels. Its name should have a three letter prefix which is 2 letters for race and one letter for gender. This prefix defines which race-gender combination of a PC or NPC can use this portrait.
The race prefixes are
HU - human
DW - dwarf
EL - elf
HE - half elf
GN - gnome
HA - halfling
HO - half orc
HG - half ogre
The gender prefixes are
M - male
F - female
Special prefixes
NPC - this portrait is useable only by NPC's, regardless of race or gender
ANY - anyone (PC or NPC of any race or gender) can use this portrait
Examples:
{1}{ELM1} means there is a portrait named data/portrait/ELM1.bmp which is
only available to elf males
{2}{ANYpretty} means there is a portrait named data/portrait/ANYpretty.bmp
which is useable by anyone
{3}{NPCbob} means there is a portrait named data/portrait/NPCbob.bmp that isavailable to any NPC but not to PC's
For the larger versions of the portraits you can create a 128x128 BMP and append "_b" to its name. So if you have a regular portrait file called ELM1.bmp you can create another called ELM1_b.bmp to be used for the bigger portrait. This does not have to be added to the userport.mes file, the game will automatically detect and use it. If the _b file does not exist, the game will simply scale up the smaller version.
 
Slides (slide.mes):
Slide.mes controls the end slides, credits, and death screen the player will see in the game. Upon opening this message file, you will see this:
// This file enumerates the slide in the game. Slides can be added via the script slide
// command in one of these scripts:
//
// 997 - called when a script has ended the game
// 998 - called when the player has died
// 999 - called when in-game credits are requested
//
// Note that NO script is called when the game ends through the player exiting the game.
// Each slide lists a BMP and an MP3. The bmp is an 8-bit BMP located in the module's
// Slide directory. The MP3 must be located in the module's Sound/Speech/Slide directory.
// Note: slide 0 is the DEFAULT death slide. If the player dies and no slide is queued by
// script 998, then slide 0 is used.
{0}{death.bmp DeathSound.mp3}
{1}{DeadWorld.bmp v41_m.mp3}
{0} and {1} are the slide numbers the scripts reference. So if I wanted to queue up these end slides (depending on whether a certain global flag had been set or not), my script might look like this:
0. If Global Flag 2632 = 1
THEN do nothing
ELSE goto line 3
1. slideshow: queue slide 1
2. Return and RUN default
3. slideshow: queue slide 0
4. Return and RUN default
Sounds:
General (snd_user.mes):
To add sounds to a module, copy the desired .WAV file into the sound directory and add it to the index in snd_user.mes starting at line 6000. Once this is done, the sound can be played via scripts.
Scheme Data (schemelist):
The schemelist allows the user to specify music as well as collections of sounds to create ambient environments. Some of the sound schemes found in the schemelist are embedded in the terrain sector data i.e. Forest sectors play a certain music and ambient scheme. Beyond that, sound schemes then can be assigned to a map as a whole or on a sector by sector basis. Schemes can also be called in scripts. In Arcanum, tile scripts were placed on either side of the thresholds (doors, windows) of certain buildings. When you crossed the tile into the building, the script turned on a scheme of ambient sound (such as a blacksmith’s shop) and changed it back to the default upon leaving the building.
Though there is no physical restriction on where music and ambient schemes can be listed in the file, we at Troika have decided to allocate half of the list to music (lines 100-2900) and the rest to ambient schemes (lines 3000+).
When adding sounds to schemelist, all the sounds listed need to be in the sound directory. Note that MP3’s are always streamed from the disc and WAV’s are cached into memory. Therefore, music should always be in the MP3 format and sound effects should use the WAV format.
Each entry in the schemelist is separated 100 lines, this allows for 100 sounds that can be played for a given scheme. Each line first has a file that is in the sound directory listed. For example {3000}{LEVEL_UP.WAV}. After the name a number of parameters can be specified, allowing the user to control things such as volume, balance, etc. Below is a list of all the legal parameters.
/LOOP - causes the sound to loop indefinitely until that scheme is exited. Loop is exclusive of all other controls except VOL and TIME.
/ANCHOR - this is a one-off song. Play it immediately at the start of this scheme and then stop.
/OVER - this is a one-off song. At its termination, it brings back the previously-playing scheme. WARNING: You can only have one /OVER sound per scheme. If you have multiple ones, the first one that ends will cause the previous scheme to reload.
/FREQ: - frequency of occurrence (0-100) (default: 50)
/TIME: - range of times (in 24-hr units) (default: 0-23 inclusive)
/TIME:6-8 ; from 6am to 8am
/TIME:19-21 ; from 7pm to 9pm
/TIME:12 ; only during the hour of noon
/BAL: - range of balance ((L)0-100(R)) (default: 50)
/BAL:50 ; always centered
/BAL:30-70 ; range from left to right a bit
/BAL:0-100 ; can spread left/right anywhere
/VOL: - range of volume (0-100) (default: 100)
/VOL:10-50 ; ranges from pretty quiet to half-loud
/VOL:80-100 ; ranges from pretty loud to full volume
/SCATTER: - range of scatter (sets /BAL and /VOL) (default: 50)
/SCATTER:0 ; equivalent to: /VOL:100 and /BAL:50 (this is default anyway)
/SCATTER:50 ; equivalent to: /vol:50-100 and /BAL:25-75
/SCATTER:100 ; equivalent to: /vol:50-100 and /BAL:0-100
Scheme Index (schemeindex):
The schemeindex indexes all of the sound schemes found in schemelist.mes. Each line number corresponds to the scheme’s first line in schemelist/100. For example the scheme starting at line 3000 in schemelist.mes would be indexed at line 30 in schemeindex.mes. In the second set of brackets goes the name of the scheme (this will be the name you see in WorldEd) followed by #number of the scheme. For example line 30 of the scheme index would read like this: {30}{SchemeName #3000}.
Objects:
Critters:
AI (gameai.mes):
GameAI.mes lets you add new AI packets for the NPC’s in your game. player.
When the file is opened, you will see this:
// This file contains parameters for AI packets in NPC's.
// The numbers on each line have the following meaning:
// Given a line N with data D1 D2 D3 D4 D5...
// The values stand for:
// ---- the first five are fleeing params
// D1: percentage of NPC hit points below which NPC will flee
// D2: number of people besides PC beyond which NPC will flee
// D3: number of levels above NPC beyond which NPC will flee
// D4: percentage of PC hit points below which NPC will never flee
// D5: how far to flee, in tiles
// ---- the next five are follow params
// D6: the reaction level at which the NPC will not follow the PC
// D7: how far PC align is above NPC align before NPC wont follow
// D8: how far PC align is below NPC align before NPC wont follow
// D9: how many levels the NPC can be above the PC and still join
// D10: how much an accidental hit will lower a follower's reaction
// ---- the next two are kill-on-sight (KOS) params
// D11: NPC will attack if his reaction is below this
// D12: how different alignments can be before NPC attacks
// ---- the next param controls spell use
// D13: chance of throwing defensive spell (as opposed to offensive)
// D14: chance of throwing a healing spell in combat

// Start your new packets at 100, and you can go up to 149
{100}{0 1000 1000 101 1 20 1001 1000 2 0 0 1001 50 100} // generic AI
You can add new packets starting at line 100 and up to line 149. Each of the 14 parameters on each line control the corresponding AI behavior described at the top of the file. You can then set the NPC to use this packet by editing the field "AI Data" in a critter to be equal to your packet’s line number.
 
Blessings (gamebless.mes):
Gamebless.mes allows the mod builder to define blessings for the player.
When the file is opened, you will see this:
// This is the Bless Message File
// Each Bless starts on a multiple of 10
// The first line is the log entry. This line is mandatory.
// The second line is the effect number that should be applied when the Bless activates. This line is mandatory.
// The third line is the message that appears when the Bless activates. This line is optional.
{500}{Blessing} Blessing Name
{501}{1} Effect Number
{502}{You have been Blessed} Message
 
The blessing name is what appears in the logbook when the player is given a blessing. The effect number corresponds to a number in effect.mes (data/Rules) which determines the effect of the blessing. The message is what is displayed in the message window when the player gets the blessing.
IMPORTANT: You can only add or remove blessings through scripts. The number you will call in order to add a blessing is the Blessing Name number divided by 10.
For example:
{500}{cmoore’s blessing}
{501}{15}
{502}{You have received the blessing of cmoore!}
If you wanted to add this blessing through a script, you would add blessing 50 (500/10).
The next blessing would start at 510, and so on.

Curses (gamecurse.mes):
Gamecurse.mes works exactly the way that gamebless.mes works. (See above).
This is what you will see when the file is opened:
// This is the Curse Message File
// Each Curse starts on a multiple of 10
// The first line is the log entry. This line is mandatory.
// The second line is the effect number that should be applied when the Curse activates. This line is mandatory.
// The third line is the message that appears when the Curse activates. This line is optional.
{500}{Curse} Curse Book entry
{501}{2} Effect Number
{502}{You've been cursed.} Message Window Text
You will notice it looks almost exactly the same as gamebless.mes. Curses, just as blessings, can only be given and removed through scripts.
Factions (gamefaction.mes):
Gamefaction.mes is used to define the values and the names of the factions for NPC’s in the game.
This is what you will see when the file is opened:
// Factions begin at 150.
{150}{CMOORE's test faction}
The first set of brackets is the number that will be accessed by NPC’s when they check against reaction modifiers. These modifiers are defined in gamerep.mes (data/Rules), and are based upon the player’s reputations.
The second set of brackets is the name of the faction. This name will appear in World-Ed, under the faction pull-down menu for NPC’s. In this way, a mod builder can define specific factions for individual NPC’s.
Generated Dialogs:
Reputations (game_rp_npc*.mes):
These message files define how NPC’s in the game will greet the player based on his reputation. Throughout the game the player will acquire certain reputations based on his/her actions, and NPC’s can comment on those via the use of this message file.
There are four options below Reputations. They are, in order of appearance:
Female to Female (Game_rp_npc_f2f.mes)
Female to Male (Game_rp_npc_f2m.mes)
Male to Female (Game_rp_npc_m2f.mes)
Male to Male (Game_rp_npc_m2m.mes)
These four files determine the language used depending on the gender of the characters involved. Game_rp_npc_f2f is the file that governs all female-to-female interactions (f2f). This allows the NPC’s to remark on the players gender, as well as their reputation. It also allows a mod builder to customize the language of his NPC’s based on their gender.
When you open any of the files, you will see this:
// This section is for REPUTATIONS in the game.
// THESE ONLY GET USED BY THE GREETING OPCODE
// start at 1000
{1000}{}
The numbers in the first bracket correspond to the numbers in gamereplog.mes (in data/mes) and gamerep.mes (in data/Rules).
An example—let’s say you defined a reputation in your mod called "Assassin of Gilbert Bates". You might then enter this line:
{1000}{Hey! Aren’t you the fellow that killed Gilbert Bates? Bloody murderer, you are!}
NPC’s will randomly comment on this reputation, if their origin or faction has been defined to do so. You must be sure to enter responses in all four files, as empty fields will generate no comments whatsoever concerning reputation.
Rumors & Notes (game_rd_npc*.mes):
These message files allow the mod builder to create his own rumors and notes in the game. Rumors and notes are recorded in the player’s logbook, and can be activated using either dialogue op-codes or script commands. Rumors can be quelled as well (ie, crossed out in the player’s logbook), again using either dialogue op-codes or script commands.
There are five options under Rumors. They are, in order of appearance,
Female to Female (Game_rd_npc_f2m.mes)
Female to Male (Game_rd_npc_f2f.mes)
Male to Female (Game_rd_npc_m2f.mes)
Male to Male (Game_rd_npc_m2m.mes)
Dummies (Game_rd_npc_m2m_dumb.mes)
Rumors and notes are handled exactly the same way, but you may want to use them differently depending on your module.
These five files determine the language used depending on the gender of the characters involved. Game_rd_npc_f2f is the file that governs all female-to-female interactions (f2f). So, if you wanted a female NPC to speak a rumor differently than a male, you could make it so. Game_rd_npc_m2m_dumb is used for all dumb logbook entries.
Once the file is open, you will see this:
// This section is for RUMORS in the game.
// THESE ONLY GET USED BY THE RUMOR OPCODE
// start at 20000
// rumors start at rumor number * 20
// the first message is the logbook message
// all others are filled in based on NPC's social class
{20000}{}
In so many words, this means that when you use the rumors in dialogue, or you access a rumor in scripts, this is the file that it will reference. Rumors are banked in groups of 12 lines starting on multiples of 20. The first line is what is printed in the logbook. The next 11 are categorized by social class—in other words, how a particular NPC type will speak the rumor to the player.
The social class distinctions are as follows:
1 class_noble
2 class_priest
3 class_wizard
4 class_technologist
5 class_shopkeeper
6 class_guard
7 class_city_dweller
8 class_villager
9 class_beggar
10 class_thief
11 class_bandit
So. Let’s say you wanted to include a rumor in the game that there was a band of orcs down by the river. You would enter the rumor as follows:
{20000}{Rumor has it that there is a band of orcs down by the river.} Logbook Entry
{20001}{It seems there’s a band of dirty orcs down by the river!) Noble Response
{20002}{I’ve heard there are a group of poor orcs down by the river…} Priest Response
……..
{20011}{No thievin’ to be had with those bloody orcs down by the river…} Bandit Response
And so on. The next bank of rumors would begin at 20020.
IMPORTANT! You must always at least include the noble response in the "m2m" file. If none of the other class distinctions are present, then they default to the noble response in this file.
It’s a bit confusing, but the number that you will reference to access a rumor is the line number (20000) divided by 20. For example, if you wanted to add a rumor to the player’s logbook through a script, you would use the "rumor: set rumor (num) for pc (obj)" action command in Scriptmaker, and enter 1000 in the number field. (20000/20 = 1000). And remember, the only line you care about is the first line. All the other lines are used by the engine to generate different responses from NPC’s.
There is no difference between rumors and notes as far as this file is concerned. If you wanted to add a note to the PC’s logbook, you would enter it just as you would a rumor (either in the result field of a dialogue, or using the add rumor command in scriptmaker). Obviously, a note doesn’t need the 11 different NPC responses, so you don’t need to include them. (So for a line that is ONLY a note, you don’t need to include the noble response.)
Reputations:
Data (gamerep.mes):
Gamerep.mes is used to set the effects a particular reputation will have on a PC including reaction adjustment, the origin and/or faction of people who will care about the reputation, and can even grant a particular faction to the PC.
The faction numbers are the same as the numbers in Game_rp_npc.mes, which governs what NPCs may say to the PC if he has a specific reputation.
This is what you will see when you open Gamerep.mes:
// Game reputations start at 1000
// Each reputation starts with 3 faction numbers, indicating the three
// factions that will treat the reputation owner as being part of their
// faction. One or all of these faction numbers can be zero, which is
// the empty faction.
// Each reputation can then have up to 5 effects, separated by commas
// Each effect is 3 numbers, separated by spaces
// The first number is a reaction adjustment
// The second number is an origin (0 means ANY origin)
// The third number is a faction (0 means ANY faction)
// Examples:
//
// 0 0 0, -20 1 0, +30 2 0
// The reputation grants no faction to the PC, but he has a -20
// reaction from any NPC from origin 1 and a +30 reaction from any
// NPC from origin 2
//
// 1 10 0, -10 0 0
// Any NPC from factions 1 and 10 will treat the PC as being on that
// faction, and every NPC responds with a -10 reaction
//
// 1 0 0, +10 0 1
// Any NPC from faction 1 will treat the PC as being in that faction,
// and all NPC's belonging to faction 1 respond with a +10 reaction
//
// 0 0 0, +15 2 1
// The reputation grants no faction, but an NPC from origin 2
// belonging to faction 1 gets a +15 reaction to the PC
 
Here’s an example reputation:
{1025}{0 0 0, -25 13 0, -35 6 0, -25 3 0, -25 21 0, -25 8 0}
This is reputation number 1025. The rest of the numbers should be fairly self-explanatory from the above examples.
Log Entries (gamereplog.mes):
Gamereplog.mes is used to display the names of reputations in the player’s logbook.
This is what you will see when you open the file:
// Game reputations start at 1000
{1000}{}
This is a very straightforward file. The number in the first set of brackets corresponds to the number of the reputation defined in gamerep.mes (data/Rules). When a reputation is given to the PC, using either scripts or dialogue, this text in the second set of brackets is displayed.
Descriptions (gamedesc.mes):
Gamedesc.mes is used to name objects in Arcanum.
When the file is opened, you will see this:
// Known or Unknown Descriptions
{30000}{}
When an item is laid down in World-Ed, the mod builder will have the option of giving it a unique name for both its Known and Unknown states. This is the file that it will draw from.
An item that is defined as Unidentified in World-Ed will display the name in the Unknown field in World-Ed, until it has been identified. Then it will display the name chosen for the Known field. Both fields draw from this message file.
Names must be numbered from 30000 and above. Previous numbers are used by the engine, and should not be tampered with.
An example:
{30020}{Strange Gun}
{30021}{cmoore’s Ultimate Gun of Death}
A gun places in World-Ed, and flagged as unidentified, can have the "Strange Gun" description in its Unknown field, and " cmoore’s Ultimate Gun of Death" in its known field.
Internal Names (gameoname.mes):
Gameoname.mes is used to define internal names for objects in the game.
When this file is opened, you will see a fairly extensive list of object types and number ranges.
A quick explanation of internal names is in order. In reality, internal names are numbers. They are used in scripts and dialogues to identify a particular object. For example, a quest item will have an internal name, and because of that an NPC will realize that you have the object and will offer to trade, finish the quest, etc…
When an object is laid down in World-Ed, the mod builder will have the option of giving it a unique name. Depending on the type of object (ie, weapon, scenery, NPC), there will be a limited number of options for which internal names are available. Those limitations are outlined in this message file.
For example, the ranges for weapons are listed in the message file as follows:
// Weapon ranges from 2200 - 2399
{2200}{Weapon}
Now I define a couple of internal names:
{2200}{Cmoore’s Blade of Pain}
{2201}{Tim’s Sword of Brilliance}
Now when I lay down a sword in World-Ed, I can give it either one of these internal names.
I can check against these internal names, both in scripts and dialogues. For example, the script conditional
(obj) has item named (num)

the "(num)" refers to the internal name. If you were checking to see if the player was carrying Tim’s Sword of Brilliance, you would enter 2201.
Items:
Effect Descriptions (gameitemeffect.mes):
This file allows the mod builder to define the effect descriptions for particular objects, such as armor and weapons.
When the file is opened, you will see this:
// Known or Unknown Item Effect Messages
{30000}{}
The mod builder, when editing certain items in World-Ed, can choose what the item’s effect description will be. This effect description will display in the message window, just below the item’s name.
IMPORTANT: If no effect description is chosen, the engine will generate a description based on the item’s attributes.
An example:
{30122}{D:1-6 (+20 to Critical Failure)}
This effect might be chosen for a sword that increases the player’s chance at critical failure.
Keys (gamekey.mes):
This file is where the mod builder defines the KeyID for keys, as well as writing the description for that key.
This is what you will see when you open the file:
// These are the key numbers currently assigned in the game
// and the descriptions of keys with those key numbers.
// You should add a message here if you make a key or a lock,
// so that no one else makes a key using your number
// NOTE: key numbers 0 and 1 are reserved
{0}{}
KeyID numbers are used to determine which keys will open locks in the game. In World-Ed, you can enter the KeyID numbers for both locks and keys—locks can only be opened by keys with the same KeyID, with these two exceptions:
0 - no key will open this lock or this key opens nothing
1 - any key will open this lock or this key opens any lock
The description of the keys is used for the name of the keys displayed on the screen.
Written Items:
Books (gamebook.mes):
Gamebook.mes is used to when displaying book text in the game.
When the file is opened, you will see this:
// This message file contains text to be used in game-supplied books.
// Only the message line numbers 1000 or higher are valid.
// Format: each line begins with a font number and justification letter,
// followed by the text for that line. Each line becomes a paragraph in
// the book.
// Some font numbers to use:
// 37 Book Type
// 497 Script
// 171 Old English
// 28 Mage Type
// Justification letters (you must use one)
// l = left
// c = center
{1000}{37c Test message line.}
The first set of brackets is a number that is referenced by the "start line" of a book object in the game. This is how the engine knows which text to display for a particular book when it is used.
There are a few important things to notice about the second set of brackets. Gamebook.mes allows the mod builder to choose between four different fonts. One of them MUST be defined in order for the text to display correctly when a book is used. It also allows the mod builder to choose his justification style: left or center.
A book can be no longer than 10 lines in gamebook.mes. There is a 2000 character limit for every line.
An example:
{1031}{171c The quick brown Dragon jumped over the lazy Oregolem.}
This line would print the written text in Old English, center-justified on the page of the book. The start line of that book, when edited in World-Ed, would be 1034. The next book would begin at 1040.
Gamebook.mes recognizes carriage returns. These are useful if you want to customize the spacing in your book. For example, to have the title of the book appear in the middle of the first page.
The Book interface can be called through scripts as well. The command that is used is:
Written UI: Start book (num) for reader (obj).
The (num) refers to the line number in this message file. This command allows you to call the book interface in different situations. For example, when clicking on a piece of scenery that is a bookstand.
Newspapers (gamenewspaper.mes):
Gamenewspaper.mes is used to define the text for newspaper objects in the game. It works very much like gamebook.mes (see above), with a few changes.
This is what you will see when you open the file:
// This message file contains text to be used in game-supplied newspapers
// Only the message line numbers 1000 or higher are valid
// Each new newspaper begins on a multiple of 10, and can use up to 10
// lines, which must be consecutive. The first line is always the main
// headline, while the 9 remaining lines go into 4 columns of the paper.
// Format: each line begins with a font number and justification letter,
// followed by the text for that line.
// Some font numbers to use:
// 490 Extra Large Headline
// 486 Large Headline
// 492 Normal Headline
// 483 Story Body
// 488 Clip Art 0-6
// Justification letters (you must use one)
// l = left
// c = center
Some UI-necessary files then follow.
The first set of brackets is a number that is referenced by the "start line" of a newspaper object in the game. This is how the engine knows which text to display for a particular newspaper when it is used.
A few important things to remember about gamenewspaper.mes. The font is always the same, but the font size is determined by the first number in the second set of brackets. As with gamebook.mes, the justification must also be defined. So, to make an extra-large, centered headline in your paper, you would enter:
{1000}{490c CMOORE KILLS ALL MAGES!}
To enclose a paragraph of text between two lines (above and below, to break up the layout of the page), you would use the "_" character, before and after the text. An example:
{1001}{492c _ Should He Get the Chair? _ }
Notice the spacing between the "_" and the text. This is very important, as the text and lines will not displayed correctly if the spacing is inconsistent.
There character limit per line is 2000, but any article that is longer than the allotted space on the newspaper interface will be cut off where the space runs out.
Notes (gamenote.mes):
This file is used to define the texts for note objects found in the game.
This is what you will see when you open the file:
// This message file contains text to be used in game-supplied notes.
// Only the message line numbers 1000 or higher are valid
// Each new note begins on a multiple of 10, and can use up to 10
// lines, which must be consecutive. Each line appears in the note
// as a paragraph.
{1000}{My dearest Raven,
Although I must leave on my search for the Dark Elves, I shall keep the moments we shared safely in my heart. I can only hope that one day we will again walk the trees of Qintarra hand in hand.
Forever I am yours,
Renford A. Terwilliger}
{1010}{} Next Note
The first set of brackets is the "start line" value you will use when editing note objects in World-Ed.
Notes, unlike books and newspapers, only have one font and one size for that font. They also do not have a choice in justification style; they are always left-justified. Like books and newspapers, you can only have 10 lines defined per note, but the note must fit on the single page of the note interface.
The first line in this message file is an example, a note used for Arcanum. Note the use of carriage returns and spacing to achieve the desired effect. This example can be deleted and written over, if you so desire.
 
Plaques (gameplaque.mes):
Gameplaque.mes is used to define the text for the plaque interface in the game. Plaques, unlike books, newspapers or notes, do not have an item associated with them. (They were used for the pagan gods’ altars in Arcanum.)
When you open the file, you will see this:
// This message file contains text to be used in game-supplied placques.
// Only the message line numbers 1000 or higher are valid.
// Format: each line begins with a font number and justification letter,
// followed by the text for that line. Each line becomes a stanza in
// the plaque.
// Some font numbers to use:
// 37 Book Type
// 497 Script
// 171 Old English
// 28 Mage Type
// Justification letters (you must use one)
// l = left
// c = center
{1000}{}
Gameplaque.mes gives the mod builder access to fonts and justification styles, just as in gamebook.mes. There is a 2000 character limit per line, and a 10-line limit per plaque entry. Each plaque entry will begin on a multiple of 10, starting with 1000. Again, as the plaque interface is only a single page, any lines that can’t be displayed due to space limitations will be cut off.
The plaque interface can only be brought up in scripts, using this command:
Written UI start: plaque (num) for reader (obj)
Where the (num) is the line number in this message file.
Telegrams (gametelegram.mes):
This file is used to define the text that is displayed when a telegram object is used in the game.
This is what you will see when you open the file:
// This message file contains text to be used in game-supplied telegrams.
// Only the message line numbers 1000 or higher are valid
// Each new telegram begins on a multiple of 10, and can use up to 10
// lines, which must be consecutive. Each line appears in the telegram
// in one big paragraph, with the word STOP between each line
// The first two blocks, at 1000 and 1010, are reserved for UI use
{1000}{CLASS OF}
{1001}{SERVICE}
{1002}{Class A Good}
{1003}{Class B Fair}
{1004}{Class C Poor}
{1005}{Tarant Union}
{1006}{Telegraph}
{1007}{SYMBOLS}
{1008}{ST-Stop}
{1009}{ET-End}
{1010}{NR-No Response}
{1011}{NO RESPONSIBILITY is assumed by this Company, beyond the exercise of due diligence and good faith in the transmission of messages, but their best exertions of their own line, which is in the city of Tarant.}
{1012}{ STOP }
 
//Sample Telegraph
{1020}{Dear Customer,}
{1021}{Enclosed are the items which you ordered:
Sword.......................300 coin
Dagger......................150 coin
Greater Helm................400 coin}
{1022}{Please contact us if any of these items are not satisfactory.}
Gametelegram.mes always uses the same font. There is a 2000 character limit per line, and a 10 line limit per telegram. Like notes and plaques, telegrams are limited to one page of space. As described above, the word "STOP" will appear between every line. New telegrams begin every ten lines, starting with 1020.
There is a sample telegram above, starting at line 1020. Notice the use of carriage returns and spacing to achieve the desired effect. This example can be written over if you so desire.
Scripts/Dialogs: Global Flags, Global Variables, Player Flags, Player Variables, Scriptmaker
Global Flags (globalflags.mes):
Globalflags.mes is used simply to keep track of the global flags you have used in the game. The game does not reference this file at all.
Global flags are used within the context of the game to test whether certain things are true, such as whether any PC has done a certain action or spoken to a certain person. Notice, though, that global flags are the same for everyone in the game– once a global flag has been set, it is set for everyone. Care needs to be exercised in using global flags in a multiplayer module. If you want the event you are referencing to be specific to a certain PC you would want to use a PC flag instead of a global flag (see below), as they are stored with the PC and reference only him.
In dialog files (.dlg) you can either test against whether global flags are set to one or not, and you can set them in the result field.
Example:
{1}{Npc Line.}{Npc Line.}{}{}{}{}
{2}{PC Response if GF1003 = 1}{}{5}{gf1003 1}{0}{}
{3}{PC Response that sets GF1004 = 1}{}{5}{}{0}{gf1004 1}
Global flags can also be tested against and/or set in scripts:
0. If Global Flag 2632 = 1
THEN do nothing
ELSE goto line x
1. Global Flag 2655 =1
 
Global Variables (globalvars.mes):
Globalvars.mes, like Globalflags.mes, is a reference file for the designers of a module and is not accessed by the game at all.
Global variables are used as counters in the game to determine the number of times a certain action or event has occurred. Again, like global flags, they are universal and not specific to any PC (see Pcvars.mes below).
In dialog files (.dlg) you can test whether a global variable is equal to a certain number, or you can set it to equal a specific number – you can’t test whether it is less than or more than a number, and you can’t increment it by a specific amount. To accomplish those actions, a script must be used.
Ex:
Dlg:
{1}{Npc Line.}{Npc Line.}{}{}{}{}
{2}{PC Response if GV1003 = 10}{}{5}{gv1003 1}{0}{}
{3}{PC Response that sets GV1004 = 5}{}{5}{}{0}{gv1004 5}
Scr:
0. Global Variable 1 = Global Variable 1 + 5
1. If Global Variable 1<= 5
THEN goto line x
ELSE do nothing
Player Flags (pcflags.mes):
Pcflags.mes is also not referenced by the game, but is simply a reference tool for the designers.
Pc flags are used within the context of the game to test whether certain things pertaining to a specific PC are true, such as whether he has done a certain action or spoken to a certain person. Notice, though, that pc flags are stored with each individual PC, and only relate to his actions. If you want to set a flag that will be set regardless of the PC involved, you need to use a global flag (see above).
 
Example:
{1}{Npc Line.}{Npc Line.}{}{}{}{}
{2}{PC Response if PF1003 = 1}{}{5}{pf1003 1}{0}{}
{3}{PC Response that sets PF1004 = 1}{}{5}{}{0}{pf1004 1}
Pc flags can also be tested against and/or set in scripts (notice that the script requires identifying the relevant PC):
0. If PC Flag 0 of Triggerer = 1
THEN do nothing
ELSE goto line x
1. PC Flag of Triggerer 2 =1
Player Variables (pcvars.mes):
Pcvars.mes is the PC specific version of globalvars.mes, and is used in the same way. This file is used only by the designers of a module and is not accessed by the game at all.
PC variables are used as counters in the game to determine the number of times a certain action or event has occurred. Unlike global variables, they are specific to a certain PC (see Globalvars.mes above).
In dialog files (.dlg) you can test whether a PC variable is equal to a certain number, or you can set it to equal a specific number – you can’t test whether it is less than or more than a number, and you can’t increment it by a specific amount. To accomplish those actions, a script must be used.
 
Ex:
Dlg:
{1}{Npc Line.}{Npc Line.}{}{}{}{}
{2}{PC Response if PV1003 = 10}{}{5}{pv1003 1}{0}{}
{3}{PC Response that sets PV1004 = 5}{}{5}{}{0}{pv1004 5}
Scr: (Notice that the script requires identifying the relevant PC):
0. Pc Variable 1 of Triggerer = Pc Variable 1 of Triggerer + 5
1. If Pc Variable of Triggerer 1<= 5
THEN goto line x
ELSE do nothing
Scriptmaker:
Event scripts:
An event script (often referred to as just a script) is a series of instruction codes created using Sock Monkey Script Maker, called ScrMaker.exe. An event script consists of a name, a set of flags that identify special properties of the script (such as it being a trap, for example), a value representing the current number of lines of the event script, and lastly the lines of instructions themselves. Event scripts are attached to objects (including a map itself) at various script attachment points, which are actions defined according to each object. For example, most objects have attachment points at examine, use, and destroy. Many items (objects that can picked up) have attachment points at get, drop, or throw as well, and some objects such as doors and chests can have an attachment point at unlock.
Event scripts have associated dialog files, made with a text editor. These dialog files are discussed later in this document.
A typical event script might look like this:
Name: One-Shot Explosive Trap
Flags: trap, remove
Lines: 3
0: script eye candy: play 55 on Triggerer
1: damage Triggerer for 20 points of type 3 damage
2: return
This event script may be attached to a chest at its use attachment point. Anyone attempting to use (i.e. open) the chest will cause the script to execute. Since the script is marked with the trap flag, various skills and spells can detect its presence and/or remove it from the chest. Since the script also contains the remove flag, it will remove itself after execution, which means the trap only goes off once. Had this flag been omitted, the trap would have gone off whenever the chest was opened, until the trap was removed by skill or spell or until the chest was destroyed.
Each line of the script can contain an action statement or a conditional statement. Action statements are simply executed straight away, while conditional statements are evaluated and if true, the THEN action statement is executed. If false, the ELSE action statement is executed. Conditional statements cannot be nested (i.e. the THEN or ELSE statement must be an action statement, not a conditional statement), but using a GOTO action statement allows the logical equivalent of nested conditionals.
OBJ variables
In these statements below, OBJ can be instantiated as

Any Container in Vicinity any container that is on-screen near the attachee
Any Follower (single player) any NPC follower of triggering critter
Any Item in Vicinity any item that is on-screen near the attachee
Any Portal in Vicinity any portal that is on-screen near the attachee
Any Scenery in Vicinity any scenery that is on-screen near the attachee
Anyone in Group (PC and NPC, single player) anyone in group (the triggerer and every NPC follower of triggerer)
Anyone in Party (PC only, multiplayer) any PC in the triggering critter's party (multiplayer-mode only, includes triggerer)
Anyone in Team (PC and NPC, multiplayer) any critter on the triggering critter's team (PC and NPC, includes triggerer)
Anyone in Vicinity any critter who is on-screen near the attachee
Attachee the object the script is attached to (can be NULL for scripts on tiles)
Current Looped Object the current looped object value, associated with the FOR statement
Every Container in Vicinity every container that is on-screen near the attachee
Every Follower (single player) every NPC follower of triggering critter
Every Item in Vicinity every item that is on-screen near the attachee
Every Portal in Vicinity every portal that is on-screen near the attachee
Every Scenery in Vicinity every scenery that is on-screen near the attachee
Everyone in Group (PC and NPC, single player) the triggerer and every NPC follower of triggerer
Everyone in Party (PC only, multiplayer) every PC in the triggering critter's party (multiplayer-mode only, includes triggerer)
Everyone in Team (PC and NPC, multiplayer) every critter on the triggering critter's team (PC and NPC, includes triggerer)
Everyone in Vicinity every critter who is on-screen near the attachee
Extra Object the extra object mentioned in the script execution data
Local Object the local object indexed by the associated number
Player the PC object (local PC in multiplayer)
Triggerer the object which triggered the script (this is the most common focus object)

Please take special consideration of the ANY and EVERY instantiations. The ANY and EVERY instantiations are for use in conditional statements that take objects (see conditional statements below). For ANY instantiations, the statements will return true if any object in the list is true for that statement, while the EVERY instantiations are true only if every object on the list is true for that statement. For example, consider the statement
IF Anyone in Group has bless 12
This statement is true if the triggerer or any of his followers has blessing number 12. Contrast this with
IF Everyone in Group has bless 12
This statement is only true if the trigger and every one of his followers has this blessing.
The EVERY instantiations can also be used with FOR loop action statements. The script engine will loop over each script line between the FOR and END LOOP statements, and on each line, the Current Looped Object takes on a different object in the list. For example, this script counts the followers of the triggerer and leaves that value in Counter 0:
Counter 0 = 0
Loop for Every Follower (single player)
Counter 0 = Counter 0 + 1
Loop end
Note that the ANY and EVERY instantiations in conditional statements can be performed manually with a FOR loop (by looping over each object and testing it), but it is much more efficient to let the script engine perform this work for you.
Another thing to note about the vicinity checks in the ANY and EVERY instantiations. These checks are performed around the Attachee object. Since tile scripts have no Attachee objects, you cannot use these instantiations without first setting the Attachee to some object. Most script writers simply set it to the Triggerer:
Attachee = Triggerer
Also bear in mind that vicinity is defined as being visible in the game view if the Attachee object were centered on the screen. There is some wiggle room, so some objects just off-screen may be returned as well.
NUM variables
In the statements, below, the value for NUM can be
A counter: there are 4 counters (0-3) which can each hold values 0-255
A global variable: there are 1000 of these (1000-1999) which can hold a number
A global flag: there are 2200 of these (1000-3199) which can hold a flag
A local variable: there are 10 of these (0-9) which can each hold a number
A local flag: there are 32 of these (0-31) which can hold a flag
A pc variable: there are 1000 of these (1000-1999) which can hold a number
A pc flag: there are 2200 of these (1000-3199) which can hold a flag
A number which can be (approximately) from –2 billion to 2 billion
The variable NUM can be used as an lval (having their values set) or an rval (having their values read), except numbers (which can only be rvals).
Some general notes
All variables, flags, and counters are initialized to 0
Flags can only be set to 0 or 1.
Counter can only hold from 0 to 255
Variables can hold from – 2 billion to 2 billion
Counters
Counters are script specific (their values can only be read by their script) and hold their values between calls and are stored in save games. Their initial values of 0 can be overridden in Sock Monkey Script Maker. There are only 4 counters per script, numbered 0 thru 3.
Local flags
Local flags are script specific (their values can only be read by their script) and hold their values between calls and are stored in save games. Their initial values of 0 can be overridden in Sock Monkey Script Maker. There are only 32 local flags per script, numbered 0 thru 31.
Global variables
Global variables are stored in save games. Every script can see every global variable, so care must be exercised when using one. Since global variables retain their value across script instantiation and must be saved with save games, there are a limited number of global variables available.
Global flags
Global flags are stored in save games. Every script can see every global flag, so care must be exercised when using one. Since global flags retain their value across script instantiation and must be saved with save games, there are a limited number of global flags available.
PC variables
PC variables are stored in the player object. Every script can see every PC variable, so care must be exercised when using one. Since PC variables retain their value across script instantiation and must be saved with the player object, there are a limited number of PC variables available.
PC flags
PC flags are stored in the player object. Every script can see every PC flag, so care must be exercised when using one. Since PC flags retain their value across script instantiation and must be saved with the player object, there are a limited number of PC flags available.
Local variables
Local variables are used by an individual script. They do NOT maintain the values between calls to the script. Local variables are used to temporary processing, such as calculating the reward that an NPC may give a player, or to store a value to avoid calling a function repeatedly.
 
Action statements
Action statements are the default state of a line. Here is a description of all script action statements available in Sock Monkey Script Maker:
(num) = (num) - (num)
subtract the two right values and store the result in the left value
(num) = (num)
set the left value to be equal to the right value
(num) = (num) * (num)
multiply the two right values and store the result in the left value
(num) = (num) / (num)
divide the two right values and store the result in the left value
(num) = (num) + (num)
add the two right values and store the result in the left value
(obj) = (obj)
set the left object to be equal to the right object
add blessing (num) to (obj)
adds blessing (num) to PC (obj). You can access blessing numbers with Edit->Objects->Critters->Blessings.
add curse (num) to (obj)
adds curse (num) to PC (obj). You can access curse numbers with Edit->Objects->Critters->Curses.
area of (obj): store in (num)
find the area that the object is currently in and store it in (num). Valid area numbers are set in WorldEd with You can access area numbers with Edit->Map->Areas.
armor coverage of item (obj): store in (num)
store the type of coverage the armor item supplies. Valid values are:
0 torso
1 shield
2 helmet
3 gauntlets
4 boots
5 ring
6 medallion
armor of (obj): get in (num)
store the armor type worn by (obj) in (num), where the values are:
0 underwear
1 villager
2 leather armor
3 chain mail
4 plate mail
5 robes
6 plate classic
7 barbarian
8 city dweller
autolevel scheme for (obj): change to (num)
change the autolevel scheme of the NPC object to the specified number. Intended for internal use only.
call script (num) at line (num) with triggerer (obj) and attachee (obj)
call the script with the required parameters, using the same attachment point as the current script. When it returns, the current script will continue execution
call script (num) at line (num) with triggerer (obj) and attachee (obj) in (num) seconds
A time event is set up which will call the specified script in the specified number of seconds for the current game time
call script (num) at line (num) with triggerer (obj) and attachee (obj) at seconds (num)
A time event is set up which will call the specified script at the specified number of seconds after midnight, game time
call script attached to (obj) at point (num) at line (num) with triggerer (obj)
trigger the script attached to the particular object with the specified parameters. Valid script attachment points are listed below.
change art num of (obj) to (num)
changes the art number of an object. This only changes how the object looks. It cannot change the art to a different art type (ie. from scenery to item), and within type, category changes are disallowed (in scenery, a large tree cannot be changed to a small tree). Think of this as a means of changing scenery, items, or unique npcs to a different variant. For items, this only changes its look on the ground, not inside inventory. A side effect of this statement is that the object is returned to frame 0 for its new art. Here are the lists of valid art nums, by art type:
scenery art nums:
0 – 39: projectiles
0-45: large trees
0-41: medium trees
0-12: small trees and bushes
0-20: dead trees
0-70: plants
0-67: small metal objects
0-150: medium-sized metal objects
0-103: large metal objects
0-35: small stone objects
0-74: medium stone objects
0-123: large stone objects
0-48: small wooden objects
0-175: medium-sized wooden objects
0-72: large wooden objects
0-102: small misc objects
0-88: medium-sized misc objects
0-24: large misc objects
0-5: large machinery
1-2: medium-sized machinery
0-72: teleport facades
0-34: lights
0-11: beds
item
0-7: boomerangs
0-18: daggers
0-19: one-handed swords
0-15: axes
0-17: maces and hammers
0-15: pistols
0-13: two-handed swords
0-11: bows
0-22: rifles and hi tech guns
0-11: staves
0-17: villager clothes
0-19: leather
0-17: chain
0-6: tech plate
0-7: robes
0-19: classic plate
0-4: barbarian armor
0-15: city dweller clothes
0-12: shields
0-19:helmets
0-10: gauntlets
0-10: boots
0-14: rings
0-24: necklaces
0-88: food
0-2: keys
0-2: key rings
0-9: written items
0-193: generic items
unique npc
0-39: variant npcs
All other types are either unaffected by this statement or should not be used due to unintentional side effects. A full list of of these numbers can be found in the "useful lists" section.
change script attached to (obj) at point (num) to script (num)
Change the script attached to an object at a particular attachment point. This new script is NOT executed, even if the current script is the script being changed at the attachment point.
change this script to script (num)
change the script at the attachment point of this script to the script (num). The current script will continue to run until it returns.
clear global flag (num)
set the specified global flag to 0. You can access global flag numbers with Edit->Script/Dialogs->Global Flags.
clear local flag (num)
set the local flag to 0. These flags range from 0 to 31 and are script-specific.
combat: (obj) attacks (obj)
direct the AI system to force an attack
combat: force (obj) to stop attacking
stop the attack animation of the object
create item with basic prototype (num) inside (obj)
create the item specified and place it inside the container/critter (obj). If inventory is full, the item will drop to the ground near (obj). The item numbers are listed at the end of this document.
create object with basic prototype (num) near (obj)
create this new object near the specified one, within 3 tiles. Valid numbers are listed at the end of this document.
damage (obj) for (num) points of type (num) damage
apply the specified damage amount to (obj). Resistances can reduce this amount. Valid types of damage are:
0 normal
1 poison
2 electrical
3 fire
4 fatigue
damage (obj) unresistably for (num) points of type (num) damage
apply the specified damage amount to (obj). Resistances CANNOT reduce this amount. Valid types of damage are listed above.
day: store days since startup in (num)
store how many days the current game has been played
destroy (obj)
destroy the object, which removes it from the world.
destroy item named (num) in inventory of (obj)
find an item with the internal name (num) inside of (obj) and destroy it. Internal names are set in Edit->Objects->Internal Names.
dialog (num)
begin dialog with the associated dialog file for this script, beginning the dialog at NPC line (num). This script will end execution as if a RETURN AND SKIP DEFAULT had been encountered.
distance between (obj) and (obj): get in (num)
return the distance (in tiles) between the two objects
do nothing
this is a null line, which you can use as filler
drain (num) charges from (obj)
reduce the number battery charges from the object (if it has any)
end game and play slides
end the game and play slides queued by script 997.
faction of npc (obj): set to (num)
set the faction of the NPC. Valid values of faction are set in WorldEd in Edit->Objects->Critters->Factions.
faction of npc (obj): store in (num)
get the faction of the NPC and store it in (num). Valid values of faction are set in WorldEd in Edit->Objects->Critters->Factions.
fade and teleport: pass (num) seconds, play (num) sound, play (num) movie, and teleport (obj) to map (num) at X:(num) Y:(num)
fade the screen, cause some game time to pass, play the specified sound, play the specified movie, and then teleport the object to the specified map andf location. Valid values for sound, movie and map are found in WorldEd. Sounds use Edit->Media->Sounds->General and movies use Edit->Media->Movies. Maps have their numbers displayed next to the name in the File->Open Map dialog.
fade: pass (num) seconds, play (num) sound, and play (num) movie, with (num) seconds during fade
fade the screen, cause some game time to pass, play the specified sound, play the specified movie, and then hold the blank screen for the specified number of seconds. Valid values for sound and movie and map are found in WorldEd. Sounds use Edit->Media->Sounds->General and movies use Edit->Media->Movies.
fatigue of critter (obj): store current in (num) and maximum in (num) )
get the current and maximum fatigue points of the critter object
float line (num) above (obj)
the line (num) is grabbed from the associated dialog file for this script and floated above (obj). The NPC is (obj) and the PC is the closest PC to (obj).
get location of (obj) and store X in (num) and Y in (num)
store the X,Y location coordinates of the object
give (obj) spell mastery in college (num)
give the specified critter a spell mastery in the specified college. Mastery means all spells cost half fatigue. Only one college can ever be set as Mastered. Valid values for the spell college are:
0 conveyance
1 divination
2 air
3 earth
4 fire
5 water
6 force
7 mental
8 meta
9 morph
10 nature
11 necro evil
12 necro good
13 phantasm
14 summoning
15 temporal
give (obj) the effect (num) with cause (num)
treat (obj) as if under the specified effect. Valid values for causes are
0 race
1 background
2 class
3 bless
4 curse
5 item
6 spell
7 injury
8 tech
9 gender
give (obj) xps for a quest level (num)
give the critter object the same number of experience as if he had finished a quest of level (num).
gold of (obj): adjust by (num)
add the amount of gold specified to (obj)
goto line (num)
jump to line indicated by the value of (num)
grant one fate point to (obj)
give a fate point to the PC (obj)
have (obj) instantly become prone
force the critter (obj) to immediately lay down, with no animation
have (obj) perform animation (num)
have the object play an animation. Valid values are:
0 stand
1 walk
3 stealth walk
5 conceal fidget
6 run
7 fall down
8 get up
12 pickpocket
13 vault
14 throw
17 decapitation
18 blown out chunk
19 severed leg
20 attack
21 attack low
23 stunned
24 explode
have (obj) try to steal 100 coins from (obj)
have the critter object try to pickpocket up to 100 coins from the target critter object
have (obj) use (obj) on (obj) using skill (num) with modifier (num)
give a critter the goal of using the specified item on another object, using a skill with a modified (bonuses are positive, penalties are negative). Valid skill values are listed above.
have critter (obj) become a follower of (obj)
the critter will become a follower of the specified (other) critter, ignoring charisma and other limitations (this is called a forced follower in the game)
have critter (obj) run to X:(num) Y:(num)
tell the critter that its goal is to run to the specified location. It will walk there if possible unless interrupted (as in attacked)
have critter (obj) stop following his leader
the critter will be forced to stop following his leader (again ignoring charisma or Persuasion effects)
have critter (obj) wait for his leader
put the critter into wait mode, as if his leader had told him to wait here
have critter (obj) walk to X:(num) Y:(num)
tell the critter that its goal is to walk to the specified location. It will walk there if possible unless interrupted (as in attacked)
heal (obj) for (num) fatigue points
heal the (obj) for the specified number of fatigue points. You cannot increase its fatigue points above its maximum value with this statement. This will cause unconscious critters (due to fatigue being negative) to wake up.
heal (obj) for (num) points
heal the (obj) for the specified number of hit points. You cannot increase its hit points above its maximum value with this statement. This will not resurrect dead critters.
heal (obj) for (num) poison points
reduce the poison level of the critter by the specified amount
hit points of (obj): store current in (num) and maximum in (num)
get the current and maximum hit points of the object
hour: store current game hour in (num)
store the current game hour, 0 to 23
hour: store hours since startup in (num)
store the number of hours since the game started in (num)
kill (obj)
this kills the associated critter object, leaving a corpse behind
lock state of (obj): set to (num)
set the lock state of container/portal (obj) to the specified number. Valid values are
0 – unlocked
1 – locked
2 - unlock permanently
loop break
terminate the loop and go to the next line after the loop end.
loop end
the end of the loop. Return to the beginning of the loop with Current Loop Object set to the next value of (obj), or go to the next line if there are no more objects on the list
loop for (obj)
begin a loop, setting the Current Loop Object to the first value of (obj)
magic/tech: adjust (num) by item (obj) used by (obj) on (obj): store in (num)
this statement adjusts the first number based on the magic-tech complexity/aptitudes of all of the associated objects
magic/tech: adjust (num) by item (obj) used by (obj): store in (num)
adjust the number based on the magic complexity of the item and the magic aptitude of the critter, and store the result
mark map location (num) of pc (obj) as known
mark the area (num) for this PC as known, so it will show up on his worldmap. The valid area numbers are set in WorldEd in Edit->Map->Areas.
minute: store current game minute in (num)
store the current game minute, 0 to 59
newspaper: float current headline over (obj)
float the headline of the currently queued newspaper over the specified object
newspaper: queue (num) with priority (num)
the newspaper article will be queued for available purchase at newsstands and from newsboys. Valid newspaper numbers are set in WorldEd in Edit->Objects->Items->Written Items->Newspapers. Valid priority numbers are
0 – will be queued to appear after the last queued paper, priority or not
1 – will be queued to appear after the last priority queued paper (or tomorrow if there is no priority queued papers)
object type of (obj): store in (num)
store the object type of (obj) in (num). Values of object type are:
0 wall
1 portal
2 container
3 scenery
4 projectile
5 weapon
6 ammo
7 armor
8 gold
9 food
10 scroll
11 key
12 key ring
13 written
14 generic item
15 pc
16 npc
17 trap
origin of npc (obj): store in (num)
get the origin of the NPC and store it in (num). Valid origin values are created in WorldEd in Edit->Map->Areas.
play sound (num)
play sound (num). Valid sound numbers can be set in WorldEd in Edit->Media->Sounds->General.
play sound (num) at (obj)
play the sound (num) localized at the specified object, so that it appears to be making the sound. Valid sound numbers can be set in WorldEd in Edit->Media->Sounds->General.
play sound scheme (num) and (num)
begin the specified sound schemes. Valid scheme numbers are set in WorldEd in Edit->Media->Sounds->Scheme Data.
print line (num) with a message class of (num)
the line (num) is grabbed from the associated dialog file for this script, using the Attachee as the NPC and the Triggerer as the PC. The line is printed in the message window as class (num), where the values are:
0 level
1 poison
2 curse
3 bless
4 exclamation
5 question
6 feedback (most commonly used value)
7 skill
8 spell
9 spell college
10 tech discipline
11 tech degree
12 stat
13 schematic
random number (num) to (num): store in (num)
generate a random number in the specified range and store it
reaction of npc (obj) to pc (obj): adjust by (num)
add (num) to the NPC’s reaction to the PC.
reaction of npc (obj) to pc (obj): set to (num)
set the NPC’s reaction to the PC to (num)
reaction of npc (obj) to pc (obj): store in (num)
get the NPC’s reaction to the PC and store it in (num)
remove blessing (num) from (obj)
removes blessing (num) from PC (obj), if he has one. You can access blessing numbers with Edit->Objects->Critters->Blessings.
remove curse (num) from (obj)
removes curse (num) from PC (obj), if he has one. You can access curse numbers with Edit->Objects->Critters->Curses.
remove from (obj) the effect (num)
remove the effect, if it exists on the object. For internal use only.
remove from time queue the call to script (num) with attachee (obj)
find the first instance of a script with the specified number and attachee, and remove it from the time queue
remove this script
remove this script from its attachment point, leaving no script attached there. The current script will continue to run until it returns.
rename (obj) as (num)
change the internal name of (obj) to (num). Valid internal names are set in Edit->Objects->Internal Names.
reputation: give (obj) the reputation (num)
add the reputation to the critter (obj). Valid reputations numbers are set in WorldEd in Edit->Objects->Critters->Reputations->Data.
reputation: remove from (obj) the reputation (num)
remove the reputation from the critter (obj), if it has it. Valid reputations numbers are set in WorldEd in Edit->Objects->Critters->Reputations->Data.
return and RUN default
cease execution of this script immediately and perform the default action for this attachment point
return and SKIP default
cease execution of this script immediately and do NOT perform the default action for this attachment point
rotation of (obj): set to (num)
set the object to face one of eight directions, 0 thru 7, where 0 is straight up and each increment is a clockwise rotation of 45 degrees
rumor: quell rumor (num) for pc (obj)
strike out this rumor in the PC’s logbook, if it is there. Valid rumor numbers are set in WorldEd in Edit->Objects->Critters->Generated Dialogs->Rumors (for various gender combinations).
rumor: set rumor (num) for pc (obj)
add this rumor to the specified PC’s logbook. Valid rumor numbers are set in WorldEd in Edit->Objects->Critters->Generated Dialogs->Rumors (for various gender combinations).
schematic UI start: display for (obj)
display the schematics for the specified critter
script eye candy: play (num) on (obj)
play the script eye candy animation on the object. Valid values for script eye candy are described at the end of this document, but the most common one is 55, the explosion eye candy.
script eye candy: stop (num) on (obj)
stop playing the specified script eye candy, if it is playing on (obj). Valid values for script eye candy are described at the end of this document.
scroll distance: store in (num)
retrieve the number of tiles that the screen can scroll away from the PC. This value is dependent on the PC’s Perception stat, with the formula ((P/2) + 3)
set day standpoint of critter (obj) to X:(num) Y:(num)
set the creature’s new daytime standpoint (where it prefers to spend its day time hours)
set day standpoint of critter (obj) to X:(num) Y:(num) on map (num)
set the creature’s new daytime standpoint (where it prefers to spend its day time hours) to the new location on the specified map. Valid map numbers are displayed in WorldEd in the File->Open Map dialog.
set global flag (num) to true
set the specified global flag to 1. Global flag numbers are set in Edit->Scripts/Dialogs/Global Flags.
set local flag (num) to true
set the local flag to 1. Valid local flags are number 0 to 31 and are script-specific.
set night standpoint of critter (obj) to X:(num) Y:(num)
set the creature’s new night time standpoint (where it prefers to spend its night time hours)
set night standpoint of critter (obj) to X:(num) Y:(num) on map (num)
set the creature’s new night time standpoint (where it prefers to spend its night time hours) to the new location on the specified map. Valid map numbers are displayed in WorldEd in the File->Open Map dialog.
set PC (obj) quest (num) to state (num)
change the state of the specified quest for the specified PC to be the specified number. Quest numbers are set in Edit->Game->Quests->Data. Quest states are unknown 0, mentioned 1, active 2, achieved 3, completed 4, other 5 and botched 6.
set PC (obj) quest (num) to state unbotched
If the PC has the specified quest set to state 6 (botched), then return the quest to the state it was at before being botched. Quest numbers are set in Edit->Game->Quests->Data.
set quest (num) to global state (num)
set the global state of the specified quest to the specified number. Quest numbers are set in Edit->Game->Quests->Data. Quest states are unknown 0, mentioned 1, active 2, achieved 3, completed 4, other 5 and botched 6.
skill (num) of (obj): store in (num)
get the skill of the creature (on a scale of 0 to 20) and store it in (num). Valid skill numbers are:
0 bow
1 dodge
2 melee
3 throwing
4 backstab
5 pick pocket
6 prowling
7 spot trap
8 gambling
9 haggle
10 heal
11 persuasion
12 repair
13 firearms
14 pick lock
15 disarm trap
slideshow: queue slide (num)
add a slide to the queue to be played. Valid slide numbers can be set in WorldEd. This statement can only be used inside of three scripts called at specific times:
997 – end game
998 – player died
999 – credits
social class of npc (obj): store in (num)
get the social class of the NPC and store it in (num). Valid values are:
0 noble
1 priest
2 wizard
3 technologist
4 shopkeeper
5 guard
6 city dweller
7 villager
8 beggar
9 thief
10 bandit
spell eye candy: play (num) on (obj)
play the specified spell eye candy on the object. Valid values are spell eye candy are listed at the end of this document.
spell eye candy: stop (num) on (obj)
stop playing the specified spell eye candy on the object, if it is playing. Valid values are spell eye candy are listed at the end of this document.
spells: cast spell (num) on (obj)
the specified spell is cast upon the object. The spell does not come from a particular source and therefore costs no mana. A spell list is at the end of this document.
spells: cast unresistable spell (num) on (obj)
cast the specified spell on the target object. The target cannot be resist via saving throw, magic resistance, or tech aptitude. A spell list is at the end of this document.
spells: have (obj) cast free and unresistable spell (num) on (obj)
have the object cast a spell on the target that cannot be resisted via saving throw, magic resistance, or tech aptitude. The caster is NOT charged fatigue. A spell list is at the end of this document.
spells: have (obj) cast free spell (num) on (obj)
have the specified object cast the spell on specified target. The caster is NOT charged fatigue. A spell list is at the end of this document.
spells: have (obj) cast spell (num) on (obj)
force a spell casting. The casting object will be charged mana if a creature or mana-storing item. A complete spell list is at the end of this document.
spells: have (obj) cast unresistable spell (num) on (obj)
have the object cast a spell on the target that cannot be resisted via saving throw, magic resistance, or tech aptitude. A spell list is at the end of this document.
spells: stop spell (num) on (obj)
if the object has the specified spell being maintained on it, stop that spell. A spell list is at the end of this document.
stat (num) of (obj): adjust by (num)
adjust the stat value of the specified object by the specified amount. Valid values for the stat number are listed below.
stat (num) of (obj): store in (num)
store the value of the stat in (num). The stats are:
0 strength
1 dexterity
2 constitution
3 beauty
4 intelligence
5 perception
6 willpower
7 charisma
8 carry weight
9 damage bonus
10 ac adjustment
11 speed
12 heal rate
13 poison recovery rate
14 reaction modifier
15 max followers
16 magic tech aptitude
17 level
18 experience points
19 alignment
20 fate points
21 unspent points
22 magic points
23 tech points
24 poison level
25 age
26 gender
0 female
1 male
27 race
0 human
1 dwarf
2 elf
3 half elf
4 gnome
5 halfling
6 half orc
7 half ogre
8 dark elf
9 ogre
10 orc
story state: set to (num)
set the game’s story state to (num). Valid story states are set in WorldEd in Edit->Game->Story.
story state: store in (num)
retrieve the game’s story state and store it in (num). Valid story states are set in WorldEd in Edit->Game->Story.
teleport (obj) to map (num) at X:(num) Y:(num)
teleport the object (and its whole party, if a leader critter) to the new map at the specified location. Valid map numbers can be seen in WorldEd in the File->Open Map dialog.
toggle (obj) invulnerability
this toggles the object’s invulnerability. An invulnerable object cannot take damage of any kind, and an invulnerable critter will never attack.
toggle (obj) open/closed
make the specified container/portal object change its open/close state
toggle (obj) state on/off
this will turn the object on or off. An off object is not drawn by the render and is ignored by most functions. They will receive a first heartbeat, however.
toggle item (obj) inventory display on/off
change the inventory display state of the item. When display is off, the item will not show up in inventory.
toggle monster generator (num) on/off
toggle the monster generator on/off

toggle the blocked state of sector at location X:(num) and Y:(num)
change the blocked state of the sector at the specified location. Blocked sectors cannot be traveled thru in the worldmap. The player must walk through the sector.
touch art (num)
causes the associated art to be loaded into the art cache. For internal use only.
transfer item named (num) from (obj) to (obj)
find the item with internal name (num) inside one critter/container and move it to another critter/container. Internal name values are set in Edit->Objects->Internal Names.
transform Attachee into basic prototype (num)
change the Attachee object into a new object with prototype (num). Objects are allowed to become new types (like items transforming into npc’s). Hit points and facing direction are retained, and if a critter is transformed into another critter, fatigue is retained as well. Valid prototype numbers are at the end of this document.
unfog townmap (num)
mark the specified townmap as complete unfogged. Valid townmap values can be set in WorldEd in Edit->Map->Townmaps.
weapon of (obj): get in (num)
get the weapon type of (obj) and store it in (num). Valid values are:
1 unarmed
2 dagger
3 sword
4 axe
5 mace
6 pistol
7 two handed sword
8 bow
10 tech gun
13 staff
written start in (obj) set to (num)
change the starting line in the specified written object to be (num). This number should correspond to a value in one of the Edit->Objects->Items->Written Items files.
written UI start: book (num) for reader (obj)
open a book interface using the text at line (num) in the written message file (editable thru WorldEd in Edit->Objects->Items->Written Items->Books).
written UI start: image (num) for reader (obj)
open an interface displaying the specified image using the specified art number. For internal use only.
written UI start: plaque (num) for reader (obj)
open a plaque interface using the text at line (num) in the written message file (editable thru WorldEd Edit->Objects->Items->Written Items->Plaques).
Note that putting a RETURN action statement at the end of the script is optional. If the script finishes with no kind of return statement, then the script will act as if a RETURN AND RUN DEFAULT statement is present.
Also note that calling a script action statement on an invalid object will do nothing. For example, trying the change the autolevel scheme of a tree will have no effect.
Conditional statements
Conditional statements have the form
IF <condition>
THEN <action1>
ELSE <action2>
If <condition> evaluates to true, then <action1> is executed. If it evaluates to false, then <action2> is executed. Both action statements are selected from the same list of possibilities as an action statement. Here is a description of all script conditional statements available in Sock Monkey Script Maker:
(num) <= (num)
true if left num is less than or equal to right num
(num) == (num)
true if left num is equal to right num
(obj) can hear (obj)
true if left obj can hear right obj
(obj) can open the container (obj)
true if left obj is capable of open the container obj (if locked he must have a key)
(obj) can open the portal (obj) in direction (num)
true if left obj can open portal obj located in the specified direction. Non-follower NPC’s can open any door not marked as OPF_ALWAYS_LOCKED. Also, anyone can open a non-OPF_ALWAYS_LOCKED portal that leads outside, i.e. they are inside and the door leads outside.
(obj) can see (obj)
true if left obj can see right obj
(obj) has a body spell
true if obj has any of the "Body Of" elemental spells active
(obj) has at least (num) gold
true if obj has at least num coins carried
(obj) has bad associates
true if the obj has any summoned followers (besides animals or familiars)
(obj) has bless (num)
true if obj has the specified blessing. You can access blessing numbers with Edit->Objects->Critters->Blessings.
(obj) has curse (num)
true if obj has the specified curse. You can access curse numbers with Edit->Objects->Critters->Curses.
(obj) has item named (num)
true if obj has an item in its inventory that has internal name of (num). You can access internal name numbers with Edit->Objects->Internal Names.
(obj) has mastered spell college (num)
true if obj has spell mastery in college (num). College numbers are
0 conveyance
1 divination
2 air
3 earth
4 fire
5 water
6 force
7 mental
8 meta
9 morph
10 nature
11 necro evil
12 necro good
13 phantasm
14 summoning
15 temporal
 
(obj) has maximum followers
true if obj has as many followers as allowed by his Charisma limit
(obj) has mirror image
true if obj has the mirror image spell active (no longer supported)
(obj) has reputation (num)
true if obj has the specified reputation. Valid reputations numbers are set in WorldEd in Edit->Objects->Critters->Reputations->Data
(obj) has surrendered
true if npc obj is in the surrender mode (they enter this mode when they flee far enough away to stop running)
(obj) is an animal
true if critter obj has the OCF_ANIMAL flag set
(obj) is at location X:(num) Y:(num)
true if the location of obj is X, Y
(obj) is busted
true if the obj in question is busted (like a broken item) but not destroyed
(obj) is dead
true if the critter obj is dead
(obj) is identified
true if the item obj is identified
(obj) is in combat
true if the critter obj is fighting
(obj) is in dialog
true if the critter obj is in a dialog with a PC
(obj) is invisible
true if the obj is invisible
(obj) is invulnerable
true if the obj is marked with the OF_INVULNERABLE flag
(obj) is named (num)
true if the obj has internal name (num). You can access internal name numbers with Edit->Objects->Internal Names.
(obj) is open
true if the container/portal is open
(obj) is polymorphed
true if the obj is under the effect of a polymorph spell
(obj) is prowling
true if the critter obj is using Prowling skill
(obj) is shrunk
true if the obj is under the effect of the Shrink spell
(obj) is switched off
if the obj is marked with the OF_OFF flag
(obj) is undead
true if the critter obj is marked with the OCF_UNDEAD flag
(obj) is under the influence of spell (num)
true if the obj is under the effect of the specified spell. A spell list is at the end of this document.
(obj) is waiting for leader's return
true if the critter is in wait mode for his leader to come back
(obj) is wielding item named (num)
true if the critter obj is wielding or wearing an item with internal name (num). You can access internal name numbers with Edit->Objects->Internal Names.
(obj) is within (num) tiles of location X:(num) Y:(num)
true if the distance from obj to X,Y is less than or equal to (num) tiles
(obj) knows spell (num)
true if the critter obj knows the specified spell. A spell list is at the end of this document.
(obj) was jilted by a PC
true if the critter obj waited somewhere for his leader’s return and eventually reached his patience limit and went home
global flag (num) is set
true if the specified global flag is 1. You can access global flag numbers with Edit->Script/Dialogs->Global Flags.
it is daytime
true if the game hour is greater than or equal to 6 but less than 18
items are being rewielded
true if the script was called while items were being removed and rewielded on a critter
local flag (num) is set
true if the specified local flag is 1. These flags range from 0 to 31 and are script-specific.
monster generator (num) is disabled
true if the specified monster generator is not on. Monster generator values are set by the user when editing a critter marked as a generator.
npc (obj) has met pc (obj) before
true if the NPC has met the PC before (they have spoken in a dialog, or the PC has done anything to change the NPC’s reaction to him)
npc (obj) is a follower of pc (obj)
true if the NPC is a direct follower of the PC (not a follower of a follower of a PC)
npc (obj) is a monster of specie (num)
true if the NPC is a monster type of the specified species. Valid species are:
0 wolf
1 spider
2 orc
3 earth elemental
4 lesser demon
5 lesser skeleton
6 lesser zombie
7 lesser mummy
8 greater demon
9 bunny
10 mech spider
11 automaton
12 lizard man
13 phantom knight
14 wererat
15 snake man
16 ape
17 bear
18 chicken
19 cougar
20 sheep
21 tiger
22 pig
23 cow
24 wisp
25 mutant pig
26 fire elemental
27 water elemental
28 air elemental
29 death knight
30 spider queen
31 werewolf
PC (obj) has quest (num) in state (num)
true if the PC has the specified quest in the specified state. . Quest numbers are set in Edit->Game->Quests->Data. Quest states are unknown 0, mentioned 1, active 2, achieved 3, completed 4, other 5 and botched 6.
pc (obj) knows rumor (num)
true if the PC has the specified rumor in his logbook. Valid rumor numbers are set in WorldEd in Edit->Objects->Critters->Generated Dialogs->Rumors (for various gender combinations).
quest (num) in global state (num)
true if the specified quest is in the specified global state. Quest numbers are set in Edit->Game->Quests->Data. Quest states are unknown 0, mentioned 1, active 2, achieved 3, completed 4, other 5 and botched 6.
rumor (num) has been quelled
true if the specified rumor has been quelled (by script or by dialog). Valid rumor numbers are set in WorldEd in Edit->Objects->Critters->Generated Dialogs->Rumors (for various gender combinations).
sector at location X:(num) and Y:(num) is blocked
true if the sector at the specified location has been marked as blocked (the player cannot travel thru blocked sectors with the world map; the player must walk through them).
 
Dialogue
Dialog is handled in scripts by calls to the dialog tree, maintained separately as file similar to our messaging system. A line structure is
{N}{Text}{G}{I}{Test}{R}{Result}
where N is the number of the text line, and the remaining fields differ in meaning depending on whether the line is a PC and NPC response.
For a PC response,
{Text} is the text of the dialog message
{G} field is left empty if any gender can say it, 0 if only female PC’s can say it, and 1 if only male PC’s can say the line.
{I} is the minimum IQ (if negative, it’s the maximum IQ, and it CANNOT be zero)
{Test} contains tests to see if the PC can speak this line. See the Test section below.
{R} is the response line (or if negative, it’s the script line to run if this response is chosen, or if zero, it means to return to the calling point in the associated script).
{Result} contains results which are triggered if the PC speaks this line. See the Result section below.
For an NPC response,
{Text} is the NPC response if the PC is male
{G} is the NPC response if the PC is female
{I} must be left empty
{Test} must be left empty
{R} is usually empty, but on a generated dialog line for an NPC, the R field may be filled in with a response line. See GeneratedDialog.doc for more details.
{Result} contains results which are triggered if the NPC speaks this line in dialog (but not if used as a float or barter or other message). See the Result section below.
All of the lines following an NPC response, up to but not including the next NPC response, are the PC responses. For example:
{14}{Can I help you sir?}{Can I help you madam?}{}{}{}{}
{15}{Just looking...}{}{1}{}{20}{}
{16}{Do you have any swords?}{}{5}{}{30}{}
{17}{I am looking for a triply-lathed gold-gilded hilt with silver inlay}{}{13}{}{-15}{}
{20}{OK, let me know if you see anything.}{Call me if you need me.}{}{}{}{}
etc...
So line 14 is an NPC line, and lines 15, 16 and 17 are PC responses, and line 20 is another NPC response. If dialog jumps to line 14, the NPC will speak that line, and the PC will be given the choice of lines 15, 16, or 17.
Note that line 17 calls -15 when selected by the player, which refers to the calling script’s line 15. That line will check the NPC’s reaction to the PC and then call back into the dialog tree accordingly.
Dialogue Test Field
The Test field is non-blank only on certain PC lines that the designer wishes to restrict to certain PC’s. The general format of a test field is
code num1 num2
where code is a 2-letter code possibly followed by one or two numbers. Multiple tests can be placed in one field, separated by commas, and their restriction is AND’ed together (meaning the test only succeeds if all of the individual tests succeed).
Test codes and their numbers are:
$$ if num1 > 0, true if PC and followers have at least num1 gold
if num1 < 0, true if PC and followers have no more than -num1 gold
al if num1 > 0, true if PC’s alignment is >= num1
if num1 < 0, true if PC’s alignment is <= -num1
ar if num1 > 0, true if PC is aware of area num1 (it is marked on his map)
if num1 < 0, true if PC is NOT aware of area -num1
ch if num1 > 0, true if PC’s Charisma is >= num1
if num1 < 0, true if PC’s Charisma is <= -num1
fo if num1 is 0, true if NPC is not a follower of PC
if num1 is 1, true if NPC is a follower of PC
gf true if global flag num1 is equal to value num2
gv true if global variable num1 is equal to value num2
ha if num1 > 0, true if PC’s Haggle is >= num1
if num1 < 0, true if PC’s Haggle is <= -num1
ia if num1 > 0, true if PC is in area num1
if num1 < 0, true if PC is NOT in area –num1
in if num1 >= 0, true if PC or any follower has item with name index num1
if num1 < 0, true if NPC has item with name index –num1
lc true if local counter num1 is equal to num2
le if num1 > 0, true if PC’s level is >= num1
if num1 < 0, true if PC’s level is <= -num1
lf true if local flag num1 is equal to num2
ma if num1 > 0, true if PC’s Magical Aptitude is >= num1
if num1 < 0, true if PC’s Magical Aptitude is <= -num1
me if num1 is 0, true if NPC has not met PC before
if num1 is 1, true if NPC has met PC before
na if num1 > 0, true if PC’s alignment is >= -num1
if num1 < 0, true if PC’s alignment is <= num1
Examples:
Na 100 is true if the PC’s alignment is –100 or greater (-90, -50, 0, 80, 500, etc)
Na –100 is true if the PC’s alignment is –100 or lower ( -150, -300, -500, etc)
ni if num1 >= 0, true if PC and followers do NOT have item with name index num1
if num1 < 0, true if NPC does NOT have item with name index –num1
pa if num1 > 0, true if follower with name index num1 is in the PC’s party
if num1 < 0, true if follower with name index num1 is NOT in the PC’s party
pe if num1 > 0, true if PC’s Perception is >= num1
if num1 < 0, true if PC’s Perception is <= -num1
pf true if PC flag num1 is equal to value num2
ps if num1 > 0, true if PC’s Persuasion is >= num1
if num1 < 0, true if PC’s Persuasion is <= -num1
pv true if PC variable num1 is equal to value num2
qa true if quest num1 is in a state >= num2
qb true if quest num1 is in a state <= num2
qu true if quest num1 is in state num2
ra if num1 > 0, true if PC’s race is num1
if num1 < 0, true if PC’s race is not –num1
re if num1 > 0, true if NPC’s reaction to PC is >= num1
if num1 < 0, true if NPC’s reaction to PC is <= -num1
rp if num1 > 0, true if PC has the reputation num
if num1 < 0, true if PC does NOT have rumor –num
rq if num1 > 0, true if rumor num1 is quelled
if num1 < 0, true if rumor –num1 is NOT quelled
ru if num1 > 0, true if PC has rumor num1 in log
if num1 < 0, true if PC does NOT have rumor –num1 in log
sc if num2 > 0, true if PC knows at least num2 spells in college num1
if num2 <= 0, true if PC knows no more than -num2 spells in college num1
sk if num2 > 0, true if PC’s rank in skill num1 is >= num2
if num2 < 0, true if PC’s rank in skill num1 is <= -num2
ss if num1 > 0, true if the current story state is >= num1
if num1 < 0, true if the current story state is <= -num1
ta if num1 > 0, true if PC’s Tech Aptitude is >= num1
if num1 < 0, true if PC’s Tech Aptitude is <= -num1
tr if num2 > 0, true if PC’s training in skill num1 is >= num2
if num2 < 0, true if PC’s training in skill num1 is <= -num2
wa if num1 is 0, true if NPC is not currently waiting for his leader to pick him up
if num1 is 1, true if NPC is currently waiting for his leader to pick him up
wt if num1 is 0, true if NPC has not waited for his leader and the time expired
if num1 is 1, true if NPC waited for his leader and the time expired
Example:
{ps 3, al –500} true if the PC’s perception is >= 3 and his alignment is below –500
Here are some expected ranges to test for each code
$$ ranges from 0 to millions of gold
al ranges from –1000 (pure evil) to 1000 (pure goodness) with 0 being neutral. 100 is tinged with good, 300 is squarely good, 500 is quite good, 700 is damn good, 900 is saintly. Reverse for evil.
ar indexes are stored in data/mes/area.mes
ch ranges from 1 (very hateable personality) to 20 (god-like presence), with 10 being average. 3 is very annoying, 7 is annoying, 13 is nice to be around, and 17 is love to be around.
fo num1 MUST be 0 or 1
gf num1 ranges from 1000 to 3199
gv num1 ranges from 1000 to 1999
ha ranges from 1 (couldn’t sell a life preserver to a drowning man) to 20 (could sell a refrigerator to an Eskimo), with 5 being default. 3 means he can rarely get a good deal, 7 means he can sometimes get a good deal from nice people, 10 means he can negotiate good deals but rarely great ones, 15 means he can usually get great deals.
ia indexes are stored in data/mes/area.mes
in indexes are stored in data/oemes/oname.mes
lc num1 ranges from 0 to 3, num2 from 0 to 255
le levels can range from 1 to 20
lf num1 ranges from 0 to 31, num2 from 0 to 1
ma this ranges from 0 to 100, with 0 being the default. 100 is a master mage, 80 is an awesome mage, 60 is a great mage, 40 is a good mage, and 20 is a starting mage.
me num1 MUST be 0 or 1
na ranges from –1000 (pure evil) to 1000 (pure goodness) with 0 being neutral. 100 is tinged with good, 300 is squarely good, 500 is quite good, 700 is damn good, 900 is saintly. Reverse for evil.
ni indexes are stored in data/oemes/oname.mes
pa indexes are stored in data/oemes/oname.mes
pe ranges from 1 (notices nothing) to 20 (notices everything), with 10 being average. 3 will miss a lot of stuff, 7 will miss things that are not obvious and some that are, 10 will miss some non-obvious things, 13 will rarely miss hidden things, and 17 will notice anything that is not well-hidden.
pf num1 ranges from 1000 to 3199
ps ranges from 1 (no one cares about his opinion) to 20 (people think his words are law), with 5 being default. 3 means he must struggle to convince people the sky is blue, 7 means he can convince people with great effort, 10 means he can convince people to do things if they are predisposed, 15 means he can convince people to do things they might regret.
pv num1 ranges from 1000 to 1999
qa the states are unknown 0, mentioned 1, active 2, achieved 3, completed 4, other 5 and botched 6.
qb the states are unknown 0, mentioned 1, active 2, achieved 3, completed 4, other 5 and botched 6.
qu the states are unknown 0, mentioned 1, active 2, achieved 3, completed 4, other 5 and botched 6.
ra races are 1.human, 2.dwarf, 3.elf, 4.half elf, 5.gnome, 6.halfling, 7.half orc, 8.half ogre
re reaction is usually between 0 and 100, with 50 being neutral. Below 0 is pure hatred, and above 100 is pure love.
rp reputations are 1000 or greater
rq rumor numbers are 1000 or greater
ru rumor numbers are 1000 or greater
sc spell colleges range from 0-15 and spells known from 0-5
sk skills range from 0-11 for basic skills, and 12-15 for tech skills. The rank ranges from 0-20.
ss The story state value ranges from 0 on up
ta this ranges from 0 to 100, with 0 being the default. 100 is a master technologist, 80 is an awesome technologist, 60 is a great technologist, 40 is a good technologist, and 20 is a starting technologist.
tr skills range from 0-11 for basic skills, and 12-15 for tech skills. The training ranges from 0-3, 0 being untrained and 3 being master.
 
Dialogue Result Field
The Result field can be filled with a number of results to be triggered if the line is spoken by a PC or an NPC. These results are ONLY triggered in dialog and are NOT triggered if the line is used as a float, barter or other kind of message. The general format of a result field is
code num1 num2
where code is a 2-letter code possibly followed by one or two numbers. Multiple results can be placed in one field, separated by commas, and all of their results are triggered in order.
Result codes and their numbers are:
$$ if num1 >= 0, add num1 money to PC
if num1 < 0, remove this much gold from PC and followers
al if +num1, then add num1 to PC’s alignment
if -num1, then subtract num1 from PC’s alignment
if <num1, then PC’s alignment cannot be greater than num1
if >num1, then PC’s alignment cannot be less than num1
if num1, then set PC’s alignment to num1
ce start the character editor on the NPC in passive mode (this will terminate dialog)
co start combat between speakers and terminate dialog
et ONLY USABLE ON PC LINES!
Tests whether PC can have expert training in skill num1. If he can, then, continue dialog at num2. If he cannot, the NPC will say why and then dialog will continue at the response line for this line. Please note that only two reasons are tested for (not enough rank and no training) and that specifically we do not test for money or if the PC already has expert training (or higher).
fl float line num1 above NPC’s head and terminate dialog
fp give 1 fate point to the PC
gf set global flag num1 equal to value num2 (can only be 0 or 1)
gv set global variable num1 equal to value num2
ii start the inventory UI in identify mode
in if num >= 0, transfer item with name index num1 from PC or follower to NPC
if num < 0, transfer item with name index -num1 from NPC to PC
jo ONLY USABLE ON PC LINES!
ask NPC to join PC’s group. If num1 is 0, then pay attention to charisma limits. If num1 is 1, then override charisma limits. If successful, continue dialog at num2. If unsuccessful, the NPC will say why and then dialog will continue at the response line for this line.
lc set local counter num1 equal to num2
lf set local flag num1 equal to num2
lv make NPC leave the party
mm mark map area num1 as known on PC’s map
nk kill the NPC involved in this dialog
np add newspaper num1 with priority num2 (0 means no priority, 1 means high priority – make this tomorrow’s paper)
or Set NPC’s origin to num
pf set PC flag num1 equal to value num2 (can only be 0 or 1)
pv set PC variable num1 equal to value num2
qu set quest num1 as being in state num2. the states are unknown 0, mentioned 1, active 2, achieved 3, completed 4, other 5 and botched 6.
re if +num1, then add num1 to NPC’s reaction to PC
if -num1, then subtract num1 from NPC’s reaction to PC
if <num1, then NPC’s reaction to PC cannot be greater than num1
if >num1, then NPC’s reaction to PC cannot be less than num1
if num1, then set NPC’s reaction to PC to num1
ri start the inventory UI in repair mode
rp if num1 > 0, add reputation num1 to PC
if num1 < 0, remove reputation –num1 from PC
rq quell rumor num
ru add rumor num to PC log
sc NPC will stay close
so NPC will spread out
ss set the current story state to num1 if it is lower than num1
su start the schematic UI on the PC
tr set the training of skill num1 to num2
uw ONLY USABLE ON PC LINES!
ask NPC to unwait and rejoin PC’s group (assumes NPC was told to wait). If num1 is 0, then pay attention to charisma limits. If num1 is 1, then override charisma limits. If successful, continue dialog at num2. If unsuccessful, the NPC will say why and then dialog will continue at the response line for this line.
wa make the NPC wait here
xp award experience points to the PC as if he had solved a quest of level num1
Example:
{re –5, fl 5} the NPC’s reaction to the PC is reduced by 5, he will float line 5 above his head, and dialog is over
Quests
Quests are treated specially by the script system. Each quest has an associated global quest structure, which, among other fields, contains a quest status variable and quest dialog entry points for each state of that variable. The seven states are:
State Number Description
Unknown 0 the NPC has never talked about the quest to the PC, so the PC has no knowledge of it
Mentioned 1 the NPC has mentioned the quest, but the PC has not accepted it
Accepted 2 the PC has agreed to do the quest
Achieved 3 the PC has achieved the goal of the quest, but has to return to the NPC to report it
Completed 4 the PC has finished the quest by achieving and reporting the goal
Other 5 another PC has completed this quest
Botched 6 the quest can no longer be completed by anyone. Perhaps the item was destroyed or the victim killed.
Note that most of the quest structure must be kept in a PC-related data area, in case two PC’s are trying to do the same quest. One PC may have accepted the quest, while another has never heard of it before, and the NPC must react appropriately to each PC. However, each quest has a global state which indicates that it is completed or botched, so that the NPC may check this flag and react appropriately. Note also that many quests can only be completed by one PC (e.g. there is only one little girl to rescue), but remember that any experience rewarded to a PC will automatically be shared by any team member in the vicinity. Finally, note that quest states can only increase (ie. move from one state to a higher numbered state) with one exception – a quest can be botched in any state and if unbotched, it will return to its earlier (low numbered) state.
To mention a quest, use the dialog text line
Q:N
as a PC response, where N is the quest number. The appropriate dialog line is inserted based on the quest state. For example, if the NPC has never mentioned the quest, the unknown dialog entry point is used. If the player accepts the quest, the line is replaced with the accepted dialog entry point.
Here’s an example involving rescuing a prince’s daughter. Given a quest that has the following structure to it:
Quest Status Dialog Entry Point
Unknown 5
Mentioned 6
Accepted 7
Achieved 7
Completed -1
Other -1
Botched -1
We can make a dialog as follows:
{1}{What brings you before me?}{What is it madam?}{}{}{}{}
{2}{Q:1}{}{0}{}{0}{}
{3}{Nothing. Bye.}{}{1}{}{0}{}
{4}{The following are quest responses.}{}{}{}
{5}{I have heard you have a job available to a resourceful individual}{}{5}{}{10}{qu 1 1}
{6}{I have come to discuss the rescue of your daughter.}{}{5}{}{20}{}
{7}{I have found your daughter}{}{5}{}{script call to check this, If true, set quest completion, give player lots of gold, add 50 to reaction and goto 60, else lower reaction by 20 and goto 70}{}
{10}{Yes, my daughter has been kidnapped by ruffians. Can you rescue her?}{ Yes, my daughter has been kidnapped by ruffians. Can you rescue her?}{}{}{}{}
{11}{Yes.}{}{1}{}{50}{qu 1 2}
{12}{Maybe. I’ll come back.}{}{1}{}{0}{}
{20}{Have you decided to rescue my daughter?}{ Have you decided to rescue my daughter?}{}{}{}{}
{21}{Yes.}{}{1}{}{50}{qu 1 2}
{22}{Not yet. Bye.}{}{1}{}{0}{}
{50}{Thank you. Let me know if you find her.}{You are too kind madam.}{}{}{}{}
{51}{Ok.}{}{1}{}{0}{}
{60}{Here is you weight in gold! You have my gratitude.}{Thank you madam. Here is your gold!}{}{}{}{}
{61}{Bye.}{}{1}{}{0}{}
{70}{You liar! Begone!}{Lying bitch! Leave me!}{}{}{}{}
{71}{[exit]}{}{1}{}{0}{}
On the daughter’s object, we hook in a script on her death which, if this quest is not completed, we mark this script as failed. However, first we MUST check if the script is completed, since it should not affect the player if the daughter dies after she is returned.
More so, since the global quest flag is set to completed or failed too, the script for the prince can change his dialog starting point. For completed and other, he might say
{100}{I’m so happy to have my daughter back! What can I do for you sir?}{ I’m so happy to have my daughter back! What can I do for you madam?}{}{}{}{}
and for failure
{110}{My only daughter, dead…I am in hell. What would you have of me?}{ My only daughter, dead…I am in hell. What would you have of me?}{}{}{}{}
The possibilities are endless.
Script Attachment Points
The following is a list of every script attachment point in the game and each one’s primary function. All of the attachment points are editable in WorldEd.
ATTACHMENT POINT ATTACHMENT NUMBER PRIMARY FUNCTION
EXAMINE 0 Override the default examine text of an object, providing a message in the display window or a floating text bubble above the object.
USE 1 Prevent an object from being opened or used, or to detect that such an action is taking place.
DESTROY 2 Detect or prevent the destruction of an object.
UNLOCK 3 Force a container, door or window to be locked
GET 4 Detect or prevent an item from being picked up from the ground
DROP 5 Detect or prevent an item from being dropped to the ground
THROW 6 Detect or prevent a critter from throwing an item
HIT 7 Detect that a critter has used an item to successfully hit a target
MISS 8 Detect that a critter has used an item in a unsuccessful attempt to hit a target
DIALOG 9 Allow a dialog interface to be used
FIRST HEARTBEAT 10 Detect when a critter first becomes active or prevent its activity
CATCHING THIEF PC 11 Detect stealing or prevent an attack because of it
DYING 12 Detect or prevent a critter from dying
ENTER COMBAT 13 Detect when an NPC has begun combat
EXIT COMBAT 14 Detect when an NPC has finished combat
START COMBAT 15 Detect when an NPC has begun a combat round
END COMBAT 16 Detect when an NPC has completed a combat round
BUY OBJECT 17 Detect or prevent an NPC from buying an item from the PC
RESURRECT 18 Detect or prevent a critter from being raised from the dead
HEARTBEAT 19 Allow periodic activity of a critter or to prevent such activity
LEADER KILLING 20 Detect when an NPC’s leader has killed a victim
INSERT ITEM 21 Detect when an object has taken possession of an item
WILL KOS 22 Prevent an NPC from attacking a critter on sight
TAKING DAMAGE 23 Detect or prevent an object from taking damage
WIELD ON 24 Detect when an item is being wielded
WIELD OFF 25 Detect when an item is being unwielded
CRITTER HITS 26 Detect that a critter has successfully hit a target
NEW SECTOR 27 Detect that an NPC’s leader has entered a new sector
REMOVE ITEM 28 Detect when an object has lost a possession
LEADER SLEEPING 29 Detect when an NPC’s PC leader sleeps
BUST 30 Detect when an object busts
----- 31 Unavailable script attachment point
TRANSFER 32 Detect or prevent an item from being transferred from one inventory to another
CAUGHT THIEF 33 Detect a thief (called on the thief, not the target like with CATCHING THIEF PC)
CRITICAL HIT 34 Detect that a critter has used a weapon to critically hit a target or that his armor has taken a critical hit from target
CRITICAL MISS 35 Detect that a critter has used a weapon in a critical failure in an attempt to hit a target or that his armor has taken a critical miss from himself
The following information details the exact usage of each script: when it is called, what values its three parameters (triggerer, attachee, and extra object) may have, and what effect the return value of RETURN AND SKIP DEFAULT will have in the game.
EXAMINE
when called: when the pc hovers over an object in the isometric view with his mouse
triggerer: pc
attachee: targeted object
extra object: NULL
effect of RETURN AND SKIP DEFAULT: the standard examine data is not displayed
USE
when called: when a critter uses something, ie. a container, door or window is opened, a trap is triggered, an item is used (outside of the context of combat. For combat see HIT and MISS script attachment points)
triggerer: object user
attachee: object used (may be NULL with a tile trap)
extra object: the target of the object (usually NULL, is non–NULL when an item is used by a critter on a critter)
effect of RETURN AND SKIP DEFAULT: the use of the object is disallowed. So, for example, a container would not open.
DESTROY
when called: when an object is being completely destroyed and removed from the game
triggerer: object
attachee: object
extra object: NULL
effect of RETURN AND SKIP DEFAULT: the object will not be destroyed. Note that the item is not healed or restored in any way. It is simply not destroyed.
UNLOCK
when called: when a lockable object (container, door or window) is being queried by a critter to see if the object is locked. Note that doors and windows are queried by the path generation function, so this script could be called multiple times when a critter is attempting to find a path that includes the door or window, and it could be called even when ultimately the path with the door or window is not used.
triggerer: critter
attachee: lockable object
extra object: NULL
effect of RETURN AND SKIP DEFAULT: the game assumes the object cannot be unlocked
GET
when called: when a critter is picking up an item from the ground. Note: this script is NOT called when an item is transferred from one critter to another (see TRANSFER attachment point)
triggerer: critter
attachee: item
extra object: NULL
effect of RETURN AND SKIP DEFAULT: the critter is not allowed to pick up the item, which remains on the ground
DROP
when called: when an item is removed from a critter’s inventory and place on the ground
triggerer: critter
attachee: item
extra object: NULL
effect of RETURN AND SKIP DEFAULT: the item remains in the critter’s inventory
THROW
when called: when a critter tries to throw an item at a target
triggerer: critter
attachee: item
extra object: target (may be NULL if the critter is throwing item at a location)
effect of RETURN AND SKIP DEFAULT: the throw is disallowed. No message is generated.
HIT
when called: when a successful attack is performed by a critter on a target
triggerer: critter
attachee: item
extra object: target (may be NULL if the critter is throwing item at a location)
effect of RETURN AND SKIP DEFAULT: no effect. This script is called for informational reasons only. It cannot prevent the hit.
MISS
when called: when an unsuccessful attack is performed by a critter on a target. Note that for unsuccessful throws, this occurs when the projectile has reached its maximum range
triggerer: critter
attachee: item
extra object: target (may be NULL if the critter is throwing item at a location)
effect of RETURN AND SKIP DEFAULT: no effect. This script is called for informational reasons only. It cannot prevent the miss.
DIALOG
when called: when the pc targets and clicks on an npc in the isometric view
triggerer: pc
attachee: targeted pc
extra object: NULL
effect of RETURN AND SKIP DEFAULT: the npc will NOT float a generic greeting
FIRST HEARTBEAT
when called: when a critter is on a sector that is loaded into memory
triggerer: critter
attachee: critter
extra object: NULL
effect of RETURN AND SKIP DEFAULT: the critter will not perform normal heartbeat functions, like combat or AI-related activities
CATCHING THIEF PC
when called: when the PC fails or critically fails at pick pocketing (stealing or planting) an item from an NPC, or when a container, door or window that the NPC cares about is damaged or picklocked by the PC
triggerer: PC
attachee: NPC
extra object: pick pocketed item or opened object
effect of RETURN AND SKIP DEFAULT: the NPC will NOT attack the PC
DYING
when called: when a killer kills a victim
triggerer: killer
attachee: victim
extra object: NULL
effect of RETURN AND SKIP DEFAULT: the effects of dying (magic effects turning off, experience point awards, etc) do not occur. Note that as with DESTROY, the critter is not healed or restored in any way. He is simply not processed for death. The script must heal him.
ENTER COMBAT
when called: when an NPC switches to combat mode and targets a foe
triggerer: foe
attachee: NPC
extra object: NULL
effect of RETURN AND SKIP DEFAULT: no effect. This script is called for informational reasons only. It cannot prevent the combat.
EXIT COMBAT
when called: when an NPC stops fighting
triggerer: last valid foe (may be dead or NULL)
attachee: NPC
extra object: NULL
effect of RETURN AND SKIP DEFAULT: no effect. This script is called for informational reasons only. It cannot prevent the end of combat.
START COMBAT
when called: when a combat round for an NPC starts in turn-based, or before an attack begins in real-time
triggerer: foe
attachee: NPC
extra object: NULL
effect of RETURN AND SKIP DEFAULT: no effect. This script is called for informational reasons only. It cannot prevent the start of combat.
END COMBAT
when called: when a combat round for an NPC ends in turn-based, or when an attack completes in real-time
triggerer: foe
attachee: NPC
extra object: NULL
effect of RETURN AND SKIP DEFAULT: no effect. This script is called for informational reasons only. It cannot prevent the end of combat.
BUY OBJECT
when called: when NPC buys an item from the PC
triggerer: item
attachee: NPC
extra object: PC
effect of RETURN AND SKIP DEFAULT: NPC won’t buy the item in question

RESURRECT
when called: when a dead critter is being raised from the dead by a caster, who might be using an item
triggerer: caster
attachee: critter
extra object: item (can be NULL)
effect of RETURN AND SKIP DEFAULT: critter is not resurrected

HEARTBEAT
when called: every two seconds on all NPC’s in loaded sectors
triggerer: npc
attachee: npc
extra object: NULL
effect of RETURN AND SKIP DEFAULT: no heartbeat functions (combat, AI, etc)

LEADER KILLING
when called: when an NPC’s leader is killing a victim
triggerer: victim
attachee: NPC
extra object: leader
effect of RETURN AND SKIP DEFAULT: no effect. This script is called for informational reasons only. It cannot prevent the death of the victim

INSERT ITEM
when called: when an item is inserted into an object’s inventory
triggerer: object
attachee: item
extra object: NULL
effect of RETURN AND SKIP DEFAULT: no effect. This script is called for informational reasons only. It cannot prevent the acquisition of the item.

WILL KOS
when called: when an NPC is considering initiating an attack on a foe (called "kill on sight")
triggerer: foe
attachee: npc
extra object: NULL
effect of RETURN AND SKIP DEFAULT: NPC will not attack the foe. Note that the NPC will still fight back if attacked.

TAKING DAMAGE
when called: when an object is hit by a foe
triggerer: foe
attachee: object
extra object: NULL
effect of RETURN AND SKIP DEFAULT: object will not take any damage

WIELD ON
when called: when an item is wielded by a critter
triggerer: critter
attachee: item
extra object: NULL
effect of RETURN AND SKIP DEFAULT: no effect. This script is called for informational reasons only. It cannot prevent the wielding of the item.

WIELD OFF
when called: when an item is unwielded by a critter
triggerer: critter
attachee: item
extra object: NULL
effect of RETURN AND SKIP DEFAULT: no effect. This script is called for informational reasons only. It cannot prevent the unwielding of the item.

CRITTER HIT
when called: when a successful attack is performed by a critter on a target
triggerer: target
attachee: critter
extra object: NULL
effect of RETURN AND SKIP DEFAULT: no effect. This script is called for informational reasons only. It cannot prevent the hit.

NEW SECTOR
when called: when an NPC’s leader has entered a new sector
triggerer: leader
attachee: npc
extra object: NULL
effect of RETURN AND SKIP DEFAULT: no effect. This script is called for informational reasons only.

REMOVE ITEM
when called: when an item is removed from an object’s inventory
triggerer: object
attachee: item
extra object: NULL
effect of RETURN AND SKIP DEFAULT: no effect. This script is called for informational reasons only. It cannot prevent the loss of the item.

LEADER SLEEPING
when called: when an NPC’s PC leader sleeps
triggerer: PC leader
attachee: NPC
extra object: OBJ_HANDLE_NULL
effect of RETURN AND SKIP DEFAULT: no effect. This script is called for informational reasons only. It cannot prevent the PC from sleeping.

BUST
when called: when an object is being busted by an attacker (usually, this means reduced to 0 hit points but not destroyed. Not everything can bust).
triggerer: attacker
attachee: object
extra object: NULL
effect of RETURN AND SKIP DEFAULT: no effect. This script is called for informational reasons only. It cannot prevent the object from busting.

TRANSFER
when called: when an item’s owner is transferring an item to a target (either a critter or a container)
triggerer: owner
attachee: target
extra object: item
effect of RETURN AND SKIP DEFAULT: the target is not allowed to receive the item, which remains on the owner

CAUGHT THIEF
when called: when the thief fails or critically fails at pick pocketing (stealing or planting) an item from a target critter
triggerer: target
attachee: thief
extra object: pick pocketed item
effect of RETURN AND SKIP DEFAULT: no effect. This script is called for informational reasons only. It cannot prevent the item from being stolen.

CRITICAL HIT
when called: when a critical hit is performed by a critter on a target using a weapon OR when a critter takes a critical hit to his armor by target
triggerer: critter
attachee: weapon or armor
extra object: target (may be NULL if the critter is throwing item at a location)
effect of RETURN AND SKIP DEFAULT: no effect. This script is called for informational reasons only. It cannot prevent the hit.

CRITICAL MISS
when called: when an critical miss is performed by a critter on a target using a weapon (note that for unsuccessful throws, this occurs when the projectile has reached its maximum range) or when a critter critically misses and hits himself
triggerer: critter
attachee: weapon or armor
extra object: target (may be NULL if the critter is throwing item at a location) or critter (in case of a critical miss on himself)
effect of RETURN AND SKIP DEFAULT: no effect. This script is called for informational reasons only. It cannot prevent the miss.
Useful Lists:
Spell List:
When calling spells from scripts or adjusting counter 3 on traps, you will need the correct spell number. Some of these "spells" aren’t really spells at all, they perform certain functions in the game we wanted to add. So, if you are picking an entry that doesn’t seem like anything you have heard of in the game before, you might get some strange results. Some of the numbers will say next to it "Unused Spell Entry", these do nothing.
All the "spells" in the game are listed below and include the proper number next to it.
0 Disarm
1 Unlocking Cantrip
2 Unseen Force
3 Spatial Distortion
4 Teleportation
5 Sense Alignment
6 See Contents
7 Read Aura
8 Sense Hidden
9 Divine Magick
10 Vitality of Air
11 Poison Vapours
12 Call Winds
13 Body of Air
14 Call Air Elemental
15 Strength of Earth
16 Stone Throw
17 Wall of Stone
18 Body of Stone
19 Call Earth Elemental
20 Agility of Fire
21 Wall of Fire
22 Fireflash
23 Body of Fire
24 Call Fire Elemental
25 Purity of Water
26 Call Fog
27 Squall of Ice
28 Body of Water
29 Call Water Elemental
30 Shield of Protection
31 Jolt
32 Wall of Force
33 Bolt of Lightning
34 Disintegrate
35 Charm
36 Stun
37 Drain Will
38 Nightmare
39 Dominate Will
40 Resist Magick
41 Disperse Magick
42 Dweomer Shield
43 Bonds of Magick
44 Reflection Shield
45 Hardened Hands
46 Weaken
47 Shrink
48 Flesh to Stone
49 Polymorph
50 Charm Beast
51 Entangle
52 Control Beast
53 Succour Beast
54 Regenerate
55 Harm
56 Conjure Spirit
57 Summon Undead
58 Create Undead
59 Quench Life
60 Minor Healing
61 Halt Poison
62 Major Healing
63 Sanctuary
64 Resurrect
65 Illuminate
66 Flash
67 Blur Sight
68 Phantasmal Fiend
69 Invisibility
70 Plague of Insects
71 Orcish Champion
72 Guardian Ogre
73 Hellgate
74 Familiar
75 Magelock
76 Congeal Time
77 Hasten
78 Stasis
79 Tempus Fugit
80 Unused Spell Entry
81 Unused Spell Entry
82 MI: Fire Shield (Passive: Parent Damaged)
83 MI: Shield (Duration)
84 MI: Invisibility
85 MI: Demonic Armor: Base (Passive: Wield)
86 MI: Demonic Armor: Shield (Passive: Parent Damaged)
87 MI: Electrical Shield (Passive: Parent Damaged)
88 MI: SnakeForm (Script Spell)
89 MI: Earthquake (Passive: Parent Attacks Target)
90 MI: Harm Undead
91 Unused Spell Entry
92 MI: Holy Smiting
93 MI: Slaying Strength (Passive: Parent Atks or Hit by Target)
94 MI: Hammer of the Earth (Passive: Wield)
95 MI: Axe of the Winds (Passive: Wield)
96 MI: Dagger of Pain (Passive: Wield)
97 Unused Spell Entry
98 Unused Spell Entry
99 Unused Spell Entry
100 Unused Spell Entry
101 Unused Spell Entry
102 Unused Spell Entry
103 Unused Spell Entry
104 Unused Spell Entry
105 MI: Unrevivifiable Undead
106 Unused Spell Entry
107 Unused Spell Entry
108 Unused Spell Entry
109 Unused Spell Entry
110 Unused Spell Entry
111 Unused Spell Entry
112 MI: Staff of the Necromancer
113 Unused Spell Entry
114 MI: Elven Perfume
115 MI: Heal Light (Will 'O Wisp)
116 MI: Pad Lighting1 (NOT A SPELL)
117 MI: Pad Lighting2 (NOT A SPELL)
118 MI: Pad Lighting3 (NOT A SPELL)
119 MI: Pad Lighting4 (NOT A SPELL)
120 MI: Pad Lighting5 (NOT A SPELL)
121 MI: SuperHeal (Script Spell)
122 MI: Araya Projectile
123 MI: Summon Seether
124 MI: Summon Were-Rat
125 MI: Summon Wargun
126 MI: Summon Baleful Hound
127 MI: Flesh-To-Stone (Duration)
128 Unused Spell Entry
129 Unused Spell Entry
130 Unused Spell Entry
131 MI: Call Winds (All)
132 MI: Unseen Force (All)
133 MI: Stasis (Duration)
134 MI: Freeze
135 MI: Summon Undead
136 MI: Conjure Spirit II
137 MI: Heal Potion
138 MI: Haste Boots
139 MI: 60
140 Tech: Snare
141 Tech: Brain Builder
142 Tech: Hypnotic Suggestion
143 Tech: Basic Paralysis Effect
144 Tech: Muscle Maker
145 Tech: Dex Enhancer
146 Tech: Magick Detect
147 Tech: Jolt
148 Tech: Explode (Hallucinate)
149 Tech: Heal Regen
150 Tech: Heal Light
151 Tech: Fatigue Restore
152 Tech: Cure Poison
153 Tech: Fatigue Limiter
154 Tech: Heal Accelerator
155 Tech: Wonder Drug
156 Tech: Cure All
157 Tech: Boost Intelligence
158 Tech: Boost Strength
159 Tech: Boost Perception
160 Tech: Boost Dexterity
161 Tech: Boost Mental
162 Tech: Boost Physical
163 Tech: Boost All
164 Tech: Poison
165 Tech: Hallucinate
166 Tech: Acid
167 Tech: Animal Scent
168 Tech: Charged Regenerate
169 Tech: Venom
170 Tech: Cleaner
171 Tech: Strong Poison
172 Tech: Wine
173 Tech: Aqua Vitae
174 Tech: Electrical Shield
175 Tech: Explosion
176 Tech: Dynamite
177 Tech: Explode (Flash)
178 Tech: Explode (Smoke)
179 Tech: Explode (Stun)
180 Tech: Explode (Fire)
181 Tech: Alchohol)
182 Tech: Magnetic Inversion
183 Tech: Animal Lure
184 Tech: Trap Springer
185 Tech: Explode (Poison)
186 Tech: Flash
187 Tech: Magnetic Inversion Charge
188 Tech: Arm/Disarm
189 Tech: Invigorator
190 Tech: Reanimator
191 Tech: Heal Injection
192 Tech: Miracle Cure
193 Tech: Mental Inhibitor
194 Tech: Necromizer
195 Tech: Fortifier
196 Tech: Sleep Aid
197 Tech: Potion of Paralysis
198 Tech: Knock-Out Gas
199 Tech: Explode (Electrical)
200 Tech: Mustard Gas
201 Tech: Explode (Concussion)
202 Tech: Explode (Paralysis)
203 Tech: Grenade Launcher
204 Tech: Tranquilizer Gun
205 Tech: Explode (Grenade Launcher)
206 Tech: Vivifier
207 MI2: Kerghan's Death Spell
208 MI2: Kerghan's Attack Spell
209 MI2: Kerghan's Heal Spell
210 MI2: Potion of Fatigue Slower
211 MI2: Potion of Essence of Intellect
212 MI2: Potion of Haste
213 MI2: Liquid of Skin Thickening
214 MI2: Potion of Kalispi's Venom
215 MI2: Potion of Restorative
216 MI2: Conjure Spirit Permanent
217 MI2: Phantom Knight Death
218 Exit
219 Molotov Cocktail
220 Time Bomb
221 Quench Life
222 Wolf Form (Permanent)
Eye Candy List:
The eye candy file is a list of almost every visual effect in the game. You can call these visual effects from scripts. Be aware that a lot of visual effects in the game have sounds and lights attached to them. Some of the numbers have been removed because they contain no data.
College: Conveyance
Disarm
0 // Cast
1 // Projectile
2 // Destination
Unlocking Cantrip
10 // Cast
12 // Destination
Unseen Force
20 // Cast
21 // Projectile
22 // Destination
Spatial Distortion
30 // Cast
32 // Destination
Teleportation
40 // Cast
42 // Destination
College: Divination
Sense Magic
50 // Cast
See Contents
60 // Cast
62 // Destination
63 // Secondary Destination
Read Aura
70 // Cast
Sense Hidden
80 // Cast
82 // Destination
Divine Magic
90 // Cast
College: Air
Vitality of Air
100 // Cast
102 // Destination
Poison Vapours
110 // Cast
112 // Destination
113 // Secondary Destination
 
Call Winds
120 // Cast
122 // Destination
Body of Air
130 // Cast
132 // Destination
Call Air Elemental
140 // Cast
142 // Destination
College: Earth
Strength of Earth
150 // Cast
152 // Destination
Stone Throw
160 // Cast
161 // Projectile
162 // Destination
Wall of Stone
170 // Cast
Body of Stone
180 // Cast
182 // Destination
Call Earth Elemental
190 // Cast
192 // Destination
College: Fire
Agility of Fire
200 // Cast
202 // Destination
Wall of Fire
210 // Cast
Fireflash
220 // Cast
221 // Projectile
222 // Destination
223 // Secondary Destination
Body of Fire
230 // Cast
232 // Destination
Call Fire Elemental
240 // Cast
242 // Destination
College: Water
Purity of Water
250 // Cast
252 // Destination
Call Fog
260 // Cast
262 // Destination
263 // Secondary Destination
Squall of Ice
270 // Cast
272 // Destination
273 // Secondary Destination
Body of Water
280 115, 1, 100%, Add, 14040, b | : 1, 0 96 204 // Cast
282 126, 1, 100%, Add, 14045, | : 1, 0 96 204 // Destination
Call Water Elemental
290 // Cast
292 // Destination
293 // Secondary Destination
College: Force
Shield of Protection
300 // Cast
302 // Destination
303 // Secondary Destination
305 // Damage FX
Jolt
310 // Cast
312 // Destination
313 // Secondary Destination
Wall of Force
320 // Cast
Bolt of Lightning
330 // Cast
331 // Projectile
332 // Destination
333 // Secondary Destination
Disintegrate
340 // Cast
341 // Projectile
342 // Destination
College: Mental
Charm
350 // Cast
352 // Destination
353 // Secondary Destination
Stun
360 // Cast
362 // Destination
Drain Will WAS Stupefy
370 // Cast
372 // Destination
Nightmare
380 // Cast
382 // Destination
Dominate Will
390 // Cast
392 // Destination
393 // Secondary Destination
 
College: Meta
Resist Magic
400 // Cast
402 // Destination
403 // Secondary Destination
Disperse Magic
410 // Cast
412 // Destination
Dweomer Shield
420 // Cast
422 // Destination
423 // Secondary Destination
Bonds of Force
430 // Cast
432 // Destination
433 // Secondary Destination
Reflection Shield
440 // Cast
442 // Destination
443 // Secondary Destination
College: Morph
Hardened Hands
450 // Cast
Weaken
460 // Cast
462 // Destination
463 // Secondary Destination
Shrink
470 // Cast
472 // Destination
Flesh to Stone
480 // Cast
482 // Destination
Polymorph Other
490 // Cast
492 // Destination
College: Nature
Charm Beast
500 // Cast
502 // Destination
Entangle
510 // Cast
512 // Destination
513 // Secondary Destination
Control Beast
520 // Cast
522 // Destination
523 // Secondary Destination
Succor Beast
530 // Cast
532 // Destination
Regenerate
540 // Cast
542 // Destination
543 // Secondary Destination
 
College: Necromantic Evil
Harm
550 // Cast
552 // Destination
Conjure Spirit
560 // Cast
562 // Destination
563 // Secondary Destination
Summon Undead
570 // Cast
572 // Destination
Create Undead
580 // Cast
582 // Destination
Quench Life
590 // Cast
592 // Destination
College: Necromantic Good
Minor Healing
600 // Cast
602 // Destination
Halt Poison
610 // Cast
612 // Destination
Major Healing
620 // Cast
622 // Destination
Sanctuary
630 // Cast
632 // Destination
633 // Secondary Destination
Resurrect
640 // Cast
642 // Destination
643 // Secondary Destination
 
College: Phantasm
Illuminate
650 // Cast
652 // Destination
653 // Secondary Destination
Flash
660 // Cast
662 // Destination
Blur Sight
670 // Cast
672 // Destination
673 // Secondary Destination
Phantasmal Fiend
680 // Cast
682 // Destination
Invisibility
690 // Cast
692 // Destination
College: Summon
Plague of Insects
700 // Cast
702 // Destination
703 // Secondary Destination
Orcish Champion
710 // Cast
712 // Destination
Guardian Ogre
720 // Cast
722 // Destination
Hellgate
730 // Cast
732 // Destination
Familiar
740 // Cast
742 // Destination
College: Temporal
Magelock
750 // Cast
752 // Destination
753 // Secondary Destination
Congeal Time
760 // Cast
762 // Destination
763 // Secondary Destination
Hasten
770 // Cast
772 // Destination
773 // Secondary Destination
Stasis
780 // Cast
782 // Destination
783 // Secondary Destination
Tempus Fugit
790 // Cast
792 // Destination
793 // Secondary Destination
Item-Only Spells
MI: Regeneration
800 // Cast
802 // Destination
803 // Secondary Destination
MI: Drain Life
810 // Cast
812 // Destination
813 // Secondary Destination
MI: Fire Shield
823 // Secondary Destination
 
MI: Shield
832 // Destination
833 // Secondary Destination
835 // Damage FX
MI: Invisibility, Continuing
840 // Cast
842 // Destination
MI: Demonic Armor: Base
852 // Destination
MI: Demonic Armor: Shield
863 // Secondary Destination
MI: Electrical Shield
872 // Destination
MI: SnakeForm
882 // Destination
MI: Earthquake
892 // Destination
MI: Harm Undead
902 // Destination
MI: Area Fear Undead
912 // Destination
MI: Holy Smiting
922 // Destination
MI: LifeWard
1000 // Cast
1002 // Destination
1003 // Secondary Destination
MI # 36 -- Reserved for Pad ing1 for scripts
1161 // Projectile
1162 // Destination
1163 // Secondary Destination
1164 // Secondary Casting
MI # 37 -- Reserved for Pad ing2 for scripts
1170 // Cast
1171 // Projectile
1172 // Destination
1173 // Secondary Destination
1174 // Secondary Casting
MI # 38 -- Reserved for Pad ing3 for scripts
1180 // Cast
1181 // Projectile
1182 // Destination
1183 // Secondary Destination
1184 // Secondary Casting
MI # 39 -- Reserved for Pad ing4 for scripts
1190 // Cast
1191 // Projectile
1192 // Destination
1193 // Secondary Destination
1194 // Secondary Casting
MI # 40 -- MISC EFFECTS
1200 // Left Pillar
1201 // Right Pillar
1202 // Teleport Effect
1203 // Chest Breaking
MI: SuperHeal SuperHeal
1212 // Destination
MI: Araya Projectile
1220 // Cast
1221 // Projectile
1222 // Destination
MI: Summon Seether
1230 // Cast
1232 // Destination
MI: Summon Were-Rat
1240 // Cast
1242 // Destination
MI: Summon Wargun
1250 // Cast
1252 // Destination
MI: Summon Baleful Hound
1260 // Cast
1262 // Destination
MI: Flesh To Stone Duration
1270 // Cast
1272 // Destination
MI: Slow Party
1282 // Destination
1283 // Secondary Destination
MI: Poison DOT
1292 // Destination
MI: Fatigue DOT
1302 // Destination
MI: Call Winds All
1312 // Destination
MI: Unseen Force All
1322 // Destination
MI: Stasis Duration
1332 // Destination
1333 // Secondary Destination
MI: Freeze
1340 // Cast
1342 // Destination
MI: Summon Undead
1350 // Cast
1352 // Destination
 
MI: Conjure Spirit II Tulla Pool Guy
// Destination
// Secondary Destination
 
// ------------------------------
// Tech Items:
// ------------------------------
Tech: Bear Trap
1402 // Destination
1403 // Secondary Destination
 
Tech: Brain Builder
1412 // Destination
Tech: Hypnotic Suggestion
1422 // Destination
 
Tech: Basic Paralysis Duration Effect
1432 // Destination
1433 // Secondary Destination
Tech: Muscle Maker
1442 // Destination
Tech: Dex Enhancer
1450 // Cast
Tech: Magic Detect
1460 // Cast
Tech: Shocking Staff
1472 // Destination
1473 // Secondary Destination
Tech: Explode Hallucinate
1482 // Destination
Tech: Heal
1502 // Destination
Tech: Fatigue Restore
1512 // Destination
Tech: Cure Poison
1522 // Destination
Tech: Fatigue Limiter
1532 // Destination
Tech: Heal Accelerator
1542 // Destination
Tech: Wonder Drug
1552 // Destination
Tech: Cure All
1562 // Destination
Tech: Boost Intelligence
1572 // Destination
Tech: Boost Strength
1582 // Destination
Tech: Boost Perception
1592 // Destination
Tech: Boost Dexterity
1602 // Destination
Tech: Boost Mental
1612 // Destination
Tech: Boost Physical
1622 // Destination
Tech: Boost All
1632 // Destination
Tech: Poison
1642 // Destination
Tech: Hallucinate
1652 // Destination
Tech: Acid
1662 // Destination
Tech: Animal Scent
1672 // Destination
Tech: Charged Regenerate
1682 // Destination
Tech: Venom
1692 // Destination
Tech: Cleaner
1702 // Destination
 
Tech: Strong Poison
1712 // Destination
Tech: Aqua Vitae
1732 // Destination
 
Tech: Electrical Shield
1742 // Destination
Tech: Explosion Grenade
1752 // Destination
1753 // Secondary Destination
Tech: Explosion Dynamite
1762 // Destination
1763 // Secondary Destination
Tech: Explode Flash
1772 // Destination
1773 // Secondary Destination
Tech: Explode Smoke
1782 // Destination
1783 // Secondary Destination
Tech: Explode Stun
1792 // Destination
Tech: Magnetic Inversion
1822 // Destination
1825 // Damage FX
Tech: Animal Lure
1832 // Destination
Tech: Trap Springer
1842 // Destination
Tech: Explode Poison
1852 // Destination
1853 // Secondary Destination
Tech: Magnetic Inversion Charge not being used currently
1872 // Destination
1875 // Damage FX
Tech: mtTechInvigorator
1892 // Destination
Tech: mtTechReanimator
1902 // Destination
Tech: mtTechHealInjection
1912 // Destination
Tech: mtTechMiracleCure
1922 // Destination
Tech: mtTechFortifier
1952 // Destination
Tech: mtTechSleepAid
1962 // Destination
Tech: mtTechPotionOfParalysis
1972 // Destination
1973 // Secondary Destination
Tech: mtTechKnockOutGas
1982 // Destination
Tech: mtTechExplodeElectrical
1992 // Destination
1993 // Secondary Destination
Tech: mtTechMustardGas
2002 // Destination
2003 // Secondary Destination
Tech: mtTechExplodeConcussion
2012 // Destination
2013 // Secondary Destination
Tech: mtTechExplodeParalysis
2022 // Destination
2023 // Secondary Destination
Tech: Grenade Launcher
2032 // Destination
2033 // Secondary Destination
Tech: Tranquilizer Gun
2042 // Destination
Tech: Grenade Launcher Part II
2052 // Destination
2053 // Secondary Destination
// Item-Only Spells Part 2 -----
MI2: Kerghan's Death Spell
2070 // Cast
2072 // Destination
MI2: Kerghan's Attack Spell
2080 // Cast
2082 // Destination
MI2: Kerghan's Heal Spell
2092 // Destination
2093 // Secondary Destination
2095 // Damage FX
MI2: mtMI2PotionFatigueSlower
2102 // Destination
MI2: mtMI2PotionEssenceOfIntellect
2112 // Destination
MI2: mtMI2PotionHaste
2122 // Destination
2123 // Secondary Destination
MI2: mtMI2PotionLiquidOfSkinThickening
2132 // Destination
MI2: mtMI2PotionKalispisVenom
2142 // Destination
MI2: mtMI2PotionRestorative
2152 // Destination
MI2: mtMI2ConjureSpiritPermanent
2160 // Cast
2162 // Destination
2163 // Secondary Destination
MI2: Phantom Knight Death
2172 // Destination
MI2: Teleport Exit
2180 // Cast
2182 // Destination
MI2: Molotov Cocktail
2192 // Destination
2193 // Secondary Destination
MI2: Time Bomb
2202 // Destination
2203 // Secondary Destination
MI2: Quench Life Full
2210 // Cast
2212 // Destination
 
Script Eye Candy List:
The script eye candy file is a list of some extra visual effects in the game. You can call these visual effects from scripts at any time. Be aware that a lot of these visual effects have sounds and lights attached to them. Some numbers have descriptions and some are just miscellaneous effects quickly thrown into the game.
0
1 // PAD Lighting:
2 // Air Rune
3 // Divination Rune
4 // Earth Rune
5 // Fire Rune
6 // Force Rune
7 // Material Rune
8 // Mental Rune
9 // Meta Rune
10 // Morph Rune
11 // Nature Rune
12 // Necro (Black) Rune
13 // Necro (White) Rune
14 // Pelojians Rune
15 // Phantasm Rune
16 // Power Rune
17 // Spirit Rune
18 // Summon Rune
19 // Temporal Rune
20 // Truth Rune
21 // Water Rune
// MISC EFFECTS
22
23
24
25
26 // Conveyance Rune
27
28
29
30
31
32
33
34
35 //Generic Light Heal Effect
36 //Generic Parial Light Heal Effect
37 //Generic Major Heal Effect
38 //Generic Parial Major Heal Effect
39 //Generic Light Fatigue Restore Effect
40 //Generic Parial Light Fatigue Restore Effect
41 //Generic Major Fatigue Restore Effect
42 //Generic Parial Major Fatigue Restore Effect
43 //Generic Cure Poison Effect
44 //Generic Parial Cure Poison Effect
45 //Generic Full Healing Effect
46 //Generic Parial Full Healing Effect
47 //Generic Spell Faiure
48 //Phantom Knight Death
49 //Phantom Knight Death
50 //Phantom Knight Death
51 //Phantom Knight Death
52 //Familiar
53 //Familiar Slasher
54 //Familiar Bloodclaw
55 // Explosion!
56
57
58
59 // Puff of Smoke for Fire Damage.
60
61
62 // Multi-Player Flag Red
63 // Multi-Player Flag Blue
64 // Multi-Player Flag Yellow
65 // Multi-Player Flag Green
66 // Multi-Player X underlay Red
67 // Multi-Player X underlay Blue
68 // Multi-Player X underlay Yellow
69 // Multi-Player X underlay Green
70 // Multi-Player O underlay Red
71 // Multi-Player O underlay Blue
72 // Multi-Player O underlay Yellow
73 // Multi-Player O underlay Green
74
Scenery List:
This file lists scenery numbers that can be called upon in scripts. They are usually used to change one item into another. When these numbers are called in scripts, you should always drop the first set of digits. If the number is 7032, in a script you would call number 32. The first digit is used to define what kind of prototype it is. For instance "large trees" are all in the "1000" block, and "medium trees" are all in the 2000 block.

Another thing to keep in mind is that an objects art can only be changed into art within the same prototype. You cannot change a "large tree" prototype into a "small wooden". You must change a large tree into another large tree prototype.
Here is the list:
// Projectiles start at 0
0 Fly_Arrow1.art
1 Fly_Arrow2.art
2 Fly_Arrow3.art
3 Fly_Arrow4.art
4 proj-fireball-trav_0_F.art
5 proj-fireball-trav_1_F.art
6 proj-fireball-trav_2_F.art
7 proj-fireball-trav_3_F.art
8 proj-tesla-trav_F.art
9 proj-tesla-trav_F.art
10 proj-tesla-trav_F.art
11 proj-tesla-trav_F.art
12 arrow-1.art
13 arrow-2.art
14 arrow-3.art
15 arrow-4.art
16 FG-Projectile_1.art // Flying Gs
17 FG-Projectile_2.art //
18 FG-Projectile_3.art //
19 FG-Projectile_4.art //
20 Krull-rot-1_F.art // Glaive
21 Krull-rot-2_F.art //
22 Krull-rot-3_F.art //
23 Krull-rot-4_F.art //
24 Shakram-rot-1_F.art // Temp Chakram
25 Shakram-rot-2_F.art //
26 Shakram-rot-3_F.art //
27 Shakram-rot-4_F.art //
28 boomerang_1_F.ART // Temp Boomerang
29 boomerang_2_F.ART //
30 boomerang_3_F.ART //
31 boomerang_4_F.ART //
32 Tech-Guns-Bronwycks-Projectile_1_F.ART // Bronwycks Projectile
33 Tech-Guns-Bronwycks-Projectile_2_F.ART //
34 Tech-Guns-Bronwycks-Projectile_3_F.ART //
35 Tech-Guns-Bronwycks-Projectile_4_F.ART //
36 Dagger-Rot-1.ART // Dagger Projectile
37 Dagger-Rot-2.ART //
38 Dagger-Rot-3.ART //
39 Dagger-Rot-4.ART //

// Large Trees start at 1000
1000 tree.art
1001 T_bushy_willow_2.ART
1002 T_swamp_1.ART
1003 T_swamp_2.ART
1004 T_swamp_3.ART
1005 T_swamp_4.ART
1006 T_swamp_5.ART
1007 T_swamp_6.ART
1008 T_swamp_7.ART
1009 T_bushy_willow_1.ART
1010 ftr1.ART
1011 ftr2.ART
1012 ftr3.ART
1013 ytree1.ART
1014 ytree2.ART
1015 ytree3.ART
1016 ElfForestTree1_L.ART
1017 ElfForestTree2_L.ART
1018 ElfForestTree3_L.ART
1019 ElfForestTree4_L.ART
1020 Kactus01.ART
1021 tropical_tree01.ART
1022 tropical_tree02.ART
1023 tropical_tree03.ART
1024 tropical_tree04.ART
1025 tropical_tree05.ART
1026 tropical_tree06.ART
1027 tropical_tree07.ART
1028 tropical_tree08.ART
1029 tropical_tree09.ART
1030 tropical_tree10.ART
1031 tropical_tree11.ART
1032 tropical_tree12.ART
1033 tropical_tree13.ART
1034 tropical_tree14.ART
1035 tropical_tree15.ART
1036 tropical_tree16.ART
1037 savanna_tree01.ART
1038 savanna_tree02.ART
1039 savanna_tree03.ART
1040 savanna_tree04.ART
1041 savanna_tree_tall01.art
1042 savanna_tree_tall02.art
1043 VOID-Tree-Big1.ART
1044 VOID-Tree-Big2.ART
1045 VOID-Tree-Big3.ART
// Medium Trees start at 2000
2000 T_bottle_brush_1.ART
2001 T_bottle_brush_2.ART
2002 T_bottle_brush_3.ART
2003 T_bottle_brush_4.ART
2004 T_snow_eucalypt_1.ART
2005 T_snow_eucalypt_2.ART
2006 T_snow_eucalypt_3.ART
2007 T_snow_tree_1.ART
2008 T_snow_tree_2.ART
2009 T_snow_tree_3.ART
2010 T_snow_willow.ART
2011 T_willow_2.ART
2012 T_willow_3.ART
2013 T_young_lemon_4.ART
2014 T_young_pine_1.ART
2015 T_young_pine_2.ART
2016 tdtr1.ART
2017 tdtr2.ART
2018 tdtr3.ART
2019 tr4.ART
2020 T_snow_willow_1.ART
2021 T_snow_willow_2.ART
2022 ElfForestTree5_M.ART
2023 ElfForestTree6_M.ART
2024 jtr1.ART
2025 jtr2.ART
2026 jtr3.ART
2027 jtr4.ART
2028 jtr5.ART
2029 jtr6.ART
2030 jtr7.ART
2031 jtr8.ART
2032 jtr9.ART
2033 hedge01.ART
2034 hedge01-02.ART
2035 hedge02.ART
2036 hedge02-02.ART
2037 hedge03.ART
2038 hedge04.ART
2039 hedge05.ART
2040 hedge06.ART
2041 hedge07.ART
// Small Trees and Bushes start at 3000
3000 T_baby_tree_1.ART
3001 T_baby_tree_2.ART
3002 T_baby_tree_3.ART
3003 T_fallen_1.ART
3004 T_snow_tree_small_1.ART
3005 T_snow_tree_small_2.ART
3006 T_willow_1.ART
3007 T_willow_4.ART
3008 T_willow_5.ART
3009 T_willow_6.ART
3010 T_young_lemon_1.ART
3011 T_young_lemon_2.ART
3012 T_young_lemon_3.ART
// Dead trees start at 4000
4000 T_dead_dirt_1.ART
4001 T_dead_dirt_2.ART
4002 T_dead_dirt_3.ART
4003 T_dead_dirt_4.ART
4004 T_dead_dirt_5.ART
4005 T_dead_grass_1.ART
4006 T_dead_grass_2.ART
4007 T_dead_grass_3.ART
4008 T_dead_grass_4.ART
4009 T_dead_small_1.ART
4010 T_dead_small_2.ART
4011 T_dead_small_3.ART
4012 T_dead_small_4.ART
4013 T_dead_small_5.ART
4014 T_dead_small_6.ART
4015 T_leafless_1.ART
4016 T_leafless_2.ART
4017 T_leafless_3.ART
4018 T_leafless_4.ART
4019 T_leafless_5.ART
4020 T_leafless_6.ART
// Plants start at 5000
5000 P_fern_1.ART
5001 P_fern_2.ART
5002 P_fern_5.ART
5003 P_fern_6.ART
5004 P_fern_7.ART
5005 P_leafy_bush_3.ART
5006 fbsh1.ART
5007 fbsh2.ART
5008 fwd1.ART
5009 fwd2.ART
5010 shr1.ART
5011 shr2.ART
5012 shr3.ART
5013 tdpl1.ART
5014 tdpl2.ART
5015 tdpl3.ART
5016 P_dead_bush_1.ART
5017 P_dead_bush_10.ART
5018 P_dead_bush_2.ART
5019 P_dead_bush_3.ART
5020 P_dead_bush_4.ART
5021 P_dead_bush_5.ART
5022 P_dead_bush_6.ART
5023 P_dead_bush_7.ART
5024 P_dead_bush_8.ART
5025 P_dead_bush_9.ART
5026 P_bush_1.ART
5027 P_bush_2.ART
5028 P_bush_3.ART
5029 P_bush_4.ART
5030 P_bush_5.ART
5031 P_fern_3.ART
5032 P_fern_4.ART
5033 P_flowering_reed_1.ART
5034 P_flowering_reed_2.ART
5035 P_flowering_reed_4.ART
5036 P_grass_clump_1.ART
5037 P_grass_clump_2.ART
5038 P_grass_clump_3.ART
5039 P_grass_clump_4.ART
5040 P_grass_clump_5.ART
5041 P_leafy_bush_1.ART
5042 P_leafy_bush_2.ART
5043 P_leafy_bush_4.ART
5044 P_reeds_1.ART
5045 P_reeds_2.ART
5046 P_reeds_3.ART
5047 P_reeds_4.ART
5048 P_reeds_5.ART
5049 P_reeds_6.ART
5050 P_snow_bush_1.ART
5051 P_snow_bush_2.ART
5052 P_snow_bush_3.ART
5053 Plains-Grass.ART
5054 flower01.ART
5055 flower02.ART
5056 flower03.ART
5057 flower04.ART
5058 flower05.ART
5059 flower06.ART
5060 flower07.ART
5061 flower08.ART
5062 flower09.ART
5063 flower10.ART
5064 flower11.ART
5065 tropical_tree04.ART
5066 tropical_tree07.ART
5067 tropical_tree02.ART
5068 VOID-Plant1.ART
5069 VOID-Plant2.ART
5070 VOID-Plant3.ART
// Small Metal Objects start at 6000
6000 Bucket1.ART
6001 Bucket2.ART
6002 cooker.ART
6003 HandWaterPump.ART
6004 Junk1.ART
6005 Junk2.ART
6006 LanternHang1.ART
6007 LanternHang2.ART
6008 lamp1p.ART
6009 lamp2p.ART
6010 MetalBasket.ART
6011 MetalBasket_Bread.ART
6012 MineJunk11.ART
6013 PaintCan.ART
6014 Wall_light1.ART
6015 Wall_light2.ART
6016 WTlampp1.ART
6017 WTlampp2.ART
6018 tarantbridgelight.ART
6019 bunny_trap_empty_flip.ART
6020 bunny_trap_full_flip.ART
6021 dwalven_trap_door.ART
6022 dwalven_trap_door_flip.ART
6023 dwalven_trap_door_closed.ART
6024 dwalven_trap_door_closed_flip.ART
6025 Dwarven_scenery_002.ART
6026 Dwarven_scenery_003.ART
6027 Dwarven_scenery_004.ART
6028 Still_prop01.ART
6029 Still_prop01_flip.ART
6030 Still_prop02.ART
6031 Still_prop03.ART
6032 Still_prop04.ART
6033 Still_prop04_flip.ART
6034 Still_prop04_v02.ART
6035 Still_prop04_v02_flip.ART
6036 red_rope.ART
6037 red_rope_flip.ART
6038 red_rope_pole.ART
6039 sign_2.ART
6040 sign_2_flip.ART
6041 lab_scenery01.ART
6042 lab_scenery02.ART
6043 lab_scenery03.ART
6044 lab_scenery04.ART
6045 lab_scenery05.ART
6046 lab_scenery06.ART
6047 lab_scenery07.ART
6048 lab_scenery08.ART
6049 vent.ART
6050 vent2.ART
6051 deco.art
6052 deco_flip.art
6053 Vent-vend.art
6054 vent-vend_flip.art
6055 lamp03.art
6056 lamp03_flip.art
6057 stairs-vendigroth.art
6058 stairs-vendigroth_clickable.art
6059 Vent-vend-big.art
6060 vent-vend-big_flip.art
6061 torture03.art
6062 torture04.art
6063 torture05.art
6064 torture06.art
6065 torture07.art
6066 torture08.art
6067 VOID-Altar-Sword-Scenery.ART
// Medium Sized Metal Objects start at 7000
7000 anvil.ART
7001 bathtub.ART
7002 CandleStand1.ART
7003 CandleStand2.ART
7004 CandleStand3.ART
7005 CandleStand4.ART
7006 lamp_post.ART
7007 lamp1p.ART
7008 lamp2p.ART
7009 LanternBarrel.ART
7010 metal_tank.ART
7011 MetalBarrel.ART
7012 MilkCan.ART
7013 MineCart_1.ART
7014 MineCart_2.ART
7015 MineCart_3.ART
7016 MineCart_4.ART
7017 MineCartSpill.ART
7018 Powered_Plow.ART
7019 Stove3.ART
7020 StreetLamp1.ART
7021 StreetLamp2a.ART
7022 StreetLamp2b.ART
7023 StreetLamp4.ART
7024 WTstoveR3.ART
7025 WTstoveR5.ART
7026 small-generator-1.ART
7027 small-generator-2.ART
7028 safe.ART
7029 safe_flip.ART
7030 wm_case.ART
7031 wm_fraim.ART
7032 gc_cover.ART
7033 Grate01.ART
7034 Grate01_F.ART
7035 Grate02.ART
7036 Grate02_F.ART
7037 Grate03.ART
7038 Grate03_F.ART
7039 Grate04.ART
7040 Grate04_F.ART
7041 Pipes01.ART
7042 Pipes01_F.ART
7043 Pipes02.ART
7044 Pipes02_F.ART
7045 Pipes03.ART
7046 Pipes03_F.ART
7047 Pipes04.ART
7048 Pipes04_F.ART
7049 Pipes05.ART
7050 Pipes05_F.ART
7051 Pipes06.ART
7052 Pipes06_F.ART
7053 Pipes07.ART
7054 Pipes07_F.ART
7055 Pipes09.ART
7056 Pipes09_F.ART
7057 Pipes11.ART
7058 Pipes11_F.ART
7059 TPipes01.ART
7060 TPipes01_F.ART
7061 TPipes03.ART
7062 TPipes03_F.ART
7063 TPipes04.ART
7064 TPipes04_F.ART
7065 TPipes05.ART
7066 TPipes05_F.ART
7067 TPipes06.ART
7068 TPipes06_F.ART
7069 TPipes07.ART
7070 TPipes07_F.ART
7071 TPipes08.ART
7072 TPipes08_F.ART
7073 TPipes09.ART
7074 TPipes09_F.ART
7075 TPipes10.ART
7076 TPipes10_F.ART
7077 ArmorDisplay1.ART
7078 ArmorDisplay2.ART
7079 ArmorDisplay3.ART
7080 ArmorDisplay4.ART
7081 ArmorDisplay5.ART
7082 HelmShelf1.ART
7083 HelmShelf2.ART
7084 SmithBench1.ART
7085 SmithBench2.ART
7086 SmithBench3.ART
7087 SmtihBench4.ART
7088 SwordHolder1.ART
7089 SwordHolder2.ART
7090 SwordRack1.ART
7091 SwordRack2.ART
7092 SwordRack3.ART
7093 Wall_Axes1.ART
7094 Wall_Axes2.ART
7095 Wall_Shield1.ART
7096 Wall_Shield2.ART
7097 Wall_Shield3.ART
7098 Wall_Shield4.ART
7099 Wall_Sword1.ART
7100 Wall_Sword2.ART
7101 Wall_Sword3.ART
7102 Wall_Sword4.ART
7103 Wall_SwordCross1.ART
7104 Wall_SwordCross2.ART
7105 control.ART
7106 control_thrashed.ART
7107 control02.ART
7108 control02_thrashed.ART
7109 printing_press.ART
7110 printing_press_flip.ART
7111 safe-tall.ART
7112 safe-tall_open.ART
7113 bed2.art
7114 bed2_flip.art
7115 bench2.art
7116 bench2_flip.art
7117 chair01vend.art
7118 chair01vend_flip.art
7119 device.art
7120 device_filp.art
7121 lamp.art
7122 lamp_flip.art
7123 table01.art
7124 table01_flip.art
7125 table02.art
7126 table02_flip.art
7127 lamp02.art
7128 lamp02_flip.art
7129 lamp04.art
7130 lamp04_flip.art
7131 Lamp02_new.art
7132 lamp02_new-flip.art
7133 lamp_new.art
7134 lamp_new-flip.art
7135 dresser.art
7136 dresser_flip.art
7137 deco_2.art
7138 deco_flip_2.art
7139 bench04_flip.art
7140 bench04.art
7141 bench02.art
7142 bench03.art
7143 deco_3.art
7144 deco_flip_3.art
7145 table-vend.art
7146 trash_can01.art
7147 trash_can02.art
7148 Void_Hook.ART
7149 Void_Lamp.ART
7150 VOID-LightFrames.ART
// Large Metal Objects start at 8000
8000 crane.ART
8001 LoadingHook.ART
8002 Milk_Rack1.ART
8003 Milk_Rack2.ART
8004 Dwarven_scenery_001.ART
8005 Dwarven_scenery_005.ART
8006 Machine01.ART
8007 Machine01_F.ART
8008 Machine03.ART
8009 Machine03_F.ART
8010 Machine04.ART
8011 Machine04_F.ART
8012 Still_prop05.ART
8013 Tailblade.ART
8014 stairs-up.ART
8015 stairs-down.ART
8016 Caladon-Fan.ART
8017 Mech-Fish-Fin.ART
8018 Mech-Fish-Fin2.ART
8019 Mech-Fish-Fin3.ART
8020 Statue-Head.ART
8021 Statue-Arm.ART
8022 JunkBin.ART
8023 JunkTable.ART
8024 TechBench1.ART
8025 TechBench2.ART
8026 TechBench3.ART
8027 TechBench4.ART
8028 TechBench5.ART
8029 TechBench6.ART
8030 TechCabnet_L.ART
8031 TechCabnet_R.ART
8032 TechThing1.ART
8033 TechThing2.ART
8034 TechThing3.ART
8035 lab_01.ART
8036 lab_01_flip.ART
8037 lab_02.art
8038 lab_02_flip.art
8039 lab_03.art
8040 lab_03_flip.art
8041 lab_04.art
8042 lab_04_flip.art
8043 lab_05.art
8044 lab_05_flip.art
8045 lab_06.art
8046 lab_06_flip.art
8047 lab_07.art
8048 lab_07_flip.art
8049 lab_08_flip.art
8050 lab_09.art
8051 lab_09_flip.art
8052 lab_10.art
8053 lab_10_flip.art
8054 lab_11.art
8055 lab_11_flip.art
8056 Ped_with-Goddess.art
8057 Ped_without-Goddess.art
8058 drums-0.art
8059 drums-1.art
8060 drums-2.art
8061 drums-3.art
8062 adv-temp-noanim.art
8063 adv-temp-anim.art
8064 floor-closed.art
8065 floor-open.art
8066 pedestool-no-crystal.art
8067 pedestool-with-crystal.art
8068 Cage-Low.ART
8069 Cage-High.ART
8070 Cage-Crane.ART
8071 vendjunktable.ART
8072 vendbench1.ART
8073 vendbench2.ART
8074 vendbench3.ART
8075 vendbench4.ART
8076 vendbench5.ART
8077 vendigrothstairs-up.ART
8078 vendigrothstairs-down.ART
8079 witch_caldron02.ART
8080 torture_coffin.ART
8081 torture_coffin_flip.ART
8082 torture_coffin02.ART
8083 torture_coffin02_flip.ART
8084 torture09.ART
8085 torture09_filp.ART
8086 torture11.ART
8087 torture11_flip.ART
8088 torture14.ART
8089 torture14_flip.ART
8090 VendiBridgePart1.ART
8091 VendiBridgePart2.ART
8092 VendiBridgePart3.ART
8093 VendiBridgePart4.ART
8094 VendiBridgeTower.ART
8095 Recorder-non-anim.ART
8096 Recorder.ART
8097 VOID-Stargate-Piece1.ART
8098 VOID-Stargate-Piece2.ART
8099 VOID-Stargate-Piece3.ART
8100 VOID-Stargate-Piece4.ART
8101 VOID-Stargate-Piece5.ART
8102 Iron-Clan-Entrance-Piece1.ART
8103 Iron-Clan-Entrance-Piece2.ART
// Small Stone Objects start at 9000
9000 rocks_on_deadgrass_2.ART
9001 rocks_on_deadgrass_3.ART
9002 rocks_on_deadgrass_4.ART
9003 rocks_on_grass_2.ART
9004 rocks_on_grass_5.ART
9005 block.ART
9006 pottery.ART
9007 pottery01.ART
9008 pottery02.ART
9009 pottery03.ART
9010 pottery04.ART
9011 pottery05.ART
9012 rck2.ART
9013 rck3.ART
9014 rck4.ART
9015 rck2.ART
9016 stone_block01.ART
9017 stone_block02.ART
9018 Book_on_Pedestal01.ART
9019 Book_on_Pedestal02.ART
9020 pseudo_cross01.ART
9021 pseudo_cross01_flip.ART
9022 toomb_stone.ART
9023 toomb_stone_flip.ART
9024 table_with_crystal_ball.ART
9025 MageWallDecor1_L.ART
9026 MageWallDecor1_R.ART
9027 df_Symblo01.ART
9028 df_Symblo01_2.ART
9029 df_Symblo02.ART
9030 df_Symblo02_2.ART
9031 df_Symblo03.ART
9032 df_Symblo03_2.ART
9033 df_Symblo04.ART
9034 df_Symblo04_2.ART
9035 TullaTower-Door.ART
 
// Medium Sized Stone Objects start at 10000
10000 Pedastal1.ART
10001 plant01.ART
10002 plant02.ART
10003 rck1.ART
10004 rck5.ART
10005 rck7.ART
10006 StoneTable.ART
10007 Coffin01.ART
10008 Coffin02.ART
10009 Shrine.ART
10010 Shrine02.ART
10011 schuyler_in_chair.ART
10012 schuyler_in_chair_flip.ART
10013 sarcophogos_L_open.ART
10014 sarcophogos_R_open.ART
10015 sarcophogos_L_closed.ART
10016 sarcophogos_R_closed.ART
10017 sarcophogos_L_Lid-Only.ART
10018 sarcophogos_R_Lid-Only.ART
10019 sarcophogos_Blank-Marker.ART
10020 sarcophagos_Bates.ART
10021 sarcophagos_Bates_flip.ART
10022 sarcophagos_Bates_open.ART
10023 sarcophagos_Bates_open_flip.ART
10024 Head_stone.ART
10025 CinderBlock.ART
10026 CinderBlock_F.ART
10027 MageDecor1.ART
10028 MageTable1.ART
10029 MageTable2.ART
10030 MageTable3.ART
10031 TullaInterior-Chair.ART
10032 TullaInterior-Desk.ART
10033 TullaInterior-Lamp.ART
10034 TullaInterior-Portal-01.ART
10035 TullaInterior-Portal-02.ART
10036 TullaInterior-Portal-03.ART
10037 TullaInterior-Portal-04.ART
10038 TullaInterior-Portal-05.ART
10039 TullaInterior-Portal-06.ART
10040 TullaInterior-Portal-07.ART
10041 TullaInterior-Portal-08.ART
10042 TullaInterior-Portal-09.ART
10043 TullaInterior-Portal-10.ART
10044 TullaInterior-Portal-11.ART
10045 TullaInterior-Portal-12.ART
10046 TullaInterior-Portal-13.ART
10047 TullaInterior-Portal-14.ART
10048 TullaInterior-Portal-15.ART
10049 TullaInterior-Portal-16.ART
10050 TullaInterior-Portal-17.ART
10051 TullaInterior-Portal-18.ART
10052 Tulla-BigDoor-RightPiece.ART
10053 Tulla-BigDoor-LeftPiece.ART
10054 witch_caldron01.ART
10055 book_shelf07.ART
10056 book_shelf07_flip.ART
10057 book_shelf08.ART
10058 book_shelf08_flip.ART
10059 dresser_v02.art
10060 dresser_v02_flip.art
10061 head_table.ART
10062 head_table_flip.ART
10063 lamp01.ART
10064 lamp01_v02.ART
10065 lamp02.ART
10066 lamp02_v02.ART
10067 tulla-lamp03.ART
10068 tulla-table.ART
10069 tulla-table02.ART
10070 tulla-table02_flip.ART
10071 tulla-table03.ART
10072 Tulla_chair-1.ART
10073 Tulla_chair-2.ART
10074 VoidBraizure.ART
// Large Stone Objects start at 11000
11000 MineRocks1.ART
11001 MineRocks2.ART
11002 rocksWplants_on_grass_1.ART
11003 rocksWplants_on_grass_2.ART
11004 rocksWplants_on_grass_3.ART
11005 rocksWplants_on_grass_4.ART
11006 rocksWplants_on_grass_5.ART
11007 rocksWplants_on_grass_6.ART
11008 rocksWplants_on_grass_7.ART
11009 rocks_on_deadgrass_1.ART
11010 rocks_on_deadgrass_5.ART
11011 rocks_on_grass_1.ART
11012 rocks_on_grass_3.ART
11013 rocks_on_grass_4.ART
11014 BrazureLarge.ART
11015 fountain.ART
11016 tarantbridgetowermid.ART
11017 tarantbridgetowertop.ART
11018 Saint_Statue.ART
11019 Well01.ART
11020 Well02.ART
11021 Well03.ART
11022 Well04.ART
11023 RockCollum1.ART
11024 RockCollum2.ART
11025 RockCollum3.ART
11026 BatesCastleDoor.ART
11027 BatesLeftDoorPiece.ART
11028 BatesRightDoorPiece.ART
11029 Piece-Left.ART
11030 Piece-Right.ART
11031 Panarii-door-01.ART
11032 Panarii-door-02.ART
11033 Panarii-middlepiece.ART
11034 chunk_of_stone.ART
11035 pool_of_lava.ART
11036 Structure.ART
11037 Structure_flip.ART
11038 Dragon_stone.ART
11039 df_column.ART
11040 dynosaur_eggs.ART
11041 dragon_diagram.ART
11042 dragon_skull03.ART
11043 watermon_wood.ART
11044 godess_flip2.ART
11045 godess_pedestal.ART
11046 Rock01.ART
11047 Rock02.ART
11048 Rock03.ART
11049 Rock04.ART
11050 Rock05.ART
11051 Rock06.ART
11052 Rock07.ART
11053 Rock08.ART
11054 Rock09.ART
11055 Rock10.ART
11056 Rock11.ART
11057 Rock12.ART
11058 Rock13.ART
11059 Rock14.ART
11060 Monk_Statue.ART
11061 Ob_Part1.ART
11062 Ob_Part2.ART
11063 Ob_Monk.ART
11064 Ob_MonkWings.ART
11065 Ob_Monk4_Wings.ART
11066 Ob_Monk2.ART
11067 Ob_Monk3.ART
11068 Ob_Monk4.ART
11069 Statue_Monk2.ART
11070 Statue_Monk3.ART
11071 Statue_Monk4.ART
11072 Statue_Monk4_Wings.ART
11073 TullaCornerNub.ART
11074 rock01n.art
11075 rock02n.art
11076 rock03n.art
11077 rock04n.art
11078 rock05n.art
11079 rock06n.art
11080 rock07n.art
11081 altar.art
11082 altar-Piece.art
11083 pit_o_lava.ART
11084 King_Statue.ART
11085 WheelClan-Throne.ART
11086 WheelClan-Brazier.ART
11087 WheelClan-Brazier1.ART
11088 Throne-Front.ART
11089 Throne-Back.ART
11090 VOID-Altar-RibCage.ART
11091 alter_dwarven_stone_god_piece.ART
11092 alter_elven_god-piece.ART
11093 alter_elven_god-piece1.ART
11094 alter_father_of_all_piece.ART
11095 alter_father_of_all_piece1.ART
11096 alter_father_of_all_piece2.ART
11097 alter_god_of_hunt_piecealtar.ART
11098 alter_god_of_the_ogre_heart_Piece-1.ART
11099 alter_god_of_the_ogre_heart_Piece-2.ART
11100 alter_god_of_the_ogre_heart_Piece-3.ART
11101 alter_god_of_the_ogre_heart_Piece-4.ART
11102 alter_god_of_the_ogre_heart_Piece-5.ART
11103 alter_god_of_the_ogre_heart_Piece-6.ART
11104 alter_god_of_the_ogre_heart_Piece-7.ART
11105 alter_god_of_war_piece.ART
11106 alter_god_of_war_piece-1.ART
11107 alter_god_of_war_piece-2.ART
11108 alter_godess_of_balance_piece.ART
11109 alter_golden_god_of_gnomes_PIECE.ART
11110 alter_golden_god_of_gnomes_PIECE-1.ART
11111 alter_golden_god_of_gnomes_PIECE-2.ART
11112 alter_halfling_god_of_thieves_PIECE.ART
11113 alter_god_of_shadow_piecealtar.ART
11114 God_of_truth-PIECE-1.ART
11115 God_of_truth-PIECE-1-damaged.ART
11116 God_of_truth-PIECE-2.ART
11117 God_of_truth-PIECE-2-damaged.ART
11118 stone_door-1.ART
11119 stone_door-2.ART
11120 stone_door-3-open.ART
11121 stone_door-3-closed.ART
11122 TullaArch_L.ART
11123 TullaArch_R.ART
 
// Small Wooden Objects start at 12000
12000 mandolin.ART
12001 Trap1.ART
12002 Trap2.ART
12003 WheelBarrelBroke.ART
12004 gc_table.ART
12005 gc_finger.ART
12006 gc_object.ART
12007 gc_stone.ART
12008 gc_table-with Eye.ART
12009 gc_table-with finger.ART
12010 pool_sticks.ART
12011 pool_sticks_flip.ART
12012 coat_rack.ART
12013 firepit.ART
12014 Torch.ART
12015 Torch_flip.ART
12016 display-shrunkenhead.ART
12017 display-head.ART
12018 Sign.ART
12019 Sign_flip.ART
12020 plaque.ART
12021 plaque_flip.ART
12022 MageLightStand.ART
12023 GunWalls_L.ART
12024 GunWalls_R.ART
12025 ScimitarDisply_L.ART
12026 ScimitarDisply_R.ART
12027 Lumbernew.ART
12028 Lumbernew_flip.ART
12029 smalltable.ART
12030 smalltable-nothing.ART
12031 bridge_material-bust.art
12032 SP_DingyRope01.ART
12033 SP_DingyRope02.ART
12034 book_shelf01.ART
12035 book_shelf01_flip.ART
12036 book_shelf02.ART
12037 book_shelf02_flip.ART
12038 book_shelf03.ART
12039 book_shelf03_flip.ART
12040 book_shelf04.ART
12041 book_shelf04_flip.ART
12042 book_shelf05.ART
12043 book_shelf05_flip.ART
12044 book_shelf06.ART
12045 book_shelf06_flip.ART
12046 Small-Door.ART
12047 Small-Door.ART
12048 gc_table-with-Book.ART
// Medium Sized Wooden Objects start at 13000
13000 T_cut_log_1.ART
13001 T_cut_log_2.ART
13002 T_cut_log_3.ART
13003 T_hollow_stump_1.ART
13004 T_hollow_stump_2.ART
13005 T_hollow_stump_3.ART
13006 T_log_pile_1.ART
13007 T_log_pile_2.ART
13008 T_log_pile_3.ART
13009 T_snow_cutlog_1.ART
13010 T_stump_1.ART
13011 T_stump_2.ART
13012 T_stump_3.ART
13013 T_stump_4.ART
13014 T_stump_5.ART
13015 Armour_Sign03.ART
13016 Bar_Sign02.ART
13017 Inn_Sign02.ART
13018 Magic_Sign03.ART
13019 medical.ART
13020 Tech_Sign.ART
13021 barrel.ART
13022 bench.ART
13023 BigDresser1.ART
13024 BigDresser2.ART
13025 CaptansChair1.ART
13026 CaptansChair2.ART
13027 City_Chair1.ART
13028 CornerTable.ART
13029 CorrnerShelves.ART
13030 NightStand1.ART
13031 NightStand2.ART
13032 OutdoorWorkBench.ART
13033 ParkBench1.ART
13034 RabbitCages.ART
13035 road_sign02.ART
13036 road_sign03.ART
13037 road_sign04.ART
13038 RopeSpools.ART
13039 SeaTable.ART
13040 TechTable.ART
13041 Throne1.ART
13042 WheelTable.ART
13043 WTbarrel.ART
13044 WTchair1.ART
13045 WTchair2.ART
13046 VillageBarrelEmpty.ART
13047 VillageBarrelFull.ART
13048 VillageTable1.ART
13049 VillageTable2.ART
13050 WTtable1.ART
13051 WTtable2.ART
13052 File_Cabinet.ART
13053 File_Cabinet01.ART
13054 Bar_sign01.ART
13055 Bar_sign02.ART
13056 Inn_sign01.ART
13057 Inn_sign02.ART
13058 Med_sign01.ART
13059 Med_sign02.ART
13060 Armour_Sign03.ART
13061 Armour_Sign03_flip.ART
13062 Machanic_sign.ART
13063 Chair01.ART
13064 Chair02.ART
13065 Chair03.ART
13066 Chair04.ART
13067 bar_sign01.ART
13068 bar_sign02.ART
13069 jeweler_sign01.ART
13070 jeweler_sign02.ART
13071 desk_L.ART
13072 desk_R.ART
13073 Stillwater_Giant_Gone.ART
13074 Stillwater_Giant_There.ART
13075 Coffin01.ART
13076 Coffin02.ART
13077 study_table_L.ART
13078 study_table_R.ART
13079 trap_door.ART
13080 trap_door_closed.ART
13081 trap_door_closed_flip.ART
13082 trap_door_flip.ART
13083 ladder.ART
13084 ladderflip.ART
13085 Armour_Sign03_flip.ART
13086 general_sign.ART
13087 general_sign_flip.ART
13088 scarecrow01.ART
13089 scarecrow02.ART
13090 scarecrow03.ART
13091 scarecrow04.ART
13092 scarecrow05.ART
13093 machanic_sign_flip.ART
13094 police_crest.ART
13095 police_crest_flip.ART
13096 bank_sign.ART
13097 bank_sign_flip.ART
13098 table.ART
13099 ElvenChair1.ART
13100 ElvenChair2.ART
13101 ElvenLamp.ART
13102 Barrel_lid.ART
13103 Barrel_lid02.ART
13104 Barrel01.ART
13105 Barrel02.ART
13106 Barrel03.ART
13107 cloth_on_the_rack01.ART
13108 cloth_on_the_rack02.ART
13109 cloth_on_the_rack03.ART
13110 low_quality_clothing01.ART
13111 low_quality_clothing01_flip.ART
13112 low_quality_clothing02.ART
13113 low_quality_clothing02_flip.ART
13114 med_quality_clothing01.ART
13115 med_quality_clothing01_flip.ART
13116 med_quality_clothing02.ART
13117 med_quality_clothing02_flip.ART
13118 fancy_clothing01.ART
13119 fancy_clothing01_flip.ART
13120 fancy_clothing02.ART
13121 fancy_clothing02_flip.ART
13122 wheel.ART
13123 wheel_flip.ART
13124 MageShelves_L.ART
13125 MageShelves_R.ART
13126 SlullTable.ART
13127 ShieldStnd1_L.ART
13128 ShieldStnd1_R.ART
13129 ShieldStnd2_L.ART
13130 ShieldStnd2_R.ART
13131 ShieldStnd3_L.ART
13132 ShieldStnd3_R.ART
13133 cabinet.ART
13134 cabinet_flip.ART
13135 HangHurbs1_L.ART
13136 HangHurbs1_R.ART
13137 HangHurbs2_L.ART
13138 HangHurbs2_R.ART
13139 HurbPlanter1.ART
13140 HurbPlanter2.ART
13141 HurbShelf1_L.ART
13142 HurbShelf1_R.ART
13143 HurbShelf2_L.ART
13144 HurbTable1.ART
13145 HurbTable2.ART
13146 HurbTable3.ART
13147 HurbTable4.ART
13148 shelf1_L.ART
13149 shelf1_R.ART
13150 table_cloth_1.ART
13151 table_cloth_2.ART
13152 table_cloth_3.ART
13153 table_cloth_4.ART
13154 table_cloth_5.ART
13155 Park_bench.ART
13156 lampblue.ART
13157 lampblueflip.ART
13158 lampgreen.ART
13159 lampgreenflip.ART
13160 lampred.ART
13161 lampredflip.ART
13162 lampyel.ART
13163 lampyelflip.ART
13164 vendigrothdesk_l.ART
13165 vendigrothdesk_r.ART
13166 Podium01.ART
13167 Podium02.ART
13168 Podium03.ART
13169 Podium04.ART
13170 Eagle_snake_sign03.ART
13171 Eagle_snake_sign04.ART
13172 pier_pole.ART
13173 pier_pole01.ART
13174 Magic_Sign03a.ART
13175 Magic_Sign03b.ART
 
// Large Wooden Objects start at 14000
14000 BarrelCart.ART
14001 BarrelStack1.ART
14002 BarrelStack2.ART
14003 cargo.ART
14004 cart.ART
14005 CityCart1.ART
14006 CityCart2.ART
14007 lumber.ART
14008 OceanJunk1.ART
14009 OceanJunk2.ART
14010 OceanJunk3.ART
14011 wooden_structure.ART
14012 Destroyed_bridge_supplies.ART
14013 Dining_table.ART
14014 Dining_table_flip.ART
14015 stairs_down.ART
14016 stairs_down_flip.ART
14017 stair_up.ART
14018 stair_up_flip.ART
14019 bc_01.ART
14020 bc_02.ART
14021 bc_03.ART
14022 bc_2.ART
14023 bc_3.ART
14024 bc_4.ART
14025 bc_5.ART
14026 bc_6.ART
14027 bc_7.ART
14028 bc_8.ART
14029 city_hall_sign.ART
14030 city_hall_sign_flip.ART
14031 wooden_fence.ART
14032 wooden_fence_flip.ART
14033 Wooden_fence02.ART
14034 wooden_fence02_flip.ART
14035 couch.ART
14036 couch_flip.ART
14037 pool_table.ART
14038 pool_table_flip.ART
14039 library_counter01.ART
14040 library_counter01_flip.ART
14041 library_counter02.ART
14042 library_counter02_flip.ART
14043 ElvenRoundTable1.ART
14044 ElvenRoundTable2.ART
14045 wagon.ART
14046 wagon_flip.ART
14047 study_table.ART
14048 study_table_flip.ART
14049 crate_closed.ART
14050 crate-open.ART
14051 Mini-Engine.ART
14052 lizard_man_skin.ART
14053 lizard_man_skin_flip.ART
14054 P_fern_7.ART
14055 teepee-tent.ART
14056 2hcow.ART
14057 Water_mon_wood.ART
14058 Mast1-Scenery.ART
14059 Mast2-Scenery.ART
14060 redcouch.art
14061 redcouch1.art
14062 goldcouch.art
14063 goldcouch1.art
14064 greencouch.art
14065 greencouch1.art
14066 faintblue.ART
14067 faintgreen.ART
14068 faintred.ART
14069 faintyel.ART
14070 forest_portal-back.ART
14071 forest_portal-front.ART
14072 SP_Dingy.ART
 
// Small Misc. Objects start at 15000
15000 blood.ART
15001 small-steam.ART
15002 BookOnPedestool.ART
15003 Sign-left.ART
15004 sign-right.ART
15005 pile_of_books01.ART
15006 pile_of_books01_flip.ART
15007 pile_of_books02.ART
15008 pile_of_books02_flip.ART
15009 pile_of_books03.ART
15010 pile_of_books03_flip.ART
15011 blank.ART
15012 TorchFlame.ART
15013 spider_web01.ART
15014 spider_web021.ART
15015 spider_web03.ART
15016 spider_web04.ART
15017 spider_web05.ART
15018 spider_web06.ART
15019 BloodWriting.ART
15020 DarkElf-Totem1.ART
15021 DarkElf-Totem2.ART
15022 DarkElf-Totem3.ART
15023 DarkElf-Pole.ART
15024 DarkElf-TreePart.ART
15025 DarkElf-Arch1-1.ART
15026 DarkElf-Arch1-2.ART
15027 DarkElf-Arch2-1.ART
15028 DarkElf-Arch2-2.ART
15029 DarkElf-Arch3-1.ART
15030 DarkElf-Arch3-2.ART
15031 DarkElf-Arch4-1.ART
15032 DarkElf-Arch4-2.ART
15033 TQ_Divination_Rune_Off.ART
15034 TQ_Divination_Rune_On.ART
15035 TQ_Meta_Rune_Off.ART
15036 TQ_Meta_Rune_On.ART
15037 TQ_Mental_Rune_Off.ART
15038 TQ_Mental_Rune_On.ART
15039 TQ_Temporal_Rune_Off.ART
15040 TQ_Temporal_Rune_On.ART
15041 TQ_Earth_Rune_Off.ART
15042 TQ_Earth_Rune_On.ART
15043 TQ_Air_Rune_Off.ART
15044 TQ_Air_Rune_On.ART
15045 TQ_Water_Rune_off.ART
15046 TQ_Water_Rune_On.ART
15047 TQ_Fire_Rune_Off.ART
15048 TQ_Fire_Rune_On.ART
15049 TQ_Conveyance_Rune_Off.ART
15050 TQ_Conveyance_Rune_On.ART
15051 TQ_Force_Rune_Off.ART
15052 TQ_Force_Rune_On.ART
15053 TQ_Morph_Rune_Off.ART
15054 TQ_Morph_Rune_On.ART
15055 TQ_Phantasm_Rune_Off.ART
15056 TQ_Phantasm_Rune_On.ART
15057 TQ_Necro_White_Rune_Off.ART
15058 TQ_Necro_White_Rune_On.ART
15059 TQ_Necro_Black_Rune_Off.ART
15060 TQ_Necro_Black_Rune_On.ART
15061 TQ_Summon_Rune_Off.ART
15062 TQ_Summon_Rune_On.ART
15063 TQ_Nature_Rune_Off.ART
15064 TQ_Nature_Rune_On.ART
15065 TQ_Truth_Rune_Off.ART
15066 TQ_Truth_Rune_On.ART
15067 TQ_Power_Rune_Off.ART
15068 TQ_Power_Rune_On.ART
15069 TQ_Spirit_Rune_Off.ART
15070 TQ_Spirit_Rune_On.ART
15071 TQ_Material_Rune_Off.ART
15072 TQ_Material_Rune_On.ART
15073 TQ_Pelojians_Rune_Off.ART
15074 TQ_Pelojians_Rune_On.ART
15075 dynamite_lit.art
15076 Tulla-Teleport-Pad_U.ART
15077 Footprint-Humanoid.ART
15078 Footprint-Creature.ART
15079 g_bone01.art
15080 g_bone02.art
15081 g_bone03.art
15082 g_bone04.art
15083 g_bone05.art
15084 g_bone06.art
15085 g_bone07.art
15086 g_bone08.art
15087 g_bone09.art
15088 g_bone10.art
15089 g_bone11.art
15090 g_bone12.art
15091 shroom1.art
15092 shroom2.art
15093 shroom3.art
15094 TullaMural.ART
15095 crystal-ball.art
15096 crystal-ball-stand.art
15097 Time_bomb.art
15098 GodsMap.ART
15099 SecretCover.ART
15100 ELM-EARTH-Wall-O-Stone.ART
15101 ELM-FIRE-Wall-O-Fire.ART
15102 FRC-Wall-O-Force-Sustain.ART
// Medium Sized Misc. Objects start at 16000
16000 bags.ART
16001 basket01.ART
16002 basket02.ART
16003 bowl.ART
16004 CampFire.ART
16005 Sacks.ART
16006 tent1.ART
16007 Ariaskeleton.ART
16008 painting01_L.ART
16009 painting01_R.ART
16010 painting02_L.ART
16011 painting02_R.ART
16012 painting03_L.ART
16013 painting03_R.ART
16014 painting04_L.ART
16015 painting04_R.ART
16016 painting05_L.ART
16017 painting05_R.ART
16018 painting6_L.ART
16019 painting6_R.ART
16020 grave_pit_L.ART
16021 grave_pit_R.ART
16022 grave_dirt_pile.ART
16023 grave_dirt_pile_flip.ART
16024 rug_flat_L.ART
16025 rug_flat_R.ART
16026 rug_rolled_L.ART
16027 rug_rolled_R.ART
16028 rug_rolled_hatch_L.ART
16029 rug_rolled_hatch_R.ART
16030 fraimed_painting.ART
16031 fraimed_painting_flip.ART
16032 painting05_R_Map.ART
16033 poster.ART
16034 poster_flip.ART
16035 poster02.ART
16036 poster02_flip.ART
16037 MageBannerEvil_L.ART
16038 MageBannerEvil_R.ART
16039 MageBannerGenerl_L.ART
16040 MageBannerGenerl_R.ART
16041 MageBannerGood_L.ART
16042 MageBannerGood_R.ART
16043 RedPlanterLight.ART
16044 FountainWater.ART
16045 Twall_MatSymb.ART
16046 Twall_PowrSymb.ART
16047 Twall_SpitSymb.ART
16048 Twall_TrthSymb.ART
16049 torture02.ART
16050 torture02_flip.ART
16051 torture01.ART
16052 torture01_flip.ART
16053 DragonBloodFoutain.ART
16054 Spider_hole01.ART
16055 Spider_hole02.ART
16056 Spider_hole03.ART
16057 Spider_egg01.ART
16058 Spider_egg02.ART
16059 Spider_egg03.ART
16060 Spider_egg04.ART
16061 Spider_egg05.ART
16062 Spider_egg06.ART
16063 Spider_egg07.ART
16064 Spider_egg08.ART
16065 Spider_egg09.ART
16066 Spider_egg10.ART
16067 Spider_egg11.ART
16068 Spider_egg12.ART
16069 Spider_egg13.ART
16070 Spider_egg14.ART
16071 Spider_egg15.ART
16072 Spider_egg16.ART
16073 Spider_egg17.ART
16074 Spider_egg18.ART
16075 Spider_egg19.ART
16076 Spider_egg20.ART
16077 Dwarf_cocoon05.ART
16078 Dwarf_cocoon04.ART
16079 Dwarf_cocoon02.ART
16080 Dwarf_cocoon.ART
16081 RingWindow.ART
16082 AshburyWindow.ART
16083 StillwaterWindow.ART
16084 CaladonWindow.ART
16085 TarantWindow.ART
16086 IsleWindow.ART
16087 framed_picture.ART
16088 framed_picture01.ART
 
// Large Misc. Objects start at 17000
17000 NetHoist1.ART
17001 NetHoist2.ART
17002 Small_plane_crashed.ART
17003 rug02.ART
17004 rug02_flip.ART
17005 rug03.ART
17006 rug03_flip.ART
17007 rug04.ART
17008 rug04_flip.ART
17009 rug05.ART
17010 rug05_flip.ART
17011 Hut1Interior.ART
17012 Hut1Ex_L.ART
17013 Hut1Ex_R.ART
17014 Hut2Interior.ART
17015 Hut2Ex_L.ART
17016 Hut2Ex_R.ART
17017 Hut1EX_Rx.ART
17018 Hut1EX_Lx.ART
17019 Hut2EX_Lx.ART
17020 Hut2EX_Rx.ART
17021 dark_elf_hut-front.ART
17022 dark_elf_hut-back.ART
17023 TreeCover.ART
17024 TreeCover2.ART
// Machinery Large start 18000
18000 D_S_Engine.ART
18001 Engine_destroyed.ART
18002 Engine.ART
18003 Engine_old.ART
18004 Adv_engine.ART
18005 Engine_adv_destroyed.ART
// Machinery Medium start at 19000
19001 small-generator-1.art
19002 small-generator-2.art
// Teleport Facades start at 20000
20000 Mine1Int.ART
20001 Elf_Doorway2.art
20002 ElfTreeBlock.ART
20003 AncientCaveEntranceRock.ART
20004 AncientCaveEntrance.ART
20005 MineEntrancePiece.ART
20006 elven_underground_entrance.ART
20007 elven_underground_entrance_door.ART
20008 stair_in_the_hole.ART
20009 stair_in_the_hole_door.ART
20010 Door_from_interior.ART
20011 Door_from_interior_flip.ART
20012 manhole-open.ART
20013 manhole-closed.ART
20014 SewerLadder.ART
20015 EQ_Door.ART
20016 elvendoor.ART
20017 cave_entrance.ART
20018 cave_entrance-clickable.ART
20019 Subway-Kiosk.ART
20020 Subway-Kiosk-flip.ART
20021 Subway-Kiosk-Clickon.ART
20022 Subway-Kiosk-flip-Clickon.ART
20023 Subway-Entrance.ART
20024 Subway-Entrance-flip.ART
20025 Tree_Door.ART
20026 CaladonDoor.ART
20027 CaladonDoorInterior.ART
20028 SewerHole.ART
20029 DarkElf-King-Door.ART
20030 DarkElf-Entrance.ART
20031 DarkElf-Entrance_click.ART
20032 Dernholm-Pits-Door.ART
20033 DwrfStrs_UP.ART
20034 DwrfStrs_DWN.ART
20035 DwrfStrs_UP_Flip.ART
20036 DwrfStrs_DWN_Flip.ART
20037 InnerPassage.ART
20038 OutterPassage.ART
20039 DwrfDwelPassage.ART
20040 BMC-Entrance-Piece.ART
20041 Tulla-BigDoor-Scenery.ART
20042 DungeonStairsDwnL.ART
20043 DungeonStairsDwnR.ART
20044 DungeonStairsUpL.ART
20045 DungeonStairsUpR.ART
20046 PrisonStairsDwnL.ART
20047 PrisonStairsDwnR.ART
20048 PrisonStairsUpL.ART
20049 PrisonStairsUpR.ART
20050 DungeonStairs2_Dwn_L.ART
20051 DungeonStairs2_Dwn_R.ART
20052 DungeonStairs2_Up_L.ART
20053 DungeonStairs2_Up_R.ART
20054 HallDoor.ART
20055 HallExit.ART
20056 HallExitDoor.ART
20057 Vendigroth-BellTower-Door.ART
20058 Dwarven_king_chamber-entrance-door.art
20059 PlatueCavePassage.ART
20060 VoidCastleDoor.Art
20061 FallenPassageFrame.ART
20062 FallenPassage.ART
20063 FallenPassage2.ART
20064 BMC-Entrance-Piece-Interior.ART
20065 VOID-ArronaxCastle-Stairs.ART
20066 Iron-Clan-Entrance-Scenery.ART
20067 Wheel-Clan-Hole.ART
20068 DwrfDwelPassage_Flip.ART
20069 PAN_Strs_DL.ART
20070 PAN_Strs_DR.ART
20071 PAN_Strs_UL.ART
20072 PAN_Strs_UR.ART
// Light Sources start at 21000
21000 lamp1p_light.ART
21001 lamp1p-low-glow.ART
21002 BrazureFire.ART
21003 CampFire.ART
21004 Glow001.ART
21005 ElecLowLight.ART
21006 GasLowLight.ART
21007 Caladon-2-light.ART
21008 Caladon-2-light-flip.ART
21009 Caladon-5-light.ART
21010 TFirPlce.ART
21011 TullaTowerFire.ART
21012 TFirPlceFlip.ART
21013 DwrfFP1_L.ART
21014 DwrfFP1_R.ART
21015 DwrfFP2_R.ART
21016 DwrfFP2_L.ART
21017 Vendiglo.ART
21018 Vendiglo2.ART
21019 SkullFire1.ART
21020 SkullFire1F.ART
21021 SkullFire2.ART
21022 SkullFire2F.ART
21023 VOID-Castle-glow.ART
21024 VOID-Castle-glow-flip.ART
21025 VOID-LampEffect.ART
21026 VOID-PortalEffectScenery.ART
21027 VOID-PortalEffectREV.ART
21028 VOID-Kerghan-Lamp_F.ART
21029 VOID-Kerghan-LampSmoke_F.ART
21030 VOID-ArronaxBubbleLoop.ART
21031 VOID-Kerghan-Brazier_F.ART
21032 VOID-Kerghan-T-Pad.ART
21033 Forest-Portal-Loop.ART
21034 PixelDummy.ART
// Beds start at 22000
22000 PlushBed1.ART
22001 PlushBed2.ART
22002 VillageBed1.ART
22003 VillageBed2.ART
22004 bed2.art
22005 bed2_flip.art
22006 Royal_bed.ART
22007 Royal_bed_flip.ART
22008 Tulla_bed01.ART
22009 Tulla_bed01_flip.ART
22010 Tulla_bed02.ART
22011 Tulla_bed02_flip.ART
Item List:
This list is similar to, and has the same limitations as scenery.
// Boomerangs start at 20
20 boomerang-generic.ART
21 boomerang-bladed.ART
22 boomerang-balanced.ART
23 chakrum-cheap.ART
24 chakrum-serrated.ART
25 chakrum-xena.ART
26 glaive.ART
27 flying-guillotine.ART
// --- daggers start at 40
40 dagger01.ART
41 dagger02.ART
42 dagger03.ART
43 dagger04.ART
44 generic_dagger.ART
45 rusted_generic_dagger.ART
46 magedagger.art
47 DaggerSpeed.art
48 ThrowDagger.ART
49 KiteSword.art
50 spike01.ART
51 ArcaneDagger.ART
52 CharmedDagger.ART
53 Stiletto.ART
54 FancyDagger.ART
55 BoneDagger.ART
56 MechanicalDagger.ART
57 dagger01.ART
58 KiteSword.ART
// --- one-handed swords start at 60
60 2hsword01.ART
61 TimsSword.ART
62 ChargedSword.ART
63 CalEliteGuardSword.art
64 sword_of_balance.ART
65 BangellianScurge.ART
66 needart.art
67 2hsword06.ART
68 2hsword05.ART
69 2hsword08.ART
70 needart.art
71 needart.art
72 2hsword09.ART
73 1hsword03.ART
74 EnchantedSword.art
75 Falchion.art
76 Katana.art
77 Scimitar.art
78 needart.art
79 EnvenomedSword.ART
// --- axes start at 80
80 axe01.ART
81 axe02.ART
82 axe03.ART
83 axe04.ART
84 ultralite_axe.ART
85 rusted_generic_axe.ART
86 JDAAXE3.ART
87 StrengthAxe.art
88 envenomed_axe.ART
89 pyrotechnic_axe.ART
90 charged_axe.ART
91 ReapersAxe.art
92 CharmedAxe.ART
93 JDAAXE1.art
94 JDAAXE2.art
95 Harrow.ART
// --- maces/hammers start at 100
100 hammer01.ART
101 generic_mace.ART
102 rusted_generic_mace.ART
103 magical_hammer.ART
104 magical_mace.ART
105 rusted_generic_hammer.ART
106 CrushingHammer.art
107 GoodHammer.art
108 GoodMace.art
109 IngernoHammer.art
110 MachinedHammer.art
111 big_pipe.art
112 oak_axe_handle.ART
113 JDAMace1.ART
114 JDAMace2.ART
115 IronHammer.ART
116 MagicMace.ART
117 ArcaneMace.ART
// --- pistols start at 120
120 pistol01.ART
121 pistol02.ART
122 pistol03.ART
123 pistol04.ART
124 pistol05.ART
125 pistol06.ART
126 pistol07.ART
127 hushed_pistol.ART
128 new_generic_pistol.ART
129 rusted_generic_pistol.ART
130 pistol02.ART
131 OldFlintlockPistol.art
132 hushed_revolver.art
133 Crude_Flintlock.art
134 hand_cannon.art
135 drochs_warbringer.ART
// --- two-handed swords start at 140
140 BaseBroadsword.art
141 2hsword02.ART
142 2hsword03.ART
143 generic_2_h_sword.ART
144 rusted_generic_2_h_sword.ART
145 Claymore.art
146 BarbarianSword.art
147 AirSword.art
148 Flamberge.art
149 2hsword02.ART
150 Void_Sword.ART
151 ArcaneGreatSword.ART
152 MagicGreatSword.art
153 MysticGreatSword.art
// --- bows start at 160
160 bow02.ART
161 bow01.ART
162 ElvenBow.art
163 LongBow.art
164 ShortBow.art
165 TerrorBow.art
166 pyrotechnic_bow.ART
167 envenomed_bow.ART
168 magic_bow.ART
169 charmed_bow.ART
170 magick_bow.ART
171 mystic_bow.ART
// --- rifles/hi tech guns start at 200
200 Hunting_Rifle.ART
201 rifle02.ART
202 rifle03.ART
203 rifle04.ART
204 elephant_gun.ART
205 Clarington_Rifle.ART
206 Hunting_Rifle.ART
207 looking_glass_rifle.ART
208 mechanized_gun.ART
209 marksmans_rifle.ART
210 repeater_rifle.ART
211 generic_rifle.ART
212 Rusted_Rifle.ART
213 flame_thrower.ART
214 tesla_gun.ART
215 grenade_launcher.ART
216 acid_gun.ART
217 charged_accelerator_gun.ART
218 pyrotechnic_gun.ART
219 blade_launcher.ART
220 tranquilizer_gun.ART
221 rifled_cannon.ART
222 large_bore_vendigrothian_rifle.ART
// --- staffs start at 260
260 staff01.ART
261 staff02.ART
262 staff03.ART
263 shocking_staff.ART
264 tesla_rod.ART
265 HealingStaff1.art
266 MageStaff1.art
267 ShamanStaff.art
268 charmed_staff.ART
269 magick_staff.ART
270 mystic_staff.ART
271 arcane_staff.ART
// ammo starts at 1000, with subgroups increasing by 20
1000 Arrows.ART
1020 Bullets.ART
1040 Charges.ART
1060 Fuel.ART
// armor starts at 2000
// subtypes begin at multiples of 20 and are values of TIG_Art_Armor in art.h
// --- underwear starts at 2000
// --- villager starts at 2020
2020 BlackJacket_M.ART
2021 BlackJacket_S.ART
2022 black_rag.ART
2023 BrownJacket_M.ART
2024 BrownJacket_S.ART
2025 red_rag.ART
2026 BlueJacket_M.ART
2027 BlueJacket_S.ART
2028 white_rag.ART
2029 GreenJacket_M.ART
2030 GreenJacket_S.ART
2031 green_rag.ART
2032 OfficersJacket_M.ART
2033 OfficersJacket_S.ART
2034 white_rag.ART
2035 PoisonJacket_M.ART
2036 PoisonJacket_S.ART
2037 white_rag.ART
// --- leather starts at 2040
2040 BasicLeather_M.ART
2041 BasicLeather_S.ART
2042 BasicLeather_L.ART
2043 OiledLeather_M.ART
2044 OiledLeather_S.ART
2045 OiledLeather_L.ART
2046 StudedLeather_M.ART
2047 StudedLeather_S.ART
2048 StudedLeather_L.ART
2049 DragonLeather_M.ART
2050 DragonLeather_S.ART
2051 DragonLeather_L.ART
2052 MagicLeather_M.ART
2053 MagicLeather_S.ART
2054 MagicLeather_L.ART
2055 ArcaneLeather_M.ART
2056 ArcaneLeather_S.ART
2057 ArcaneLeather_L.ART
2058 CreepLeather_S.ART
2059 SpecialLeather_M.ART
// --- chain starts at 2060
2060 ClassicChain_M.ART
2061 ClassicChain_S.ART
2062 ElvenChain_M.ART
2063 FeatherWeightChain_M.ART
2064 FeatherWeightChain_S.ART
2065 FeatherWeightChain_L.ART
2066 MagicChain_M.ART
2067 MagicChain_S.ART
2068 MitheralChain_M.ART
2069 MitheralChain_S.ART
2070 OiledChain_M.ART
2071 OiledChain_S.ART
2072 GnomishChain_S.ART
2073 DwarvenChain.art
2074 Caladon_chainmail_blue.ART
2075 RegenArmor_M.ART
2076 RegenArmor_S.ART
2077 RegenArmor_L.ART
// --- plate starts at 2080
2080 MachinedPlate_M.ART
2081 MachinedPlate_S.ART
2082 MachinedPlate_L.ART
2083 ElectroPlate_M.ART
2084 ElectroPlate_S.ART
2085 ElectroPlate_L.ART
2086 IronClanPlate_S.ART
// --- robes starts at 2100
2100 PlainRobe_M.ART
2101 PlainRobe_S.ART
2102 FancyRobe_M.ART
2103 FancyRobe_S.ART
2104 MagicRobe_M.ART
2105 MagicRobe_S.ART
2106 PlainRobe_M.ART
2107 PlainRobe_S.ART
// --- plate classic starts at 2120
2120 StandardPlate_M.ART
2121 StandardPlate_S.ART
2122 StandardPlate_L.ART
2123 BronzedPlate_M.ART
2124 BronzedPlate_S.ART
2125 BronzedPlate_L.ART
2126 CharmedPlate_M.ART
2127 CharmedPlate_S.ART
2128 MagickPlate_M.ART
2129 MagickPlate_S.ART
2130 MysticPlate_M.ART
2131 MysticPlate_S.ART
2132 MysticPlate_L.ART
2133 ArcanePlate_M.ART
2134 ArcanePlate_S.ART
2135 ArcanePlate_L.ART
2136 DwarvenPlate_S.ART
2137 ElitePlate_M.ART
2138 ElitePlate_S.ART
2139 ElitePlate_L.ART
// --- barbarian starts at 2140
2140 barb01.ART
2141 Armor_Barbarian_Bronze.ART
2142 Armor_Barbarian_Grey.ART
2143 Armor_Barbarian_Dark-Grey.ART
2144 Armor_Barbarian_Red.ART
// --- city dweller starts at 2160
2160 BlackSuit_M.ART
2161 BlackSuit_S.ART
2162 BlackSuit_L.ART
2163 BrownSuit_M.ART
2164 green_dress.ART
2165 blue_dress.ART
2166 black_dress.ART
2167 magenta_dress.ART
2168 BrownSuit_S.ART
2169 BrownSuit_L.ART
2170 RedSuit_M.ART
2171 RedSuit_S.ART
2172 RedSuit_L.ART
2173 WhiteSuit_M.ART
2174 WhiteSuit_S.ART
2175 WhiteSuit_L.ART
// shields begin at 2300
2300 shield01.ART
2301 shield02.ART
2302 shield03.ART
2303 shield04.ART
2304 shield05.ART
2305 ForceShield.art
2306 ShadowShield.art
2307 magic_detector01.ART
2308 flow_disruptor.ART
2309 ShieldCharmed.ART
2310 ShieldMagick.ART
2311 ShieldMystic.ART
2312 ShieldArcane.ART
// helmets begin at 2400
2400 DarkHelm.ART
2401 FineHelmet.ART
2402 HelmOfLight.ART
2403 PigFaceHelm.ART
2404 eye_gear01.ART
2405 eye_glasses01.ART
2406 TopHat.ART
2407 Helmet.ART
2408 RustedSalet.art
2409 GeleamHelm.art
2410 inv_mag_hat.ART
2411 head_band.ART
2412 wheel_clan_spectacle.ART
2413 GoggledHelmet.ART
2414 miners_helmet.ART
2415 HelmetCharmed.ART
2416 HelmetMagick.ART
2417 HelmetMystic.ART
2418 HelmetArcane.ART
2419 HelmetOfVision.ART
// gauntlets begin at 2500
2500 gauntlet01.ART
2501 gauntlet_dwarven_gauntlet.ART
2502 RegularGauntlets.art
2503 LeatherGloves.art
2504 ChainGloves.art
2505 LightFingeredGloves.art
2506 WarGauntlets.art
2507 DexGloves1.art
2508 Vendigrothian_War_Gauntlets.ART
2509 Vendigrothian_padded_Leather_Gloves.art
2510 Gloves.ART
// boots begin at 2600
2600 boot01.ART
2601 boot02.ART
2602 OldWomanBoot.art
2603 OldShoes.art
2604 ElvenBoots.art
2605 Boots.art
2606 WomanBoot.art
2607 EnchantWarBoot.art
2608 Shoes.art
2609 OldBoots.art
2610 leg_brace01.ART
// rings begin at 2700
2700 ring01.ART
2701 Ring_General.ART
2702 GBRing.ART
2703 charged_ring.ART
2704 RingofProtection.art
2705 FatedRing.art
2706 CopperRing.art
2707 Ring_Gem.ART
2708 Ring_Magic_General.ART
2709 Ring_Mystic.ART
2710 Ring_Arcane.ART
2711 WoodRing.ART
2712 ring02.ART
2713 DiamondRing.ART
2714 Void_Ring.ART
// medallions/necklaces begin at 2800
2800 medal01.ART
2801 emblem.ART
2802 DorianAmulet.art
2803 BeautyMedalion.art
2804 finger_of_mannox.ART
2805 conveyance.art
2806 divination.art
2807 earth.art
2808 fire.art
2809 force.art
2810 mental.art
2811 meta.art
2812 morph.art
2813 nature.art
2814 necroevil.art
2815 necrogood.art
2816 phantasm.art
2817 summoning.art
2818 temporal.art
2819 water.art
2820 air.art
2821 snake_amulet.art
2822 locket.ART
2823 void_medalion.ART
2824 NecklaceBase.ART
2825 NecklaceDiamond.ART
// gold starts at 3000
3000 gold.ART
// food starts at 4000
4000 potion01.ART
4001 potion02.ART
4002 potion03.ART
4003 potion04.ART
4004 poison01.ART
4005 coca_leaf.ART
4006 cure_all.ART
4007 cure_poison.ART
4008 fatigue_limiter.ART
4009 fatigue_restore.ART
4010 heal_accelerator.ART
4011 heal_lite.ART
4012 herb01.ART
4013 herb02.ART
4014 herb03.ART
4015 poppy_flower.ART
4016 snake_oil.ART
4017 tobacco_leaf.ART
4018 venom.ART
4019 wonder_drug.ART
4020 acid.ART
4021 animal_lure.ART
4022 animal_scent.ART
4023 brewers_yeast.ART
4024 carbolic_acid.ART
4025 electrolyte_solution.ART
4026 hallucinite.ART
4027 household_cleaner.ART
4028 mushroom.ART
4029 poison.ART
4030 sulfur.ART
4031 bottle_of_wine.ART
4032 cough_syrup.ART
4033 lady's_perfume.ART
4034 man's_cologne.ART
4035 belladonna.ART
4036 blood_pills.ART
4037 boost_all_stats.ART
4038 boost_mental_faculties.ART
4039 dexterity_booster.ART
4040 energizer.ART
4041 glyceride.ART
4042 intelligence_booster.ART
4043 lavatory_cleaner.ART
4044 nerve_and_brain_pills.ART
4045 perception_booster.ART
4046 phosphorous.ART
4047 quinine.ART
4048 spirit_of_camphor.ART
4049 strength_booster.ART
4050 witch_hazel_extract.ART
4051 jug.ART
4052 LyonsRheumatismCure.art
4053 MigraineCure.art
4054 TinctureofArnica.art
4055 Sugar.art
4056 invigorator.ART
4057 reanimator.ART
4058 miracle_cure.ART
4059 mental_inhibitor.ART
4060 necromizer.ART
4061 fortifier.ART
4062 sleep_aid.ART
4063 potion_of_paralysis.ART
4064 elixir_of_hypnotic_suggestion.ART
4065 brain_builder.ART
4066 muscle_maker.ART
4067 PassionRoot.ART
4068 lemon.art
4069 potato.art
4070 Vial-of-Blood.ART
4071 bottle_of_brandy.ART
4072 dwarven_snuff.ART
4073 elven_spring_water.ART
4074 EarlGreyTea.ART
4075 absinthe.ART
4076 sweet_cakes.ART
4077 Vendigrothian_Elixir.ART
4078 vivifier.ART
4079 potionHealLight.ART
4080 potionHealGreater.ART
4081 potionFatigueLight.ART
4082 potionFatigueGreater.ART
4083 potionHealPoison.ART
4084 potionHealAll.ART
4085 potion05.ART
4086 potion06.ART
4087 potion07.ART
4088 Bread.ART
// scroll starts at 5000
5000 scroll02.ART
// key starts at 6000
6000 key01.ART
6001 skeletonkey01.ART
6002 dwarven_key.art
// key ring starts at 7000
7000 keyring01.ART
7001 KeyRingEmpty0.art
7002 dwarven_key.art
// written starts at 8000
8000 Batesjournal.ART
8001 journal.ART
8002 BookRed.ART
8003 BookGreen.ART
8004 BookBlue.art
8005 Portfolio.ART
8006 newspaper.ART
8007 schematic_drawing.ART
8008 Note.art
8009 Telegraph.art
// generic starts at 9000
9000 camera01.ART
9001 drawing01.ART
9002 statue.ART
9003 newspaper01.ART
9004 goldbars.Art
9005 bear_trap.ART
9006 clamp01.ART
9007 engine.ART
9008 large_gears.ART
9009 large_spring.ART
9010 lockpicks.ART
9011 newspaper.ART
9012 parts.ART
9013 small_spring.ART
9014 spider_curled.ART
9015 spike_trap01.ART
9016 bean.ART
9017 statue.ART
9018 trap_spring_part01.ART
9019 trap_spring01.ART
9020 watch_part01.ART
9021 vase.ART
9022 music_box.ART
9023 candle_stick.ART
9024 poison02.ART
9025 dynamite.ART
9026 journal.ART
9027 old_gear.ART
9028 metal_plates.ART
9029 capacitor.ART
9030 electric_harness.ART
9031 electric_light.ART
9032 filament.ART
*9033 healing_jacket.ART
*9034 inv_mag_hat.ART
9035 large_capacitor.ART
9036 detector01.ART
*9037 detector02.ART
9038 tesla_coil.ART
9039 old_gear.ART
9040 dynamite.ART
9041 black_powder.ART
9042 fire_obstruction.ART
9043 oxidizer.ART
9044 breach_loading_chamber.ART
9045 gun_chassis.ART
9046 revolver_chamber.ART
9047 self_loading_chamber.ART
9048 clock_parts.ART
9049 clockwork_decoy.ART
9050 watch.ART
9051 big_pipe.ART
9052 lantern.ART
9053 leather_strap.ART
9054 metal_shavings.ART
9055 small_electrical_part.ART
9056 telescope.ART
9057 dwarven_ore.ART
9058 dwarven_sheet_metal.ART
9059 fine_guard_and_hilt.ART
9060 heavy_wire.ART
9061 iron_ore.ART
9062 oak_axe_handle.ART //NOT USED
9063 pure_ore.ART
9064 sheet_metal.ART
9065 steel.ART
9066 thermometer.ART
9067 skull.ART
9068 BessiesBoot.ART
9069 bunny_trap_empty_inv.ART
9070 bunny_trap_full_inv.ART
9071 pelt_real.ART
9072 pelt_fake.ART
9073 shovel.ART
9074 boot_buckle.ART
9075 chunk_of_stone02.ART
9076 emblem.ART
9077 fraimed_painting.ART
9078 head_stone.ART
9079 newspaper.ART
9080 passport.ART
9081 treasure_chest.ART
9082 chrystal_ball.ART
9083 Gem_Rough_Saphire.ART
9084 Gem_Rough_Emerald.ART
9085 Gem_Rough_Diamond.ART
9086 Gem_Rough_Ruby.ART
9087 poison_empty.ART
9088 poison_full.ART
9089 wine_glass.ART
9090 wine_crate.ART
9091 rope.ART
9092 GrothianGunChassis.art
9093 Coal.art
9094 sewer_map.art
9095 golden_idol.art
9096 Automaton.ART
9097 Wisp-Essence.ART
9098 Bromide.ART
9099 PotasimChoride.ART
9101 Saltpeter.ART
9102 Potassium Nitrate.ART
9103 Nitroglycerin.ART
9104 ElectricalCoil.ART
9105 GlassJar.ART
9106 MetalCan.ART
9107 CardboardTube.ART
9108 EngineMuffler.ART
9109 MetalCasing.ART
9100 SodiumNitrate.ART
9111 Charcoal.ART
9112 small_pipe.art
9113 Compass.art
9114 Fertalizer.art
9115 StearicAcid.art
9116 LiquidSoap.art
9117 BrokenFlintlock.art
9118 flash_grenade01.ART
9119 explosive_grenade.ART
9120 smoke_grenade.ART
9121 stun_grenade.ART
9122 fire_obstruction.ART
9123 fieldrock.ART
9124 godess.ART
9125 eye_of_krakatur.ART
9126 parcel.ART
9127 strange_glass_device.ART
9128 Num1.ART
9129 Num2.ART
9130 kathorn_crystal.ART
9131 ruby.art
9132 strong_box.art
9133 tool_pouch.art
9134 clockwork_physician.ART
9135 noise_maker_decoy.ART
9136 knock_out_gas.ART
9137 hallucination_grenade.ART
9138 electrocution_grenade.ART
9139 time_bomb.ART
9140 concussion_grenade.ART
9141 paralysis_grenade.ART
9142 mustard_gas_grenade.ART
9143 plastique.ART
9144 detonator.ART
9145 lemon.ART // THIS DOES NOT GET USED
9146 potato.art // THIS DOES NOT GET USED
9147 pullies.ART
9148 minute_steam_works.ART
9149 BlackDiamond.ART
9150 Geode.ART
9151 HeartStone.ART
9152 LavaRock.ART
9153 OliveBranch.ART
9154 Drum.ART
9155 match_box.ART
9156 deed.ART
9157 Mnura_Coin.ART
9158 litani.ART
9159 chemistry_manuals.ART
9160 explosive_manuals.ART
9161 therapeutics_manuals.ART
9162 herbology_manuals.ART
9163 smithy_manuals.ART
9164 gunsmithy_manuals.ART
9165 mechanical_manuals.ART
9166 electrical_manuals.ART
9167 two_skulls.ART
9168 toy_train.ART
9169 Vendigroth_Sheet_Metal.ART
9170 unknown_chemical_compound.ART
9171 heirloomstatue.ART
9172 religious_artifact.ART
9173 match_book.ART
9174 eye_balls.ART
9175 Vendigroth-Device.ART
9176 Bandages.ART
9177 DocsBag.ART
9178 Gem_Diamond.ART
9179 Gem_Emereld.ART
9180 Gem_Ruby.ART
9181 Gem_Saphire.ART
9182 Gem_StarRuby.ART
9183 Gem_StarSaphire.ART
9184 Molitov.ART
9185 Kerosene.ART
9186 Rag.ART
9187 volars_wisp_essence.ART
9188 wisp_essence.ART
9189 bracelet.ART
9190 big_cup.ART
9191 lizard_leg.ART
9192 skeletonkey01.ART
9193 DwarvenTablet.ART
// Destroyed items start here, at 10000
// --- daggers start at 10040
10040 ddagger01.ART
10041 ddagger01.ART
10042 ddagger01.ART
10043 ddagger01.ART
// --- one-handed swords start at 10060
10060 d1hsword01.ART
10061 d1hsword01.ART
10062 d1hsword01.ART
10063 d1hsword01.ART
// --- axes start at 10080
10080 daxe01.ART
10081 daxe01.ART
10082 daxe01.ART
10083 daxe01.ART
// --- maces/hammers start at 10100
// --- pistols start at 10120
10120 dpistol01.ART
10121 dpistol01.ART
10122 dpistol01.ART
10123 dpistol01.ART
10124 dpistol01.ART
10125 dpistol01.ART
10126 dpistol01.ART
// --- two-handed swords start at 10140
10140 d2hsword01.ART
10141 d2hsword01.ART
10142 d2hsword01.ART
10143 d2hsword01.ART
10144 d2hsword01.ART
10145 d2hsword01.ART
10146 d2hsword01.ART
10147 d2hsword01.ART
10148 d2hsword01.ART
// --- bows start at 10160
10160 dbow01.ART
10161 dbow01.ART
// --- rifles/hi tech guns start at 10200
10200 drifle01.ART
10201 drifle01.ART
10202 drifle01.ART
10203 drifle01.ART
// --- staffs start at 10260
10260 dstaff01.ART
10263 dstaff01.ART
10262 dstaff01.ART
// shields begin at 12300
12300 dshield01.ART
12301 dshield01.ART
12302 dshield01.ART
12303 dshield01.ART
12304 dshield01.ART
Unique NPC:
This list will be used to change the art id of "unique NPCs" to a different piece of art.
0 Human Barbarian
1 Human Townsperson
2 Human Villager
3 Gnome Villager
4 Human King
5 Dead Gnome
6 Human old man
7 Elven Villager
8 Elven Female Villager
9 Gnome Villager 2
10 Gnome Female Villager
11 Human Femael Villager
12 Dwarf Male Villager
13 Silver Lady
14 Robed Male
15 Human Priest
16 Gnome Female City Dweller
17 Human Female City Dweller
18 Clockwork Decoy
19 Arraya
20 Dragon
21 Gorwrath
22 Hell Beast
23 Kite
24 Krag
25 Lycanthrope
26 Snake Man
27 Kerghan 1
28 Kerghan 2
29 Kerghan 3
30 Kerghan 4
31 Shambler Monster
32 Golem Monster
33 Familiar
34 Phantom Knight 1
35 Phantom Knight 2
36 Phantom Knight 3
37 Stillwater Giant
38 Naked Halfling
39 Voorman Monster